www.ti.com
Introduction
3
SLUUC60–February 2020
Submit Documentation Feedback
Copyright © 2020, Texas Instruments Incorporated
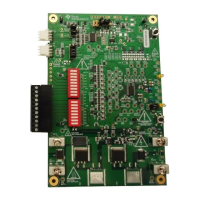
BQ24800 EVM
1 Introduction
1.1 EVM Features
Refer to the data sheet (SLUSDO8) for detailed features and operation.
1.2 I/O Descriptions
Table 1 lists the I/O descriptions.
Table 1. I/O Descriptions
Jack Description
J1– DCIN Connect to AC adapter positive output
J1– GND Connect to AC adapter, negative output
J2 – SYS Connect to system
J2 – GND Power ground
J3 – BAT Connect to battery positive
J3 - GND Connect to battery negative
J4 - 1 CMPIN Independent Comparator Input
J4 - 2 GND Analog Ground
J4-3 CMPOUT Independent Comparator Output
J5 - 1 GND Communication interface
J5 – 2 SCL
J5 – 3 SDA
J5 – 4 NC
1.3 Controls and Key Parameters Setting
Table 2 lists the controls and key parameter settings of the EVM.
Table 2. Controls and Key Parameters Settings
Jack Description Factory Setting
JP1
Connect battery positive input (BAT) to TPS3898 SENSE pin through resistor
divider (R33/R34)
Jumper installed
JP2 Connect REGN to TPS3898 VCC pin Jumper not installed
JP3 Connect BAT to BQ24800 CMPIN pin through resistor divider (R35/R36) Jumper not installed
JP4 Connect BQ24780 CMPOUT to BQ24800/BATPRES pin Jumper installed
JP5 Connect TPS3898/SENSE_OUT pin to BQ24800/BATPRES pin Jumper installed
The BQ24800EVM supports two methods for detecting the battery for input to the BATPRES pin. The use
may either use the independent comparator of the BQ24800 or the external TPS3898A Voltage Monitor
(U2.) To use the BQ24800 independent comparator, install jumpers at JP3 and JP4. To instead use the
TPS3898A, install jumpers at JP1, JP2 and JP5. Do not install both sets of jumpers. Either the BQ24800
independent comparator or the TPS3898A should be enabled via jumper but not both.