TRANSAXLE DISASSEMBLY
Page A-5
Dana Electric Transaxle Shop Rebuild and Parts Manual
Differential-Carrier Assembly Removal
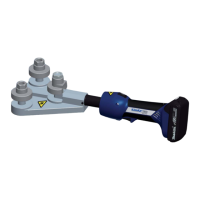
1. From axle housing, remove four saddle bolts from
saddles, then remove saddles.
(Ref Fig. A-15 on
page A-5)
Note the alignment marks on both the housing and saddles.
Saddles must be reassembled on the same side from which
removed. If alignment marks are missing, use a permanent
marker to mark saddle and housing.
Fig. A-15 Removing Saddle Bolts from Saddles
2. Remove differential-carrier assembly from axle
housing.
(Ref Fig. A-16 on page A-5)
Fig. A-16 Removing Differential-Carrier Assembly
from Axle Housing
Fig. A-17 Saddle Bolts, Saddles, and
Differential-Carrier Assembly Removed
3. Remove drive gear (2) from differential-carrier (3)
by removing four locknuts and four hex head bolts
(1).
Do not remove bearings from differential-carrier.
The differential-carrier is replaced as a single unit. No disas-
sembly of the clutch is required.
If working on a hard surface, handle the ring gear
carefully to prevent damage to the ring gear teeth.
 Loading...