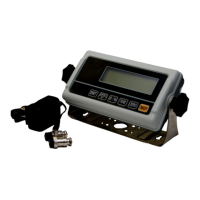
The TWP series is a weighing indicator designed for various industrial and commercial weighing applications. This service manual provides comprehensive information on its specifications, installation, operation, maintenance, and troubleshooting.
Function Description
The TWP weighing indicator serves as the central display and control unit for a weighing system. Its primary functions include:
- Weight Measurement and Display: Accurately measures and displays weight, with a resolution of 1/30,000.
- Tare Function: Allows for recording tare values and switching between gross and net weight displays.
- Zero Function: Resets the display to zero and confirms entries in setting mode.
- Unit Switching: Enables switching between different weight units (G, Lb, Oz, Tj, hJ).
- Check Weighing: Sets upper and lower limits for weighing, providing visual and audible alerts (beep) when the weight is within or out of the specified range.
- Accumulation: Automatically or manually accumulates individual weighing values into memory.
- Animal Weighing: Designed to handle vibrated loads, providing stable readings for animal weighing.
- Peak Hold: Captures and holds the maximum reading for a given weight.
- RS-232 Output: Provides an optional interface for printing results or connecting to a PC or printer, supporting continuous output protocols with various data formats.
- Calibration: Supports both normal (linear) and non-linear calibration methods, including single-point and multi-point calibration.
- Programming and Settings: Allows users to access and modify various parameters such as auto zero settings, zero setting range, decimal point settings, increment settings, and scale capacity.
Important Technical Specifications
- Model: TWP
- Resolution: 1/30,000
- Indicator Housing: ABS Plastic
- Stabilisation Time: 1 Second (typical)
- Operating Temperature: 0°C ~ +40°C / 32°F - 104°F
- Power Supply (external): AC Adaptor (12V/500mA) / Ni-MH battery (1.2V/1200mAh x 6)
- Calibration: Automatic External
- Display: 6 digits, 22mm LCD display with attached backlight
- Interface: RS-232 Output (Optional)
- Zero Range: 0mV~5mV
- Signal Input Range: 0~15mV
- ADC: Sigma Delta
- Internal Counts: 600,000
- ADC Update Rate: Max 60 times/second
- Load Cell Drive Voltage: Max 5V/150mA
- Dimensions: 185mm (width) x 100mm (height) x 45mm (depth)
Usage Features
Installation and Precaution:
- The indicator is a precision electronic instrument and should be handled carefully.
- Avoid direct sunlight, sudden temperature changes, vibration, wind, and water.
- Avoid sudden and jerky acceleration of the load.
- Avoid heavy RF noise.
- Keep the indicator clean.
- Load Cell Connection: Connect load cell cables to the terminal as shown in the diagram. The load cell drive voltage is 5 VDC, between positive excitation and negative excitation.
Power Operation:
- Mains Supply: Power is supplied through an external mains adaptor (9 VDC / 800mA). The mains supply voltage should match the local voltage.
- Battery Operation: To charge the battery, insert the adaptor pin into the jack. The scale needs to be turned on. The battery should be charged for at least 12 hours for full capacity. Avoid switching off for the first 10 hours to protect the battery. Use only the supplied adaptor. Verify that the AC power socket outlet is properly protected. The display shows a symbol for battery status (full, low, or empty).
Basic Operations:
- Power ON/OFF: Press the ON/OFF key to switch the balance on or off.
- Zero: Press the ZERO key to reset the display to zero.
- Tare: Press the TARE key to record tare values and switch between gross and net weight. In setting mode, it increases values and scrolls forward in menus.
- Gross/Net (G/N): When the scale is tared, this key switches between gross and net modes. In setting mode, it moves active digits right.
- Print/M+: Prints results via RS-232, adds values to accumulation memory (if not automatic). In setting mode, it moves active digits left.
- Unit: Switches to unit weight. In setting mode, it escapes back to menu/weighing mode.
Advanced Operations:
- Check Weighing: Set upper and lower limits. The indicator provides three modes:
- Mode 1: No beep sound within limits.
- Mode 2: Beeps and shows "OK" when weight is within limits.
- Mode 3: Beeps and shows "OK" when weight is out of limits.
- Entering Menu: From weighing mode, press UNIT and PRINT/M+ together.
- Setting Limits: Use ZERO to enter the function, TARE to select the limit, G/N to move digits, and ZERO to confirm.
- Accumulation: Place goods on the platform, wait for stability, then press PRINT M+. The value is saved and printed. To accumulate total, press PRINT M+ when display is zero.
- Animal Weighing: For vibrated loads, the indicator provides stable readings. Bring the load onto the platform, wait a few seconds for stability, and the reading will be locked.
- Peak Hold: The TWP can operate in peak hold mode, where the maximum reading is held and updated automatically when new goods are added.
Parameter Block (Settings):
- F0 H-L (Weighing with set limits): Set lower and upper limits.
- F1 toL (Total): Clear accumulation memory, print total, or print total and clear memory.
- F2 Unt (Units): Select weighing units (G, Lb, Oz, Tj, hJ).
- F3 off (Backlight and Beep): Control backlight (on, off, automatic) and beep sound (off, within limits, above limits).
- F4 prt (RS-232 Output): Configure print settings, continuous data output, PC communication, and baud rate (b600, b1200, b2400, b4800, b9600).
- P1 ref (Auto Zero): Set auto zero points and zero setting range.
- P2 cal (Calibration): Set decimal point, increment, and enter scale capacity.
- P3 pro (Program Parameters): Trim load cells, calculate new rate, and display internal counts.
- P4 chk (Mode Selection): Select weighing mode (Normal, Animal, Subtraction, Peak Hold).
Maintenance Features
Cleaning:
- Disconnect power before cleaning.
- Use a cloth with mild suds and light cleaning agents.
- Avoid fluid entering the device.
- Use a clean and soft cloth for rub off.
Error Codes and Troubleshooting:
- Error Message "----" (Maximum load exceeded): Unload or reduce weight.
- Error Message "Err 4" (Zero setting error): Zero setting range exceeded due to switching on. Make sure the platform is empty.
- Error Message "Err 6" (A/D value out of range): Check if the pan is installed correctly and if the load cell connectors are proper.
Troubleshooting No Display:
- Check if mains power is off or power supply is unplugged.
- Verify if the power supply is faulty.
- Ensure the internal battery is charged.
- Check if the On/Off switch is OK or not.
- Check the PCB power connections and cable.
Troubleshooting Display is Blank after Self Test / Err Stuck:
- Check for unstable weight.
- Verify if the platform is installed correctly.
- Try turning on again.
- Check if the load cell is touching anywhere.
- Check if the load cell is damaged and its connections.
Troubleshooting "OL" or "Lo" Display:
- "OL" (Maximum capacity exceeded):
- Check for power supply fault.
- Check all power cables and connectors.
- Calibrate again with correct calibration weights.
- Check load cell connections.
- Check for damaged load cell.
- "Lo" (Weight is below permissible limit):
- Check if the pan is installed correctly.
- Calibrate again with correct calibration weights.
- Check for power supply fault.
- Check all power cables and connectors.
- Check for damaged load cell and its connections.
- Try turning on again.
Troubleshooting Unstable Display:
- Check if the pan is seated properly and not touching anything.
- Check for any vibrations, noises, or sudden temperature changes.
- Check power supply.
- Check battery and adaptor connections for charging.
- Check if the load weight is seated properly.
- Check the load cell connections and connectors.
Troubleshooting Incorrect Value:
- Check for calibration error.
- Calibrate again with exact calibration mass weights.
- Check if the item is on the platter properly and avoid touching the surface.
- Check power supply and battery.
- Check load cell connections and connectors.
Troubleshooting Cannot Use Full Scale Capacity:
- Before weighing, ensure zero indication is showing and the scale is empty.
- Check the weighing mode.
- Check if the load cell is fitting properly and avoid touching housing or hitting the scale.
- Calibrate again with exact calibration mass weights.
- Check load cell damaged and its connections.
- Check for main board problem.
Troubleshooting Battery Not Charging:
- Check for mains voltage problem.
- Check the power supply voltage and adaptor voltage.
- Check for charging circuit failure.
- Check battery failure and its connections.