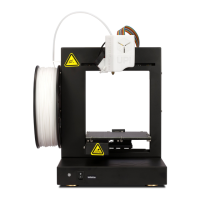
UP Plus 2 3D Printer User Manual v 2013.10.24
Note: The allowed largest calibration distance between nozzle and platform is 1mm. Make sure all
nine points are within this limitation.
Make sure the gap between nozzle and the highest point on the platform is zero.
Click and long press the green up arrow to lift the platform to a high height like 135mm.
Move the nozzle / platform to each of the 9 locations on the platform by clicking the correspond-
ing location number (1, 2...9). Find out which one of the 9 locations that has the smallest gap be-
tween the nozzle and platform. That location is the highest point on the platform. Move the nozzle
to the highest point on the platform and make sure the gap between the nozzle and the highest
point is zero.
Click button “Set nozzle height”
Move the nozzle and platform to each of the other 8 locations and measure the gap between one
by one. Beside each of the 9 locations is a box with the numbers inside, select one of the 10 num-
bers (0.1, 0.2...1) can lift the platform to a corresponding height. Use that number when it makes
the gap between the nozzle and platform is zero.
After all of the 9 location are measured and set, click the “Apply current value” at the bottom to
apply the final nozzle height. A dialogue will pop up when the calibration is successful.
Close the platform calibration dialogue and do a test print with this file
http://3dprintingsystems.com/boarder-print.UP3
6.3 (not required) Manual Platform Levelling
Manual levelling is only required if you wish to print without a raft, or your platform is un-
even more than 1mm.
The platform rests of three screws just like a tripod. In can be quite misleading looking at a square
surface while having to level a triangle (tripod). It is easier if you imagine you are levelling a tri-
angular shape.
1. Remove clips and Perfboard from the platform.
It is harder to level the platform with the Perfboard attached.
2. Click “3D Print” / “Maintenance”
3. Enter 135 in the To: box and click “To:”
4. Click “Centre” and then move the platform closer to the nozzle by increasing the “To:” value.
5. Once the nozzle is just about 0.2mm away from the platform, then click “NR” = Near Right.
The nozzle will move to the Near Right hand side.
6. Look at the distance between the nozzle and make a rough mental note, then click “FR” = Far
Right The nozzle will move to the Far Right hand side.
7. Look at the distance between the nozzle and make a rough mental note, then click “FL” = Far
Left The nozzle will move to the Far left hand side.
8. Look at the distance between the nozzle and make a rough mental note, then click “NL” =
Near Left The nozzle will move to the Near left hand side.
9. The platform rests on a tripod (three sprung screws) and in order to level it, you tighten or
loosen each of the three screws until the distance between the nozzle and the platform is equal at
each corner.
10. As the platform gets more level, increase the platform height to the nozzle, so it is easier see