Do you have a question about the Vega VEGAFLEX 81 and is the answer not in the manual?
Specifies that operations must be performed by trained, authorised personnel.
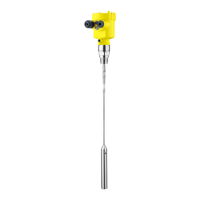
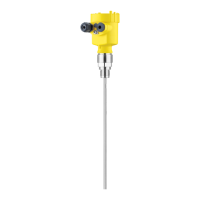
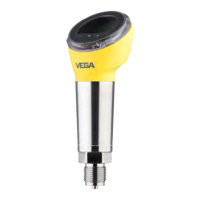
Defines the VEGAFLEX 81 as a sensor for continuous level measurement.
Highlights hazards from inappropriate or incorrect instrument use.
Outlines general safety requirements, regulations, and user obligations.
Details information on the type label for instrument identification and use.
Explains how the sensor measures level using microwave pulses.
Lists conditions required for accurate interface measurements between two liquids.
Gives general instructions for installing the sensor, including warnings.
Provides specific instructions for mounting the sensor in different vessel types and situations.
Covers safety instructions, voltage supply, connection cables, and grounding.
Describes the procedure for connecting the voltage supply and signal output.
Illustrates wiring connections for electronics and terminal compartments.
Explains connecting external display units using the DIS-ADAPT connector.
Explains the purpose of the display and adjustment module for sensor parameter adjustment.
Provides step-by-step instructions for installing and removing the display module.
Describes the use of display keys and the adjustment system interface.
Guides through a simplified setup process for adapting the sensor to applications.
Defining medium type and dielectric constant for level measurement.
Entering maximum adjustment values.
Entering minimum adjustment values.
Setting maximum adjustment for interface measurements.
Setting minimum adjustment for interface measurements.
Describes how to suppress false signals to improve measurement accuracy.
Introduces advanced settings for demanding measurement points.
Defining medium type and dielectric constant for level measurement.
Setting the dielectric constant for the upper medium.
Entering maximum adjustment values for level measurement.
Entering minimum adjustment values for level measurement.
Setting maximum adjustment for interface measurements.
Setting minimum adjustment for interface measurements.
Assigning specific measured values to the current output.
Explains circumstances causing interfering reflections and how to suppress them.
Recommends documenting or saving parameter adjustments via PACTware.
Instructions for connecting the PC to the sensor electronics and Modbus electronics.
Connecting the PC to the RS 485 cable via a standard interface adapter.
Listing requirements for parameter adjustment with PACTware.
Explaining the need for PACTware and DTMs for sensor parameter adjustment.
Introducing quick setup as a fast method for sensor parameter adjustment.
Details on using the assistant-driven quick setup for basic settings.
Using the DTM's menu structure for advanced and special settings.
Selecting the application type, medium, and properties for measurement.
Requirements for interface measurement, including gas phase and dielectric constant.
Setting up for level measurement of liquids and bulk solids.
Setting up for interface measurement between two liquids.
Entering min/max adjustment values for level and interface measurements.
Recommends documenting or saving parameter adjustments via PACTware.
Describes the instrument's memory for storing diagnostic data.
Explains the instrument's self-monitoring and diagnostic status messages.
Categorizes status messages into Failure, Function check, Out of specification, and Maintenance.
Details error codes, causes, and rectifications for "Failure" status messages.
Lists causes and rectifications for "Function check" status messages.
Lists causes and rectifications for "Out of specification" status messages.
Lists causes and rectifications for "Maintenance" status messages.
Provides procedures for fault rectification and checking the 4-20 mA signal.
Operator responsibility for taking suitable measures to rectify faults.
First measures for fault rectification: evaluating messages, checking output, treating errors.
Procedure for connecting a multimeter to check the current signal.
Discusses common measurement errors and their causes/rectifications.
Explains errors related to constant level readings and their solutions.
Details errors occurring during filling and their corresponding rectifications.
Lists errors during emptying and the steps to resolve them.
Instructions for replacing a defective electronics module.
Outlines requirements and procedures for updating instrument software.
Provides general data on materials, wetted parts, and non-wetted parts.
| Brand | Vega |
|---|---|
| Model | VEGAFLEX 81 |
| Category | Accessories |
| Language | English |