92
BLIND HEM FOOT
Blind hem feet are obtainable as an
optional extra and are available in two
sizes. 0.5 for ne-medium fabrics and
1.0 for medium/ heavy fabrics.
Fit the appropriate foot.
Set the stitch length 4 - 4.5
Now proceed as follows:
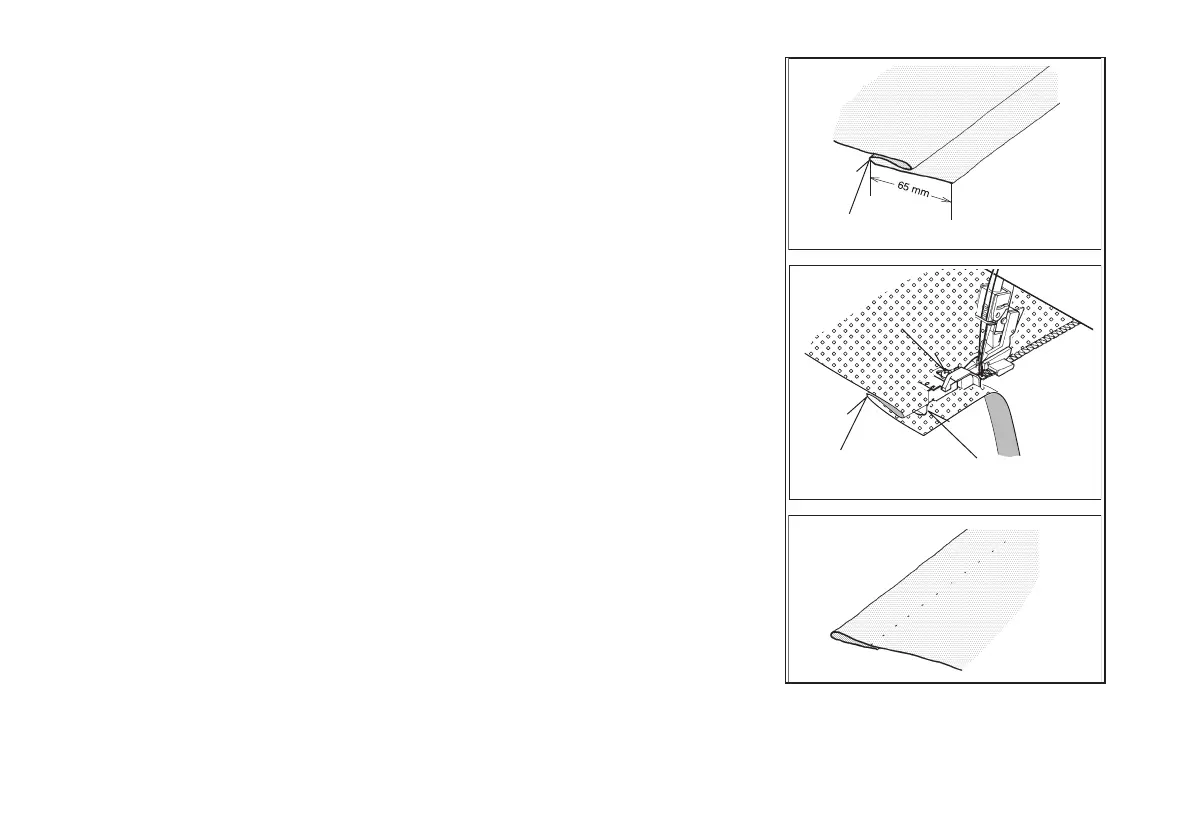
1. Turn up the hem to the required
depth and press. Fold the hem
back against the ‘right’ side of the
garment, creating a ‘soft’ fold on the
‘wrong’ side of the fabric – see Fig. 1.
2. Place fabric under the presser foot
with the ‘wrong’ side up. Feed the
folded edge through the guide in
the front of the foot and lower the
presser foot lever. Try a stitch (or
several stitches) on a spare piece
of the actual fabric, and adjust the
guide so that the needle just catches
the fold. Adjust the guide by means
of the small screw on the top of the
foot – see Fig. 2.
3. When correctly set, sew the hem.
The outside edge will be cut away
by the machine – see also Fig. 2.
After completion, open out and press
again. The stitches should be almost
invisible on the ‘right’ of the fabric –
see Fig. 3.
Illustration *
I
: Final hem length
*
II
: Screw
*
III
: Guide
6. OPTIONAL ACCESSORIES
Fig.1
*
Ϩ
Fig.3
Fig.2
*
ϩ
*
Ϩ
*
Ϫ
BLINDSTICH-FUSS
Blindstichfüße sind als Sonderausstattung
erhältlich und in zwei Größen lieferbar. 0,5
für feine/mittlere Stoe und 1,0 für mittlere/
schwere Stoe.
Montieren Sie den entsprechenden Fuß.
Stellen Sie die Stichlänge auf 4 - 4,5.
Gehen Sie nun wie folgt vor:
1. Drehen Sie den Saum auf die gewünschte
Tiefe um und bügeln Sie ihn. Falten Sie
den Saum gegen die "richtige" Seite des
Kleidungsstücks zurück, sodass eine
"weiche" Falte auf der "falschen" Seite
des Stos entsteht - siehe Abb. 1.
2. Legen Sie den Sto mit der "falschen"
Seite nach oben unter den Nähfuß.
Führen Sie die gefaltete Kante durch
die Führung an der Vorderseite des
Fußes und senken Sie den Nähfußhebel
ab. Probieren Sie einen Stich (oder
mehrere Stiche) auf einem Ersatzstück
des eigentlichen Stoes aus und stellen
Sie die Führung so ein, dass die Nadel
gerade die Falte erfasst. Stellen Sie die
Führung mit der kleinen Schraube auf der
Oberseite des Fußes ein - siehe Abb. 2.
3. Wenn er richtig eingestellt ist, nähen Sie
den Saum. Die Außenkante wird von der
Maschine weggeschnitten - siehe auch
Abb. 2. Nach Beendigung önen Sie
wieder und drücken Sie erneut. Die Stiche
sollten auf der "rechten" Seite des Stoes
fast unsichtbar sein - siehe Abb. 3.
Abbildung *
I
: Endgültige Saumlänge
*
II
: Schraube
*
III
: Anleitung
6. OPTIONALES ZUBEHÖR