Do you have a question about the Wali GSDM001-P and is the answer not in the manual?
Details serious risks of tipover and methods to prevent it, including child safety.
Complete clamp assembly by connecting C-clamp, adjusting height, and securing with hand knob.
Mount the monitor onto the assembled arm and ensure stability.
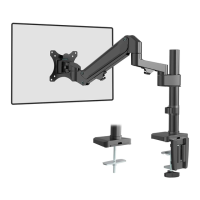
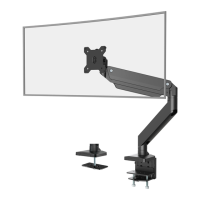
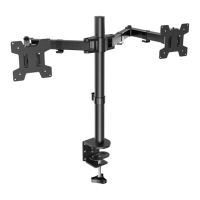
The WALI Single Monitor Desk Mount is a versatile and robust solution designed to elevate your monitor, optimize desk space, and enhance ergonomic viewing. This desk mount is engineered to provide a stable and adjustable platform for a single monitor, allowing users to customize their viewing experience for maximum comfort and productivity. Its primary function is to securely hold a monitor above the desk surface, freeing up valuable space that would otherwise be occupied by a traditional monitor stand.
One of the key usage features of this desk mount is its adaptability to various desk types and thicknesses. It offers two primary installation options: C-clamp and grommet base. The C-clamp installation is ideal for desks with a thickness ranging from 0.4 inches to 3.3 inches, providing a secure grip on the edge of the desk. This method is straightforward and involves connecting the pole and base, then attaching the C-clamp brace and C-clamp to the base. Users can select their preferred height for the C-clamp, accommodating different desk thicknesses and personal preferences. The hand knob is then rotated clockwise to fasten the clamp for stability. Anti-skid pads are applied to the bottom of the base to prevent scratching and ensure a firm hold.
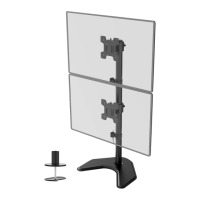
For desks with existing grommet holes or for those who prefer a more permanent installation, the grommet base option is available. This method also supports desk thicknesses between 0.4 inches and 3.3 inches. The installation involves guiding the grommet base plate through the bolt and connecting it to the base from the bottom. Similar to the C-clamp, anti-skid pads are attached to the bottom of the base for stability. If an existing grommet hole has a plastic protector, it should be removed to ensure a flat mounting surface. For desks without a pre-drilled hole, the manual provides instructions for self-drilling a 3/8-inch (10mm) diameter hole, emphasizing the importance of marking the position accurately before drilling. After the pole is inserted through the desk hole, a support plate, washer, and nut are used to secure the assembly from underneath the desk, with the nut rotated clockwise for stability.
Once the base and pole are securely installed, the arm of the desk mount is attached to the pole. A wire clip is used to guide the arm onto the pole, and the preferred height can be adjusted before tightening with a 6mm Allen key. This step ensures that the arm is positioned at an optimal height for the user's viewing needs.
The monitor attachment process is designed to be compatible with various VESA mounting patterns, specifically 75x75mm and 100x100mm. Users first need to select the appropriate monitor screws (M4x12 or M5x12) based on their monitor's threaded inserts. A helpful tip is provided to hand-thread screws into the monitor's back to determine the correct size. The VESA plate is then connected to the monitor using the selected screws and D5 washers, tightened with a screwdriver (not included). After the VESA plate is securely attached to the monitor, the assembled TV/monitor is carefully placed onto the arm. A buckle mechanism is used to secure the monitor to the arm, ensuring stability.
A crucial maintenance feature of this desk mount is the spring tension adjustment, which is essential for properly balancing the arm with the mounted monitor. This adjustment is made using a 6mm Allen key. To perform this, the arm should first be positioned and firmly held horizontally. If the arm drops, the adjustment screw needs to be turned counter-clockwise until the arm stays in a horizontal position. Conversely, if the arm rises, the screw should be turned clockwise until it remains horizontal. A critical caution is provided: "DO NOT overtighten the screws" and "To avoid damage to monitors or mount, always keep the arm in a horizontal position while making adjustments." This highlights the importance of careful adjustment to prevent damage and ensure the longevity of the product.
Cable management is another thoughtful usage feature. After the monitor is mounted and balanced, cables can be neatly guided through the cable slot integrated into the arm. This helps maintain a clean and organized workspace, reducing clutter and improving aesthetics.
The desk mount also offers extensive angle adjustments to cater to diverse viewing preferences. The VESA plate allows for tilt adjustments of +45° to -45°, which can be set using a 6mm Allen key. Users are advised to adjust to the desired angle and then tighten the screws, alternating between them for even pressure. Additionally, the monitor can be manually swiveled from -90° to +90° and rotated 180°, allowing for easy switching between landscape and portrait orientations or sharing the screen with others. These adjustments provide maximum flexibility for ergonomic positioning and collaborative work.
The product also includes important safety warnings. A "TIPOVER WARNING" emphasizes the risk of serious or fatal crushing injuries if the monitor or stand tips over. To prevent this, users are explicitly told never to allow children to climb, stand, hang, or play on any part of the monitor or stand. The use of a tipover restraint or anchoring the stand to the wall is recommended, with a note that such restraints may only reduce, but not eliminate, the risk of tipover. The manual also warns about small parts, making it clear that the product is not suitable for children under 3 years and requires adult supervision.
Overall, the WALI Single Monitor Desk Mount is designed for users seeking a flexible, space-saving, and ergonomically sound solution for their monitor. Its dual installation options, comprehensive adjustability, and integrated cable management features make it a practical addition to any home or office setup. The emphasis on proper installation and maintenance, particularly regarding spring tension and safety, ensures a secure and long-lasting user experience.
| Material | Steel |
|---|---|
| Height Adjustment | Yes |
| Weight Capacity | 22 lbs |
| Tilt | Yes |
| Rotation | No |
| Screen Size | Up to 27 inches |
| Color | Black |
| VESA Compatibility | 75x75mm, 100x100mm |