1312
3
2
1
4
5
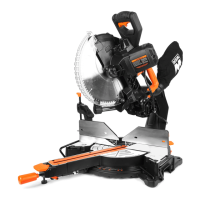
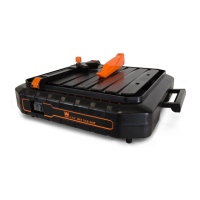
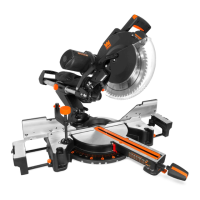
Fig. 2
ASSEMBLY & ADJUSTMENTS
WARNING: Do not plug in or turn on the tool until it is fully assembled according to the instructions. Read
through and become familiarized with the following procedures of handling and adjusting your miter saw. Failure
to follow the safety instructions may result in serious personal injury.
GUARD OPERATION
NOTE: Keep hands clear of the blade when the operat-
ing handle is lowered. Do not interfere with the proper
movement of the blade guard.
When the handle is lowered, the blade guard raises au-
tomatically. When the handle is raised, the blade guard
returns to its safety position, covering the blade.
RAISING/LOWERING THE SAW ARM
The saw arm needs to be raised up before operation and
locked down for transporting and storing.
To raise saw arm from the lower position:
1. Holding the operating handle (Fig. 2 - 3), lightly press
down on the saw arm and pull out the release knob (Fig.
2 - 2). Slowly raise the saw arm to the upper position.
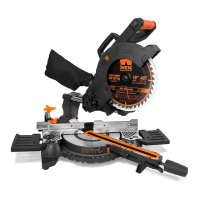
2. Set the release knob pin into the deep groove (Fig.
3 - 1) to lock the cutting head. Set the release knob pin
into the shallow groove (Fig. 3 - 2) to unlock the cutting
head.
To lower saw arm from the upper position:
1. Holding the operating handle (Fig. 2 - 3), push the
blade guard lever and pull out the release knob (Fig. 2
- 2).
2. Slowly lower the saw arm to the lower position and
lock the release knob into the deep groove (Fig. 3 - 1).
ADJUSTING THE BEVEL ANGLE
The saw arm can bevel from 0° to 45° to the left or right.
1. Unlock the bevel lock lever (Fig. 2 - 1) by rotating it
upwards (clockwise).
2. Tilt the saw arm until the bevel angle indicator points
to the desired angle on the bevel scale (Fig. 2 - 5).
3. Tighten the bevel lock lever (Fig. 2 - 1) by rotating it
down (counterclockwise). Be sure to tighten firmly with-
out over-tightening.
SETTING UP ARM SLIDE
The saw arm can be adjusted to different lengths using
the slide bar, and can slide back and forth when cross-
cutting.
For sliding cuts: Loosen the slide lock knob (Fig. 2 - 4)
and slide the saw arm to desired position.
For non-sliding cuts and transportation: Tighten the
slide lock knob (Fig. 2 - 4) for non-sliding operations
and before transporting the miter saw.
Fig. 3
1
2
 Loading...