Kunststoffschweißtechnik
Starting and operating Chapter 5
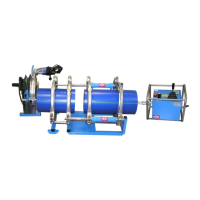
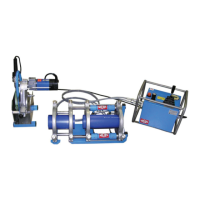
30.06.11 Working Instructions WIDOS 5100 Page 22 of 45
• Switch on the heating element and adjust the required welding temperature (reference
value 200 - 220°C for PE80 / 220 °C for PE 100) at the adjusting screw.
- The adjusted temperature is obtained when the control light is blinking and is kept
constant by a certain pulse-position ratio.
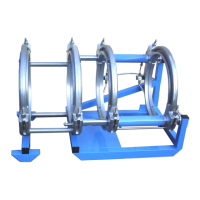
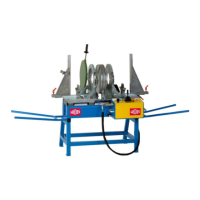
• Screw in the reduction inserts according to the outside diameter of the pipes to be welded.
• Put the workpieces into the clamping tools, tighten the clamping nuts tightly and align the
workpieces with respect to one another.
In case of long pipe ends, use WIDOS rollerstands for alignment.
• Close the slide, thereby reading the movement pressure on the manometer.
The movement pressure is displayed exactly when the slide with the clamped-pipe passes
over into its movement.
Subsequently, open slide again such that the planer fits therebetween.
• Swivel the planer between the pipe ends and switch it on.
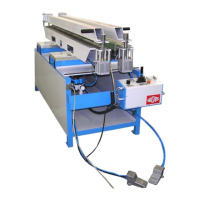
There is the danger that the planer pulls in clothes!
Do not hold the planer on its front side in any case.
If the planing pressure is too high, there is the danger that the planer falls out of
the machine during planing!
Noises exceeding 80 dB (A) may occur; during planing it is obligatory to wear
ear protection!
• Move the pipe ends towards one another by means of the valve lever and plane same with
a planing pressure between 1 and 15 bar above the movement pressure.
Planing must be carried out until a revolving cutting has been formed on both sides.
• Open the slide again by means of the valve lever, switch off planer motor, remove planer
and put it into the heat protective box.
Remove the produced cuttings without contacting the worked surfaces.
• Close slide.
• Check pipe mismatch and gap on the joining pipe ends.
According to DVS 2207, the mismatch on the pipe outer side must not exceed 0.1 x pipe
wall thickness, the admissible gap must not exceed 0.5 mm.
The mismatch compensation is carried out via further tightening or releasing of the
clamping nuts.
In case of a mismatch compensation, planing must be carried out again afterwards.
• The adjustment pressure for the pipe dimension to be welded can be gathered from the
table. Add the movement pressure.
Set the resulting pressure value at the pressure limiter valve and check by actuating the
valve lever.
• Open slide again slightly.
• Take heating up time, maximum change-over time, cooling down time and bead height for
the pipe dimension to be welded from the table.
• Put the heating element, which has been cleaned and brought to nominal temperature
between the pipes, if necessary wait until the control lamp on the heating element is
blinking in regular intervals. Take care that it lies in the zone of the throat of the tear-off
bar (see point 4.3 ).