Step 11 – Slide the ground wire from the vehicle into one end of the barrel
crimp splice, and slide the black ground wire from the Gateway into the
opposite end of the splice. Crimp the splice.
Step 12 – Mount the wall plate to the
wall or panel with the two supplied wall
plate screws.
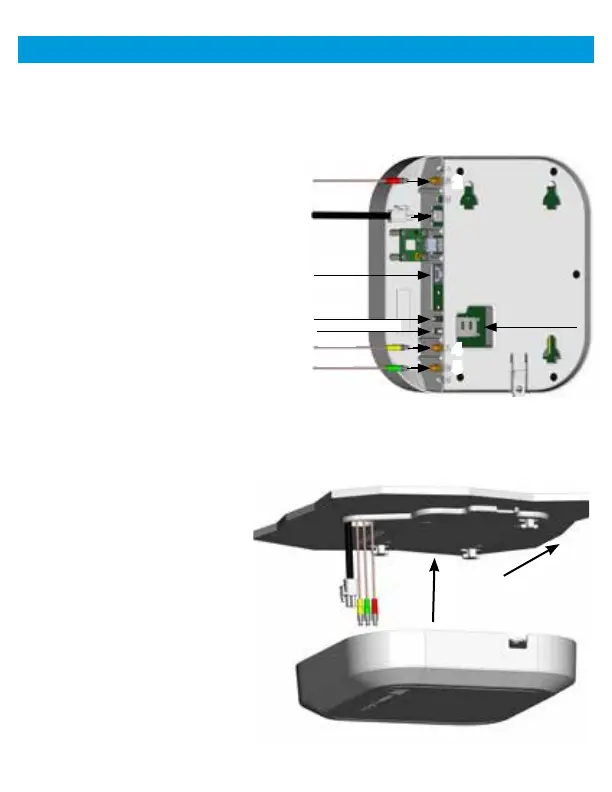
Step 13 – Next, connect the WiFi cable
with the red tubing to the mating
connector that is designated in the
#2 slot.
Step 14 – Connect the 4G LTE cables
with their respective mating connectors
(Yellow - #4 slot and Green - #5 slot).
Step 15 – Before connecting the power
cable to the Gateway confirm that all
other connections are properly made.
If so, connect the power cable. Turn the wall plate power switch to the ON
position and verify that the LED on the backside of the Gateway illuminates.
Step 16 – Lastly, feed all
excess cabling back into the
hole of the ceiling and push
the backside of the Gateway
up onto the mating hooks.
There will be two on the side
opposite the cabling hole
and one on the same side
as the cabling hole. Once
the Gateway is secure to the
hooks, slide the Gateway
towards the lever until it locks
into place. A clicking sound
indicates the Gateway is
locked in position.
Installation (cont.)
4
Red
Power
Green
Yellow
Green
Yellow
Red
Power
Ethernet
Reset Button
LED
SIM Card Slot
#4
#
2
#
5
2
1
1
2

 Loading...