Operation 15
MAN1298
(
08/01/2023
)
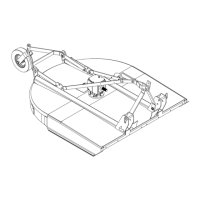
Figure 8. Cutting Height Adjustment
CUTTING HEIGHT ADJUSTMENT
■ Keep all persons away from operator control
area while performing adjustments, service, or
maintenance.
■ Avoid low cutting heights. Striking the ground
with blades produces one of the most damaging
shock loads a cutter can encounter. Allowing
blades to contact ground repeatedly will cause
damage to cutter and drive.
1. Level cutter from side to side. Check by measuring
from cutter frame to the ground at each deck rail.
2. Adjust, using tractor 3-point arm leveling device.
NOTE: Keep the front of cutter level with or slightly
lower than rear for best mowing.
3. Control cutting height with tractor 3-point arms, rear
tailwheel adjustment, or optional check chains.
4. To raise rear of cutter, move tailwheel down.
5. To raise front of cutter, raise tractor 3-point arms.
The cutting height is the distance between the blade
and the ground. The blades are approximately 1" above
the skid shoe. To check cutting height, do the following:
a) Select a cutting height; as an example, for an ap-
proximate cutting height of 3", set the skid shoe 2"
above the ground.
3" Desired cutting height
- 1.25" Distance blade cutting edge is above skid shoe
= 1.75" Distance skid shoe is above ground
b) Adjust the front-to-rear attitude from 1/2" to 3/4"
higher than the front.
6. Adjust top link to provide 1.2" of clearance between
break link and rear lift arms. See Figure 8. The clear-
ance will allow cutter to oat over uneven terrain.
SHREDDING MATERIAL HEIGHT
ADJUSTMENT
For shredding, set the cutter lower at rear. Determine
how much lower to set the rear by experimenting in dif-
ferent situations.
CHECK CHAIN ADJUSTMENT (OPTIONAL)
1. Refer to INSTALL OPTIONAL CHECK CHAINS,
page 31 for check chain installation.
2. After making cutting height adjustment, adjust both
chains (3) in check chain bracket (2) so you have
the same number of links on each side. This will
keep cutting level.
Figure 9. Check Chain Adjustment
WARNING
2
2. Check chain bracket
3. Check chain
3
3
2
LA5a
A
1.2 IN.
GROUND
SIDE SKID
TAILWHEEL HEIGHT
ADJUSTMENT BRACKET
BREAK LINK
LIFT ARMS
TRACTOR TOP LINK
TAILWHEEL ARM
CD8120
 Loading...