Using the control unit
7
Comfort+ II RF – 6720892636 (2019/04)
Releasing control unit from wall socket
Fig. 7 Releasing control unit from wall socket
▶ Insert a screwdriver into the recess on the underside of the
control unit.
▶ Gently turn the screwdriver, until the locking device opens.
Wall-mounted installation
Find a position with good signal strength before starting the
wall-mounted installation of the control unit.
If the signal is weak, try another position in the room, until the
best possible signal strength is achieved ( Section "Signal
strength", page 11).
▶ Use the wall socket as a template to mark the position of the
screws.
▶ Drill two suitable holes for the length and diameter of the
rawl plugs.
Fig. 8 Installing the wall socket for the control unit
▶ Insert the rawl plugs.
▶ Insert the screws in such a way, that they protrude
sufficiently to enable the wall socket to fit behind the screw
heads.
▶ Install the wall socket horizontally.
3.3 Putting the control unit into operation
▶ Switch on the heat source.
Control unit and Key are set and connected ex factory so that
they are directly functional.
Once the connection has been established, the preset date and
time, the heating and DHW Auto mode and the current room
temperature will appear on the display.
4 Using the control unit
The control unit has preset heating and DHW switching times
( Table 2). These settings can be adjusted to meet the
requirements of the user in the menu ( Chapter 5, page 9).
The switching times can be reset to factory settings
( section "Reset to factory settings (Reset all)", page 11).
Table 2
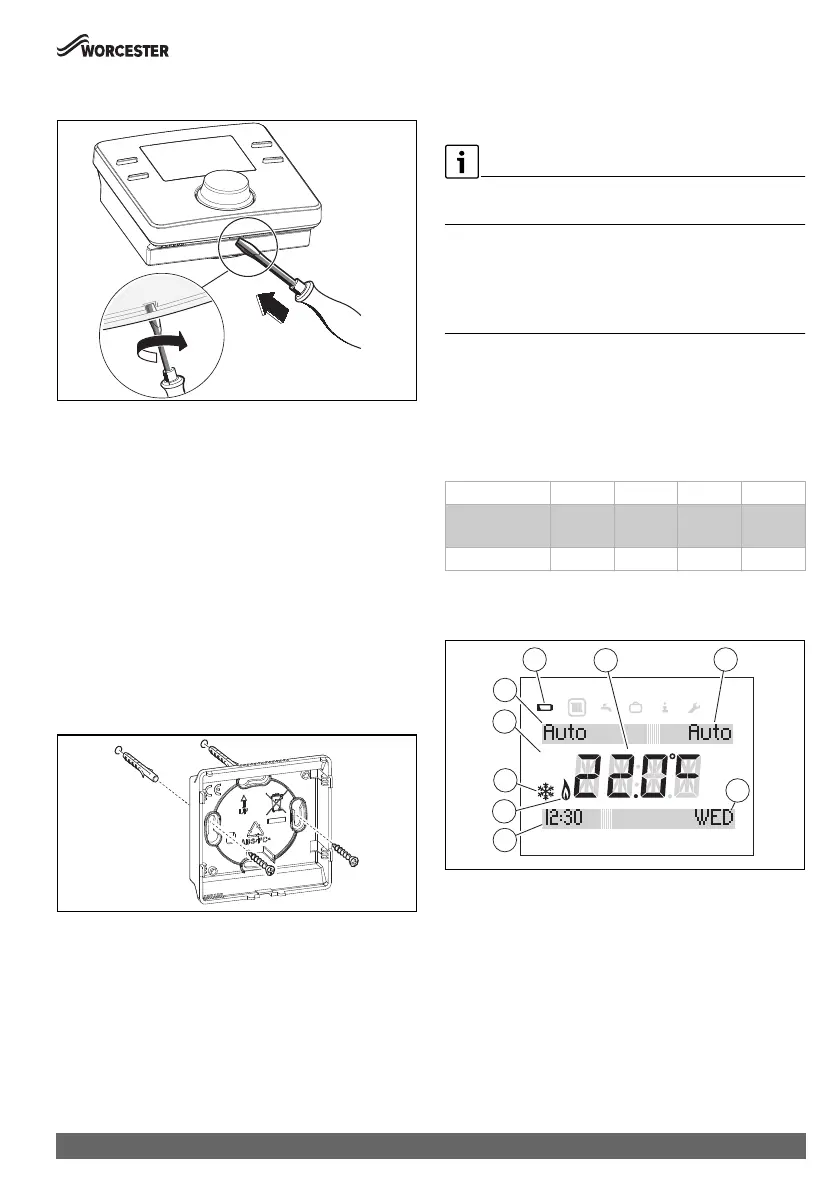
4.1 Standard display
Fig. 9 Standard display
[1] Current room temperature
[2] DHW operating mode
[3] Day of the week
[4] Clock
[5] Burner in operation (lights up if heat source is in heating
mode; up to 6-minute delay)
[6] Frost protection (lights up in heating mode Off)
[7] am or pm (lights up if 12-hour time format is used)
[8] Heating operating mode
[9] Battery low
0 010 010 085-001
2.
1.
6720810965-08.1Wo
Switching time 06:30 08:30 16:30 22:30
Heating
temperature
20 °C 16 °C 21 °C 10 °C
Hot water On Off On Off
0010009667-002
1
2
3
4
8
7
6
5
9
pmam
 Loading...