

A
Andrea StewartSep 9, 2025
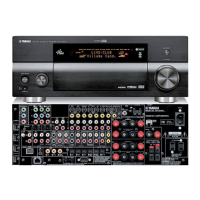
What does 'E-10:INTERNAL ERROR' mean on Yamaha Stereo Receiver?
- JjasongonzalezSep 9, 2025
The 'E-10:INTERNAL ERROR' on your Yamaha Stereo Receiver indicates a DSP communication error or hangup. To fix this, perform the auto setup procedure again.