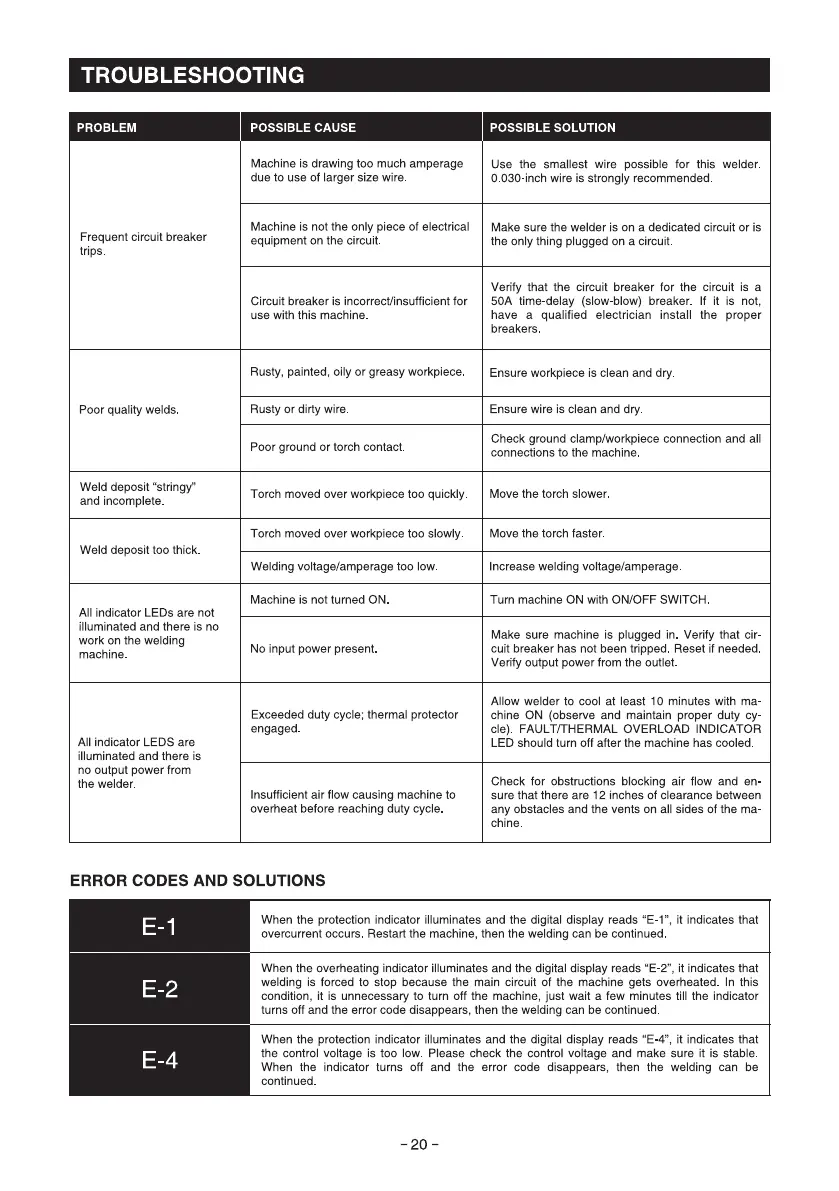
TROUBLESHOOTING
PROBLEM
Frequent circuit breaker
trips
Poor quality welds
Weld deposit "stringy'
and incomplete.
Weld deposit too thick
All indicator LEDs are not
illuminated and there is no
work on the welding
machine.
All indicator LEDS are
illuminated and there is
no output power from
the welder.
POSSIBLE CAUSE
Machine is drawing too much amperage
due to use of larger size wire.
Machine is not the only piece of electrical
equipment on the circuit.
Circuit breaker is incorrect"nsufficient for
use with this machine
Rusty, painted, oily or greasy workpiece
Rusty or dirty wire
Poor ground or torch contact
Torch moved over workpiece too quickly.
Torch moved over workpiece too slowly
Welding voltage/amperage too low
Machine is not turned ON
NO input power present.
Exceeded duty cycle; thermal protector
engaged
Insufficient air flow causing machine to
overheat before reaching duty cycle
POSSIBLE SOLUTION
Use the smallest wire possible for this welder
0 030-inch wire is strongly recommended.
Make sure the welder is on a dedicated circuit or is
the only thing plugged on a circuit
Verify that the circuit breaker for the circuit is a
50A time-delay (slow-blow) breaker If it is not,
have a qualified electrician install the proper
breakers
Ensure workpiece is clean and dry
Ensure wire is clean and dry
Check ground clamp/workpiece connection and all
connections to the machine.
Move the torch slower
Move the torch faster
Increase welding voltage/amperage
Turn machine ON with ON,'OFF SWITCH
Make sure machine is plugged in Verify that cir-
cuit breaker has not been tripped. Reset if needed
Verify output power from the outlet
Allow welder to cool at least 10 minutes with ma
chine ON (observe and maintain proper duty cy-
cle) FAULT/THERMAL OVERLOAD INDICATOR
LED should turn off after the machine has cooled.
Check for obstructions blocking air flow and en
sure that there are 12 inches Of clearance between
any obstacles and the vents on all sides of the ma
chine
ERROR CODES AND SOLUTIONS
When the protection indicator illuminates and the digital display reads "E-1", it indicates that
overcurrent occurs. Restart the machine, then the welding can be continued
When the overheating indicator illuminates and the digital display reads "E-2", it indicates that
welding is forced to stop because the main circuit of the machine gets overheated In this
condition, it is unnecessary to turn off the machine, just wait a few minutes till the indicator
turns off and the error code disappears, then the welding can be continued
When the protection indicator illuminates and the digital display reads "E-4", it indicates that
the control voltage is too low Please check the control voltage and make sure it is stable
When the indicator turns off and the error code disappears, then the welding can be
continued
- 20 -