Page 16 TETHERED CONTROLLER MX32, RADIO CONTROLLER MX32FU
7. SOFTWARE-UPDATE, uploading ICONS, PICTURES
as well as: Saving GUI and other object data, EXPORTING GUI
A flash drive that matches the following criteria is required for carrying out these steps:
FAT32 file format (with an allocation unit size of 4096 bytes) formatted in low-level format, in order to save the
large number of files in the USB root directory. A flash drive reserved for MX32 updates (otherwiese empty) is of
practical advantage. A proper flash drive comes with each ZIMO controller.
Software-Update and/or loading Data (Icons, Pictures etc.):
The latest zip file for the MX32 (i.e. MX10_MX32_01.21_0500 full.zip) is available as free download
from www.zimo.at (go to the MX32 update page under “Update & Sound”).
Beginning with software version 01.16.00 (this version MUST be in the MX32 BEFORE it is updated with the next
higher update), the zip file comes as a “container file”, which holds full versions for both the MX10 AND the MX32.
So if your current version is lower than 01.16 (i.e. 01.15 or lower), the version 01.16 must be installed first BEFORE
the version 01.17 or higher can be installed!
After downloading the .zip file, it must be unpacked first and the unpacked container file copied to the
above mentioned flash drive, but NOT the zip file itself. The files must be stored in the root directory
(not in a folder) of the flash drive because the target devices (MX10 or MX32) cannot open subfolders.
The same flash drive (with the same update file) is then used to update the command station MX10 as
well as all MX32 controllers.
The flash drive is then plugged into the running MX32, which may be done in any operating mode
(mostly in the operating mode LOCO). MX32FU must be connected with a CAN bus cable to the MX10.
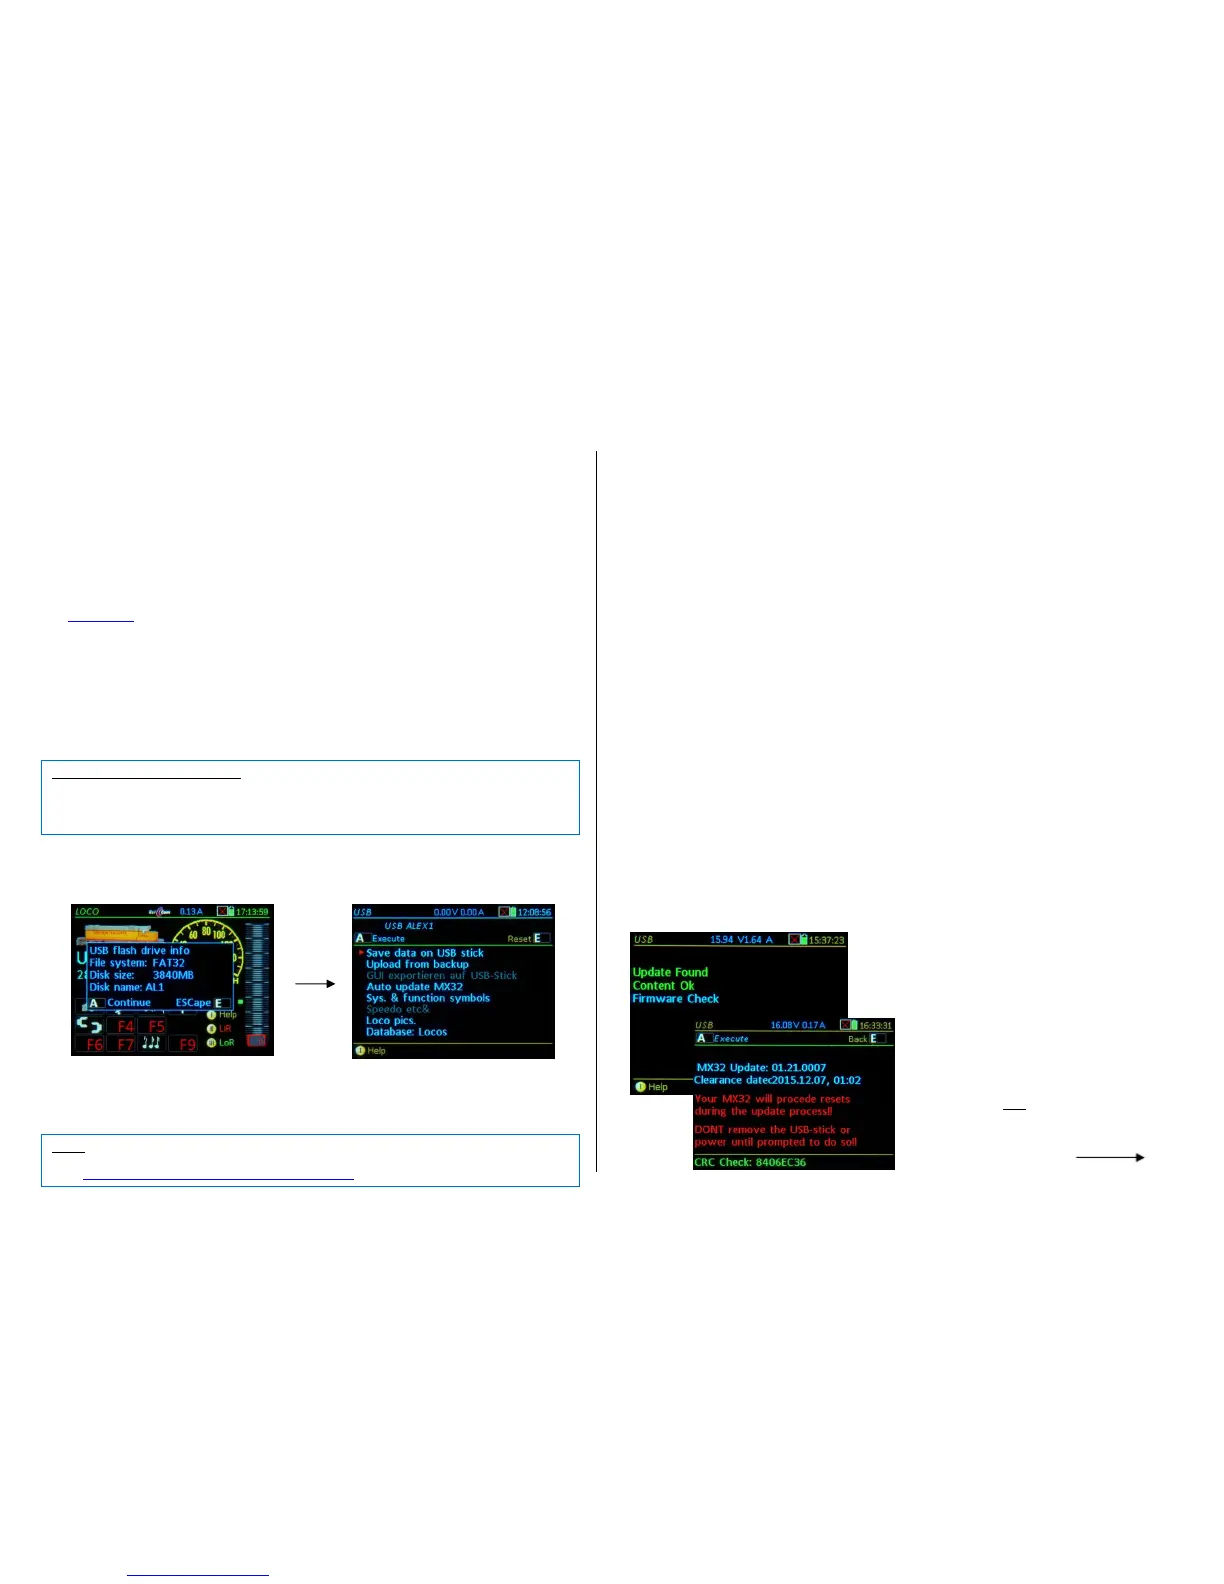
The stick is automatically recognized and read, while some information (size, name…) is being displayed
in the flash drive window:
A- Key the “table of contents” is displayed: a list of entries (in order): “DATA BACK UP to flash
drive”, “Restore Data”, “Automatic MX32 Update” and, after that, the names of expected data (not the
actual file names), such as data currently present on the stick (blue) as well as expected that is not on
the stick (gray) but could be.
Scrolling wheel select the desired line from the list
A- Key starts the selected list position;
Selecting the “Automatic MX32 Update” installs the following:
1) the actual software update and
2) the data that is usually part of the new software version (but not data the user created himself or
downloaded at his own request. This is being preserved throughout the update), such as
- the fonts and texts in the key operator languages German and English
- the system, function and switchboard icons, speedo dials and instrument graphics,
- the device sound files (Controller sound accessible in LOCO IN with address 16382)
- the help screens.
Displayed below that, a list of data which is available either in addition to the “Automatic Update" (for the
new software version) or alone (without new software version) on the stick: the detailed composition
of these files may change from version to version (new finished features...), but essentially, they are
the following:
- System and function icons for functions, speedo, speed slider etc.
- Vehicle instruments (speedos): various speedo designs, amp meter and more
- Switchboard elements: for switch panel displays of the MX32,
- Device sound files: among others warning signals, ambient sound for the MX32 sound (.wav-files),
- Vehicle pictures: lists the picture collections on the flash drive, from which one or the other can be
loaded into the controller,
- Databases: vehicles, accessories, switch panels
- CV lists and sets
Importing data (after making a selection, i.e. “System and function symbols” etc.):
TP- Key Marks the position to be imported
A- Key Displays the details of this data line, scroll again, TP- Key Select
- Last line: “Import all marked (selected) data” A- Key Starts importing data.
The actual update process (after selecting the “Automatic MX32 Update”):
After starting the “Automatic MX32 Update” (with the A- Key or making a selection and “Import all marked
…”) first, an information screen is displayed (current and new software versions as well as other data). From
there, a decision has to be made if the update shall really be made:
Firmware Check: The MX32 tests the software to
be loaded for bad or corrupted data and shows
the result. After this presentation, the control
panel automatically goes to the update infor-
mation screen.
Update information screen:
Listing of the software version to be load-
ed, and its creation date. In addition, it
shows the note: "The M32 makes several
restarts during the update! “
 Loading...