Description:
Base File Name:
Software:
3M™ Bair Hugger™
57501 Spinal Underbody Blanket
Requester:
Frank Boeshart
Reference:
Die # / Doc. Size:
12" x 11" FLAT
6" x 11" Folded SIZE
Item Spec#:
34-8724-6805-2
Supersedes#:
Cat/Product#:
57501
Structure#:
TBD
IFU
PA:
GA:
:
InDesign CC
PROCESS
BLACK
11.5.19
PU File created in SGS# 5905552 for charts, headers w/lowercase languag
11.12.19 Altsd translations received
11.14.19 Artwork approved, Final Release
12.23.19 Changes made to chart, Final Release
TOTAL # OF
LANGUAGES
31
LANGUAGE ORDER:
IN ORDER FRONT TO BACK: English, French (France), German, Italian, Spanish (Spain), Dutch, Sweden, Danish, Norwegian, Finnish,
Portuguese (Portugal), Greek, Polish, Hungary, Czech, Slovak, Slovenian, Estonian, Latvian, Lithuanian, Romanian, Russian, Croatian,
Bulgarian, Serbian, Turkish, Japanese, Chinese Simplifi ed, Arabic, Albanian and Macedonia.
Symbols Updated:
All symbols Up-to-date: 11/4/19
34872468052.indd
2
Directions for Use
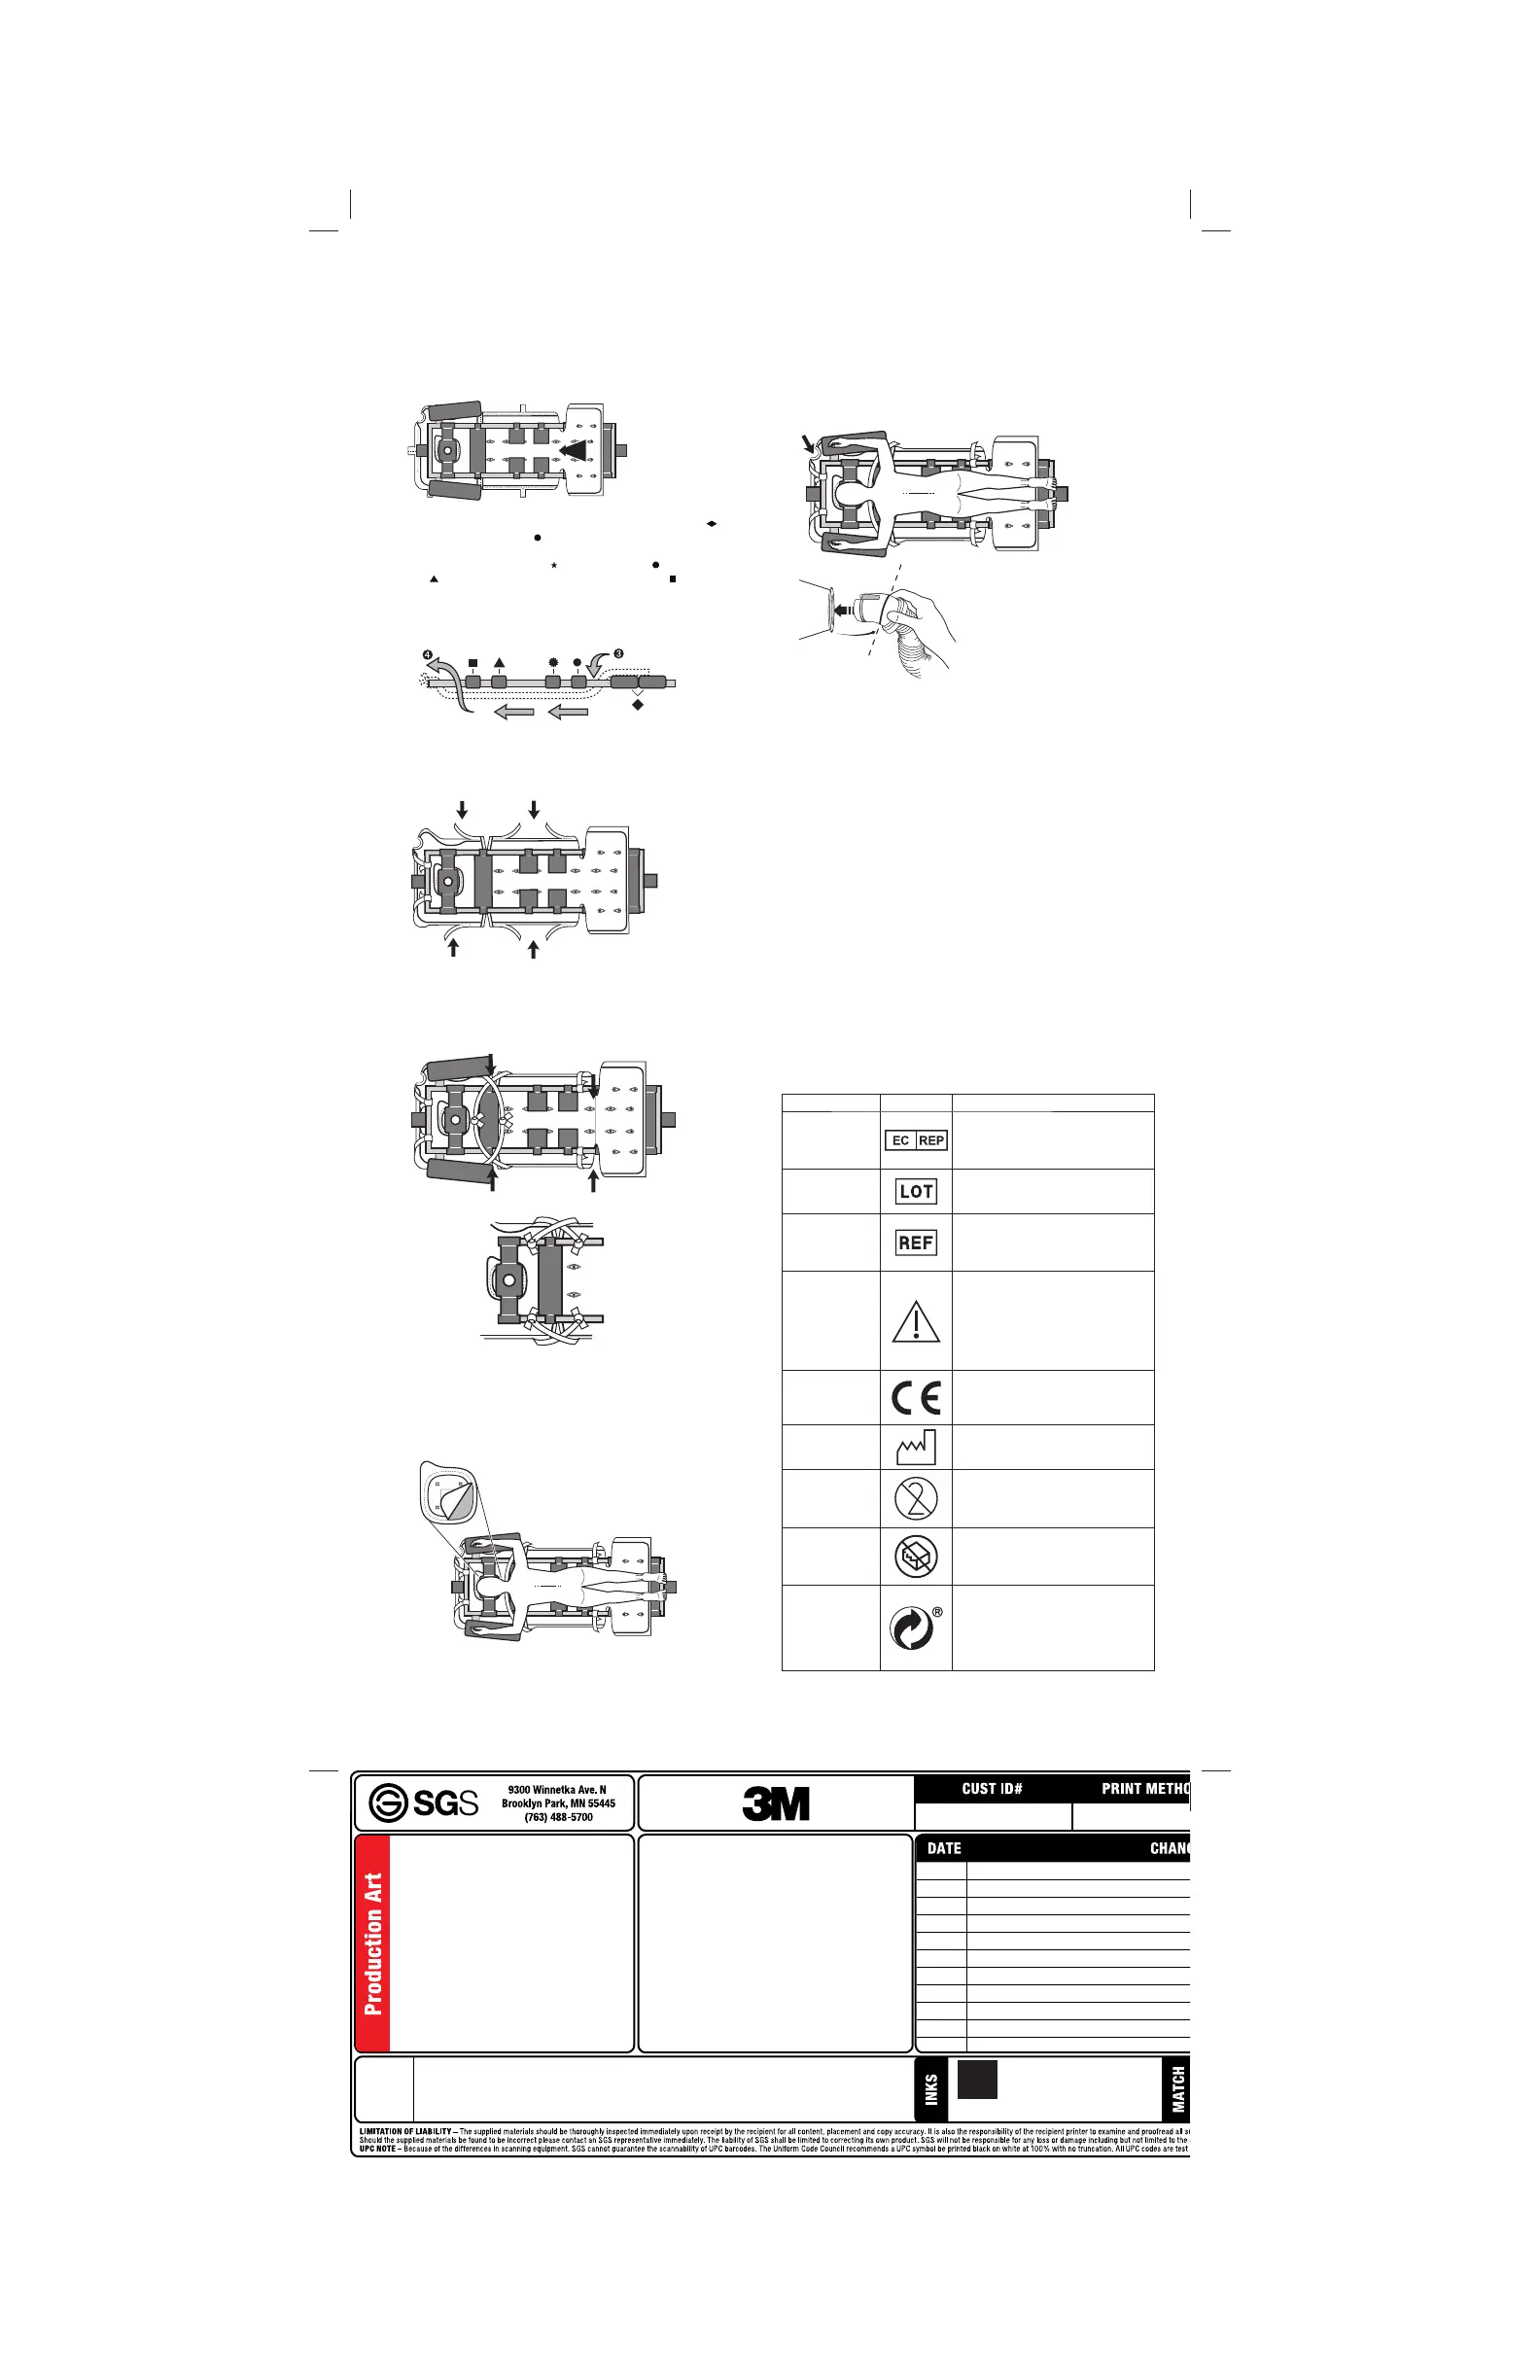
1. Open and unfold warming blanket to locate the white product
label on the blanket. Unfold the blanket so the product label faces
the patient.
2. Position the warming blanket onto the surface of the patient
footboard or onto the surface of the sling assembly. Using the
adhesive tape strip on the underside of the blanket, secure the
blanket to the table to prevent it from slipping (Figure A).
A
3. Pass the warming blanket between the patient footboard (
) and
the patient top thigh set (
) through the frame to the underside of
the frame of the spinal surgery table (Figure B). Unfold the blanket
under the top thigh pad set (
), top hip pad set ( ), patient chest
pad (
), and under the patient head support plate (
).
4. Draw the end of the warming blanket to the end of the spinal
surgery table and secure it to the end of the table frame using the
tie strips located at the end of the blanket (Figure B).
B
5. Open the four perforations on both sides of the warming blanket
and position the blanket around the edges of the spinal surgery
frame (Figure C).
C
6. Before the patient has been positioned, draw tie strips across the
top of the frame of the spinal surgery table and around each side of
the patient chest pad (Figure D, Option 1) or directly to the frame
(Figure D, Option 2).
D
Option 1
Option 2
7. Pillows and other positioning modalities used for the lower
extremities should be positioned under the blanket.
8. Optional: Tear out the circular (face) section at the head of the
warming blanket to visualize the patient’s eyes and airway from
under the table (Figure E).
E
WARNING: If a securement device (i.e. safety strap, tape) is used,
ensure the warming channels are not occluded.
9. Insert the end of the Bair Hugger warming unit hose into the hose
port (Figures F and G). Use a twisting motion to ensure a snug
fit. A visual marker is located around the mid-section of the hose
end to guide the depth of hose insertion. Support hose to insure
secure attachment.
WARNING: Do not treat patients with the Bair Hugger hose
alone. Always attach the hose to a Bair Hugger blanket before
providing therapy.
F
G
10. Select the desired temperature setting on the warming unit to
initiate warming therapy. (See the Operator Manual for your specific
Warming Unit Model)
CAUTION: Patient Monitoring Recommendations:
• 3M recommends continuously monitoring core temperature. In
the absence of continuous monitoring, monitor the temperature
of patients who are incapable of reacting, communicating
and/or who cannot sense temperature a minimum of every
15 minutes or according to institutional protocol.
• Monitor cutaneous responses of patients who are incapable
of reacting, communicating and/or who cannot sense
temperature a minimum of every 15 minutes or according to
institutional protocol.
• Adjust air temperature or discontinue therapy when the
therapeutic goal is reached, if elevated temperatures are
recorded or if there is an adverse cutaneous response in the
warmed area.
11. Based on the warming unit model utilized, turn the unit off or to
standby mode to discontinue warming therapy. Disconnect the
warming unit hose from the warming blanket and discard the
blanket per hospital policy.
Please report a serious incident occurring in relation to the
device to 3M and the local competent authority (EU) or local
regulatory authority.
Symbol Glossary
Symbol Title Symbol Description and Reference
Authorized
Representative
in European
Community
Indicates the authorized
representative in the European
Community. ISO 15223, 5.1.2
Batch code
Indicates the manufacturer's batch
code so that the batch or lot can be
identified. ISO 15223, 5.1.5
Catalogue
number
Indicates the manufacturer's
catalogue number so that the
medical device can be identified.
ISO 15223, 5.1.6
Caution
Indicates the need for the user to
consult the instructions for use for
important cautionary information
such as warnings and precautions
that cannot, for a variety of reasons,
be presented on the medical device
itself. Source: ISO 15223, 5.4.4
CE Mark
Indicates conformity to European
Union Medical Device Regulation or
Directive.
Date of
Manufacture
Indicates the date when the medical
device was manufactured. Source:
ISO 15223, 5.1.3
Do not re-use
Indicates a medical device that
is intended for one use or for use
on a single patient during a single
procedure. Source: ISO 15223, 5.4.2
Do not use
if package is
damaged or
open
Indicates a medical device that
should not be used if the package
has been damaged or opened.
Source: ISO 15223, 5.2.8
Green Dot
Indicates a financial contribution
to national packaging recovery
company per European Directive
No. 94/62 and corresponding
national law. Packaging Recovery
Organization Europe.
 Loading...