11 12
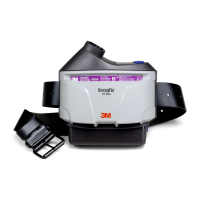
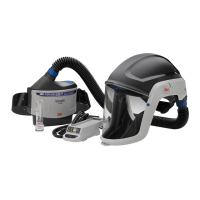
Fig. 15 – 3M™ Versao™ Powered Air Purifying Respirator
TR-600 with lter/cartridge label visible
3. Battery pack: Conrm that the battery pack is fully charged or charge is sufcient for duration of the work period. Ensure
plastic surrounding electrical contact pins are intact. The battery pack must be latched to the motor/blower. Gently tug on
the battery to ensure secure connection.
4. Breathing tube: Examine the entire breathing tube for tears, holes or cracks. Bend the tube to verify that it is exible.
Ensure the gaskets located at both ends of the breathing tube (i.e. headgear and air source connections) are present and
not damaged. The breathing tube should t securely into the air source connection.
5. Headgear: Follow the User Instructions supplied with your 3M headgear to ensure correct system operation.
6. Airow check: The TR-600 is pre-calibrated to ensure required airow. However, the 3M™ Airow Indicator TR-971 must
be used to verify minimum required airow is attained prior to each day’s use. The TR-600 compensates for changes in
air density, which is affected by elevation and air temperature. During use, if you suspect the TR-600 is not delivering a
minimum of 6 cfm (170 lpm), exit the contaminated area, see your supervisor, and recheck the airow with the 3M™
Airow Indicator TR-971. The airow is checked with your current lter installed.
• Ensure oat ball in the TR-971 moves freely in the tube and the gasket at the bottom end of the tube is in place.
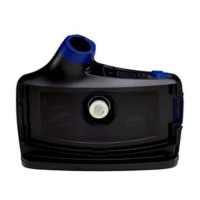
• Insert the TR-971 into the outlet of the TR-600 motor/blower unit. If the breathing tube is in place, it must be removed
to allow the airow indictor to be inserted (Fig. 16-1).
• Turn the motor/blower unit on by pressing and holding the power button for 1 second. Run the 3M™ Versao™
Powered Air Purifying Respirator TR-600 for up to 1 minute to allow the airow to stabilize.
• With the airow indicator in a vertical position, ensure that the bottom of the oating ball rests at, or above, the
minimum ow mark for the ‘letter’ representing your ‘Zone’ (Fig. 16-2). Airow indicator must be in the vertical
position for an accurate reading.
• The airow indicator is graduated into different ‘zones’ based on air density, which is based on elevation and ambient
temperature. To determine your zone, determine the elevation and temperature for the environment where you are
conducting the airow check. See your supervisor if you are not certain of these values. Find the zone where your
elevation and temperature intersect on the chart supplied with the airow indicator (Chart 1). For additional guidance
on conducting an airow check, consult 3M Technical Data Bulletin #221 Conducting Airow Check on the TR-600 or
contact 3M Technical Service.
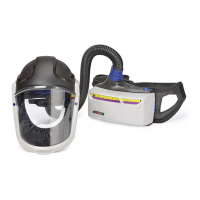
Fig. 16-1 – Attaching airow indicator Fig. 16-2 – Checking airow
°C -10 01020304050
m1432506886 104 122
-305 -1000 ABCDEFG
00BCDEFGH
305 1000 CDEFGH I
610 2000 DEFGHI J
915 3000 EFGH IJK
1219 4000 FGHIJKL
1524 5000 GH IJKLM
1829 6000 HI JKLMN
2134 7000 IJKLMNO
2439 8000 JKLMNOP
2744 9000 KLMNOPQ
3048 10000 LMN OPQR
3353 11000 MNOPQRS
3658 12000 N OPQRST
3963 13000 OPQRSTU
4268 14000 PQRSTUV
4573 15000 QRSTUVW
4877 16000 RSTUVWX
5182 17000 STU VWX Y
°F
ft
Chart 1 – Determining airow indicator zone based on elevation and temperature. Recommended use temperature
range: 14°F to 129°F (-10°C to 54°C). Recommended elevation: -328 feet to 16404 feet (-100 meters to 5000 meters)
.
Contact 3M Technical Service if intended use may be outside of these ranges.
NOTE: If the airow indicator ball fails to rise at or above the minimum ow level, do not use the motor/blower unit. Refer to
the 3M™ Versao™ Powered Air Purifying Respirator TR-600 Troubleshooting Guide or contact 3M Technical Service.
7. Low ow alarm check: Check the low airow alarm by simulating a low airow condition. With the motor/blower on:
• Remove the airow indicator and tightly cover the outlet of the motor/blower with the palm of your hand. The motor
should automatically speed up, attempting to compensate for the low airow condition.
•
Continue to press your palm tightly against the end of the outlet, making a tight seal. In less than approx. 30 seconds, the unit
will sound an audible and vibratory alarm, and the bottom bar on the lter loading/low ow indicator will ash red (Fig 14, #5).
• Remove your hand from the end of the breathing tube. In less than approx. 30 seconds, the audible alarm and the
ashing red LED should both stop when the motor returns to the selected speed.
NOTE: If the low airow alarm fails to sound, do not use the unit. Refer to the TR-600 Troubleshooting Guide or contact 3M
Technical Service.
ENTERING AND EXITING THE CONTAMINATED AREA
Prior to entering the contaminated area, complete the Inspection procedures listed in these User Instructions and ensure the
selected PAPR setup is appropriate protection for the given airborne contaminant and concentration.
1. Turn the motor/blower on.
2. Recommend to check both the airow with the airow indicator and low ow alarms. NOTE: High environmental noise
levels or use of hearing protection may interfere with the user’s ability to hear audible alarms. Heavy clothing or tasks with
high vibration levels may interfere with sensing the vibratory alarm. User may need to check for the visual alarms more
frequently in high noise, or high vibration environments.
3. Don the 3M™ Versao™ Powered Air Purifying Respirator TR-600 Assembly and Headgear. Enter the work area.
4. Leave the contaminated area immediately if any of the following conditions occur:
a. Any part of the system becomes damaged.
b. Airow into the respirator decreases or stops.
c. The low airow or low battery alarms trigger. In the event an audible, visual, or vibratory alarm triggers, the user
should immediately leave the contaminated area.
d. Breathing becomes difcult.
e. You feel dizzy or your vision is impaired.
f. You taste or smell contaminants.
g. Your face, eyes, nose or mouth become(s) irritated.
h. You suspect that the concentration of contaminants may have reached levels at which this respirator may no longer
provide adequate protection.
5. Do not remove the respirator or reach your hand into the headgear in areas where the air is contaminated.
 Loading...