Do you have a question about the ABB ACS880+N5350 and is the answer not in the manual?
Contact your local ABB representative for technical assistance and support.
Contains essential safety instructions to prevent injury or damage when installing or operating the drive.
Electrical safety precautions for installing and maintaining the drive, including capacitor discharge.
General safety guidelines for handling, operating, and maintaining the drive unit.
Safety instructions for initial drive startup and operational procedures to prevent hazards.
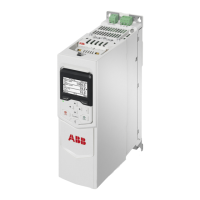
Introduction to the ACS880+N5350 drive, its design for cooling tower fans, and capabilities.
Lists the standards to which the ACS880+N5350 drives have been designed and tested.
Specifies the intended usage of the ACS880+N5350 with specific Baldor RPM AC motors.
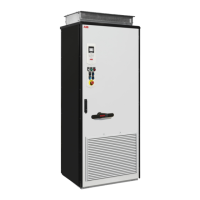
Details the drive's enclosure type (UL Type 1, IP21) and installation environment requirements.
Illustrates the physical layout and components of the standard IP21 drive enclosure.
Describes the segmentation of connections into Power and Control, and conduit mounting.
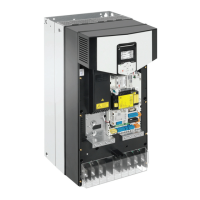
Diagram and description of the drive's main circuit components: Rectifier, DC link, Inverter, Brake chopper.
Diagram illustrating power and control interfaces, including option module slots.
Layout diagram of external control connection terminals and their descriptions.
Explanation of the information contained on the type designation label for unit identification.
Key to understanding the drive's type designation code and its various options.
Provides electrical ratings, model numbers, and frame sizes for standard ACS880+N5350 models.
Presents data on drive losses, cooling airflow requirements, heat dissipation, and noise levels.
Specifies wire gauge ranges for power connections based on catalog number and frame size.
Details power terminal tightening torque specifications for various frame sizes and connections.
Provides specifications for control wire gauge and tightening torque values.
Essential instructions for proper grounding of the drive to ensure safety and reduce interference.
Specifies the power ratings for the ACS880+N5350 and requirements for incoming power.
Guidance on protecting the drive and input cable using fuses against short-circuit situations.
Tables to guide wire gauge selection and input fuse recommendations based on maximum continuous current.
Wiring requirements for connecting the motor to the drive, including ground wire specifications.
Information on protecting motor insulation and bearings from drive output pulses and currents.
Details on connecting motor thermostats for overtemperature sensing to terminals XD24-1 and XD24-2.
Describes the 9 digital inputs for fan control and their connection terminals (XD24, XD10, XDI).
Information on the analog input for controlling cooling tower fan speed and potentiometer connection.
Details the three Form-C relay outputs for reporting internal states and their parameter selection.
Describes the two analog outputs for indicating signals like motor speed and torque.
Guidance on selecting power cables according to local regulations and nominal current.
Information on drive losses, cooling airflow, and allowed operating temperature range.
Instructions for protecting the drive and input power cable, referencing fuse operating time.
Guidance on checking insulation resistance of cables and motor before connecting to the drive.
Step-by-step instructions for connecting the power cables to the drive and motor.
Instructions for connecting control cables, including grounding of shields and conductors.
Diagram illustrating default I/O connections for the 2-wire mode of the ACS880+N5350.
Checklist for UL compliance, covering environment, temperature, circuit protection, and cabling.
Procedure for installing and performing the first-time startup of the Assistant control panel.
Instructions on how to attach the control panel directly to the drive or use a separate mounting kit.
Step-by-step guide for the initial startup of the control panel, including language selection.
Description of the Assistant control panel's display, keys, and main parts.
Details the elements shown on the control panel's display in most views.
Description of the function of each key on the control panel.
Explanation of how to switch between keypad control (Local) and terminal strip/network control (Remote).
Overview of basic operations, user interface components, and common user tasks.
Description of the main components of the user interface: Home view, main Menu, Options, Help.
Instructions on using arrow keys and softkeys for navigating the control panel interface.
Description of the Home view, used for monitoring drive status and signals.
Lists common user tasks and provides instructions on how to complete them.
Instructions for starting, stopping, setting references, and changing motor rotation direction.
Tasks related to managing parameters: choosing, viewing, editing, adding, and restoring defaults.
How to access help, view control panel version, and drive information.
Guidance on viewing, hiding, and resetting faults and warnings.
Tasks for adjusting display settings, language, time, and launching assistants.
Description and connection diagram for the 2-Wire Operating Mode.
Description and connection diagram for the 3-Wire Operating Mode.
Details on the Process Control (PID) mode for auxiliary closed loop control.
Information on connecting to an external control system via fieldbus adapters or embedded port.
Configuration steps for using Fieldbus Adapter Modules for drive control.
Configuration steps for using the Embedded Fieldbus Port for drive control via Modbus RTU.
Feature to maintain motor power during standby, preventing moisture and aiding de-icing.
Details on parameters for Trickle Current Enable, Power, and Delay Time.
Accessing Trickle Current setup through the CTDD startup assistant.
Functionality to avoid operation at points of mechanical resonance using frequency avoidance bands.
Cooling tower function to run at low speed in reverse to prevent ice buildup.
Parameters for De-Ice Enable, Speed, and Run Time.
Accessing De-Ice function setup through the CTDD startup assistant.
Information on advanced drive functions like PID and Fieldbus control.
Explanation of access levels based on CTDD USER, Fieldbus, or Expert Commissioner.
Diagram illustrating the flow for accessing different drive settings based on access level.
How the display indicates the current access level with a key symbol.
Example diagram for controlling the fan using 2-Wire Operating Mode with a manual disconnect switch.
Diagram showing a 3-position manual disconnect switch for 2-Wire mode.
Example diagram for controlling the fan using 3-Wire Operating Mode with a manual disconnect switch.
Diagram illustrating a 3-position manual disconnect switch for 3-Wire mode.
Examples of configurations for manual motor disconnect or power-off fail-safe shorting contactors.
Diagram for a remotely located motor disconnect switch.
Diagram illustrating the preferred usage of a shorting contactor.
Guide to basic startup assistants for motor data, ID run, and ACS880+N5350 program setup.
Procedure for initial startup, including motor data setup, language, and ID run.
Details on the cooling tower application assistant (CTDD Setup) for drive setup.
Definitions of Level 1 parameters, covering actual values, input references, and warnings/faults.
Explanation of how warnings and faults are annunciated, stopped, and reset.
Information on pure events recorded in the drive's event log.
How to edit warning and fault message text and add instructions.
Accessing and understanding the drive's warning and fault history.
Details on how indications are stored in the event log with timestamps.
Explanation of auxiliary codes that help pinpoint troubleshooting problems.
Information on parameters storing active and past fault/warning data.
List of warning messages, their causes, and recommended actions.
List of fault messages, their causes, and recommended troubleshooting actions.
Comprehensive technical data for the ACS880+N5350, including power, motor, and control unit specifications.
Information on derating factors for ambient temperature, altitude, and low noise control mode.
Details on how ambient temperature affects rated output current and derating calculations.
Guidance on derating continuous output currents based on altitude above sea level.
Information regarding derating of motor and braking powers when using low noise control mode.
Table and diagrams detailing dimensions, weights, and required free space for different frame sizes.
Lists applicable standards for CE compliance, including Low Voltage and EMC Directives.
Explanation of the CE mark and its verification of compliance with European directives.
Verification of compliance with the European Low Voltage Directive according to EN 60204-1 and EN61800-5-1.
Information on EMC Directive requirements for immunity and emissions, referencing EN61800-3:2004.
Explanation of the RoHS Directive regarding restriction of hazardous substances.
Details on the drive's compliance with the Machinery Directive as a safety component.
Guidelines for compliance with the EMC standard EN 61800-3:2004, including categories C2, C3, C4.
Provisions for Category C2 drive compliance with EMC standard EN 61800-3:2004.
Provisions for Category C3 drive compliance with EMC standard EN 61800-3:2004.
Provisions for Category C4 drive compliance with EMC standard EN 61800-3:2004.
Information on cULus Listed UL Type 1 (IP21) and UL Type 12 (IP55) drives.
Checklist for UL compliant installations, covering environment, temperature, and circuit protection.
Safety warning for frame sizes R6-R9 regarding lifting and potential overturning hazards.
Requirements for the installation site, including orientation, ventilation, and surrounding space.
List of essential tools required for drive installation, such as drills and screwdrivers.
Instructions on how to safely move the drive package to the installation site.
Illustration and list of items in the transport package for frames R1 to R5.
Illustration showing the contents of the cable entry box package for Frame R5.
Illustration and list of items in the transport package for frames R6 to R9.
Illustration showing the contents of the cable entry box package for Frame R6.
Illustration showing the contents of the cable entry box package for Frame R7.
Illustration showing the contents of the cable entry box package for Frame R8.
Illustration showing the contents of the cable entry box package for Frame R9.
General instructions for installing the drive, with specific steps for different frame types.
Step-by-step instructions for mounting frames R1 to R4.
Specific installation instructions for UL Type 12 frames R4 and R7.
Installation instructions for frames R5 and R9 without vibration dampers.
Reference to a supplement for cabinet installation instructions.
Section dedicated to setting up the ACS880 Cooling Tower Drive for Modbus TCP communication.
Step-by-step guide for configuring the ACS880 for monitoring and control over Modbus TCP.
Section dedicated to setting up the ACS880 Cooling Tower Drive for Modbus RTU communication.
Guide for setting up Modbus RTU serial communication using the built-in D2D port.
Section dedicated to setting up the ACS880 Cooling Tower Drive for Ethernet/IP communication.
Step-by-step guide for configuring the ACS880 for monitoring and control over Ethernet/IP.
| Type | DC Drive |
|---|---|
| Series | ACS880 |
| Model | N5350 |
| Power Range | 315 to 5220 kW |
| Power rating | 315 to 5220 kW |