9
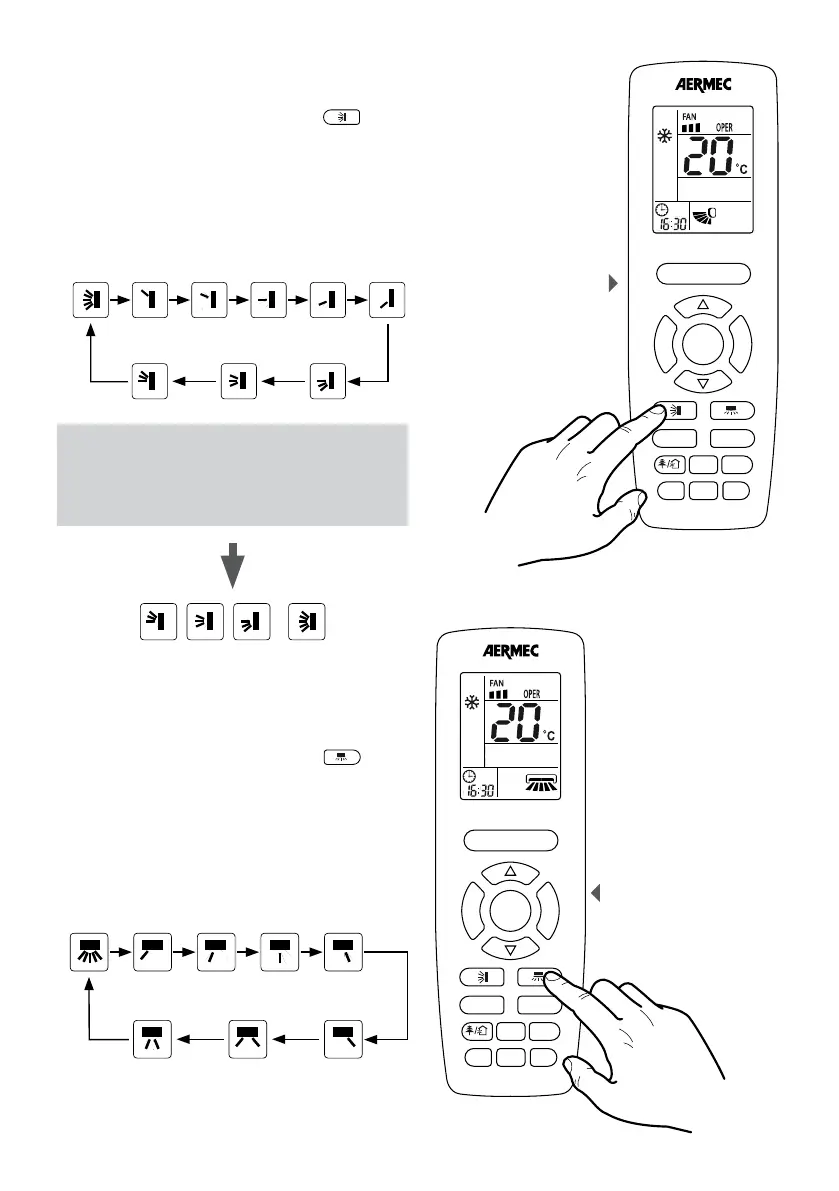
SETTING THE VERTICAL MOTORISED DISCHARGE FIN
SWING
If the unit is on, while pressing the button
F
A
N
T
U
R
B
O
ON/OFF
MODE
I FEEL
T-ON/T-OFF
TEMP
CLOCK
LIGHT
X-FAN
SLEEP
it
activates the swing of the motorized supply air fin. The
fin allows to change the air flow in the room depending
on the set position; the logic where this function is
managed:
When the unit is on, while pressing the button it’s
possible to set one by one the following steps:
ATTENTION:
(*) are present in spite of different icons for
continuous oscillation, all 4 trigger the same
mode: fluctuation continues from the lowest
point to the highest point.
, ,
=
SETTING THE HORIZONTAL MOTORISED DISCHARGE
FIN SWING
If the unit is on, while pressing the button
F
A
N
T
U
R
B
O
ON/OFF
MODE
I FEEL
T-ON/T-OFF
TEMP
CLOCK
LIGHT
X-FAN
SLEEP
it
activates the swing of the motorized supply air fin. The
fin allows to change the air flow in the room depending
on the set position; the logic where this function is
managed:
When the unit is on, while pressing the button it’s
possible to set one by one the following steps:
Fluctuation
continues
Fixed
(Step 1)
Fixed
(Step 2)
Fixed
(Step 3)
Fixed
(Step 4)
Fixed
(Step 5)
Fixed
(Step 6)
Fixed
(Step 7)
Motorised discharge
fin setting
F
A
N
T
U
R
B
O
ON/OFF
MODE
I FEEL
T-ON/T-OFF
TEMP
CLOCK
LIGHT
WiFi
SLEEP
Motorised discharge
fin setting
F
A
N
T
U
R
B
O
ON/OFF
MODE
I FEEL
T-ON/T-OFF
TEMP
CLOCK
LIGHT
WiFi
SLEEP
Fluctuation
continues(*)
Fixed
(Step 1)
Fixed
(Step 2)
Fixed
(Step 3)
Fixed
(Step 4)
Fixed
(Step 5)
Fluctuation
continues (*)
Fluctuation
continues (*)
Fluctuation
continues (*)