43
Operation
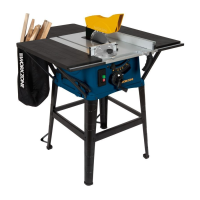
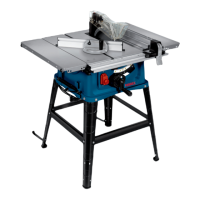
3. To turn the saw blade out of the saw table as far as the maximum,
turn the crank clockwise as far as the stop.
4. Remove the splitter by turning the clamping screw (
33
) several
revolutions counterclockwise to slacken it and then pull the
splitter up and out.
5. Secure the saw blade using the saw blade wrench (
12
):
The detents on the saw blade wrench engage in the openings in
the saw blade flange.
6. Using the ring wrench (
14
), turn the hexagon screw (
44
)
approx. one revolution counterclockwise to slacken it.
7. Hold the saw blade firmly and carefully in one hand and remove
the hexagon screw (
44
) complete with washer and saw blade
flange from the drive shaft.
8. Now remove the saw blade from the drive shaft and carefully pull
it up and out of the saw table.
9. Clean the outer and inner saw blade flange carefully before you
fit a new saw blade.
10. Place a new saw blade on the drive shaft. Check that the direction
of rotation is correct: the cutting angle of the teeth must point in
the running direction, meaning forwards. The running direction
is normally also shown on the saw blade as well.
11. Fit the outer saw blade flange back on the drive shaft. Make sure
that the outer saw blade flange is correctly aligned when you do
this.
12. Insert the hexagon screw through the pressure plate and into the
drive shaft and tighten it by hand.
13. Turn the saw blade carefully in the running direction: it must
be exactly centered and must not “wobble”. Check that the saw
blade, outer flange and pressure plate are correctly seated. If the
saw blade is not exactly centered, align the parts again.
Layout_F_TS_2000_1_UK_SPK7.indd 43Layout_F_TS_2000_1_UK_SPK7.indd 43 23.06.2020 14:29:3723.06.2020 14:29:37
 Loading...