AMSAFE SEATBELT AIRBAG SYSTEM
INSTALLATION, HANDLING AND SHIPPING INSTRUCTIONS E510629
TESTING AND FAULT ISOLATION
02-Aug-2013
Page 1005
D. Procedures
System with Enabling Switch & One Inflator:
(1) Use the following instructions to complete the AmSafe Seatbelt Airbag diagnostic check for a
system with an enabling switch.
(2) Check all possible electrical connectors within the AmSafe Seatbelt Airbag System. This
means check all Cable Interface Assembly connection ends: check EMA pigtail end and
connection(s) to all Inflator(s) for proper installation.
(3) Check EMA Pigtail, Cable Interface Assembly and Seat Belt electrical cable for breaks or worn
areas and replace, if necessary, before conducting test.
(4) When replacing SDT battery, do not allow debris or foreign objects in the opened battery
compartment.
(5) Remove Safety Tie from the Seatbelt Airbag Belt tongue (if installed). After diagnostic test is
complete, replace with new Safety Tie (in tongue) only if seat is not installed on aircraft.
WARNING:
THE AIRBAG SYSTEM SHOULD NEVER BE ACTIVE WITH AN UNSECURED SEAT OR
UNSECURED EMA. THE AMSAFE SEATBELT AIRBAG SYSTEM WILL DEPLOY IF THE
EMA OR SEAT RECEIVES AN INPUT ABOVE THE DEPLOYMENT THRESHOLD OF THE
SYSTEM. THE DEPLOYMENT THRESHOLD IS EASILY ACHIEVED IF THE EMA IS
UNSECURED TO THE SEAT, OR IF AN UNSECURED SEAT RECEIVES A SHOCK SUCH
AS DROPPING THE SEAT ON THE FLOOR. IT IS VERY IMPORTANT THAT A SEAT WITH
AN ACTIVE AIRBAG SYSTEM (SEATBELT BUCKLED AND ALL CONNECTIONS MADE)
IS SECURED SUCH THAT IT CANNOT BE DROPPED OR MISHANDLED.
WARNING:
DISCONNECT THE SDT IMMEDIATELY AFTER THE DIAGNOSTIC TEST IS COMPLETE.
LEAVING THE SDT CONNECTED TO THE SYSTEM MAY RESULT IN DRAINING OF THE
EMA BATTERY.
ACTION RESPONSES FAULT DIAGNOSIS
1
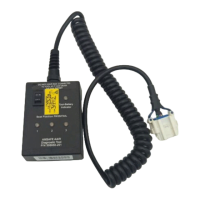
Turn SDT ON/OFF switch to ON. If
Battery check is OK, turn SDT OFF.
SDT Battery LED will illuminate green
for acceptable power and red for low
battery condition.
If red, remove cover on back of SDT
and replace with a new, commercially
available, 9-volt battery.
Connecting SDT: Confirm all seat positions to be tested are unbuckled. Remove the Diagnostic Connector’s
protective cap (if applicable) located on the Interface Cable Assembly and connect the V23 SDT connector to the
diagnostic connector.
ACTION RESPONSES FAULT DIAGNOSIS
2
Connect SDT to Diagnostic Connector
on Cable Interface Assy. Turn SDT
ON/OFF switch to ON.
All amber LEDs, go to Step 3.
All three SEAT LEDs will illuminate;
amber for a “pass” condition and green,
red, or no illumination for a “fail”
condition.
Check all connections, especially Cable
Interface Assembly. Replace EMA,
Inflator, and Cable Interface Assy. Retest
after replacing each part until a “pass”
condition is met.
3
Buckle seatbelt.
Single SEAT LED is green, go
to Step 4.
A single SEAT LED will illuminate green
for a “pass” condition. Other SEAT
LEDs will extinguish. All amber
illumination, or all extinguished, or red
illumination is a “fail” condition.
Replace associated End-Release Buckle
Assembly, EMA, Inflator, and Cable
Interface Assembly. Retest after
replacing each part until a green SEAT
LED illuminates.
4
Unbuckle seatbelt.
5 Repeat Step 3 for next seat position.
6
Unbuckle seatbelt. Turn SDT ON/OFF
switch to OFF.
If finished testing all seat positions in
aircraft disconnect the SDT to prevent
EMA battery from draining, replace the
diagnostic protective cap or cover.
Otherwise, start at Step 2 for next seat
test.
AmSafe Seatbelt Airbag System
testing complete.