Do you have a question about the Aries 2081300 and is the answer not in the manual?
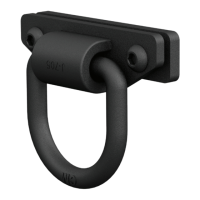
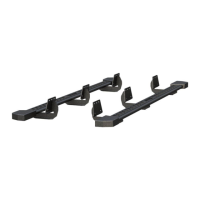
Lists components included: D-ring, button head bolts, neoprene rubber rod, and back plate.
Specifies the necessary tool for installation: an Allen wrench, M8.
Provides torque values for various bolt sizes (METRIC and SAE) crucial for secure mounting.
Advises reading instructions, using proper tools, and cleaning black finishes with mild soap.
Locate bumper slots and insert back plate into the large slot below.
Flip D-ring and insert rubber rod into the hole on its back.
Align back plate, place D-ring, secure with M12 bolts, snug but do not fully tighten. Repeat for passenger side.
Adjust and level D-ring. Tighten hardware per specs on page 1. Installation complete.
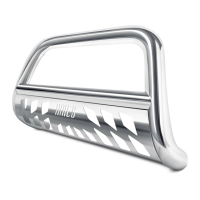
This document is an installation manual for ARIES D-rings, part number 2081300. These D-rings are designed to be installed on a vehicle's modular bumper, specifically on the driver and passenger sides. The installation is rated as "Easy" in terms of difficulty.
The ARIES D-rings serve as recovery points for a vehicle. They provide a secure attachment point for recovery straps, ropes, or chains, allowing for the safe extraction of a stuck vehicle or for other towing and recovery operations. The design includes a D-ring component and a back plate, secured with button head bolts, to ensure a robust connection to the vehicle's bumper. The inclusion of a neoprene rubber rod suggests a feature to prevent rattling or provide a snug fit, enhancing the overall user experience and product longevity.
The manual provides clear, step-by-step instructions with accompanying images for the installation process, making it user-friendly for individuals performing the installation themselves. It also includes contact information for assistance, underscoring a commitment to customer support.
| Brand | Aries |
|---|---|
| Model | 2081300 |
| Category | Automobile Accessories |
| Language | English |