Ascon Tecnologic - KX6 - ENGINEERING MANUAL - PAG. 17
]CAL group - User calibration group
This function allows to calibrate the complete measuring
chain and to compensate the errors due to:
– Sensor location;
– Sensor class (sensor errors);
– Instrument accuracy.
[87] AL.P - Adjust Low Point
Available: Always.
Range: -1999... (AH.P - 10) engineering units.
Note: The minimum difference between AL.P and AH.P is
equal to 10 Engineering Units.
[88] AL.o - Adjust Low Offset
Available: Always.
Range: -300... +300 engineering units.
[89] AH.P - Adjust High Point
Available: Always.
Range: From (AL.P + 10) to 9999 engineering units.
Note: The minimum difference between AL.P and AH.P is
equal to 10 Engineering Units.
[90] AH.o - Adjust High Offset
Available: Always.
Range: -300... +300 Engineering Units.
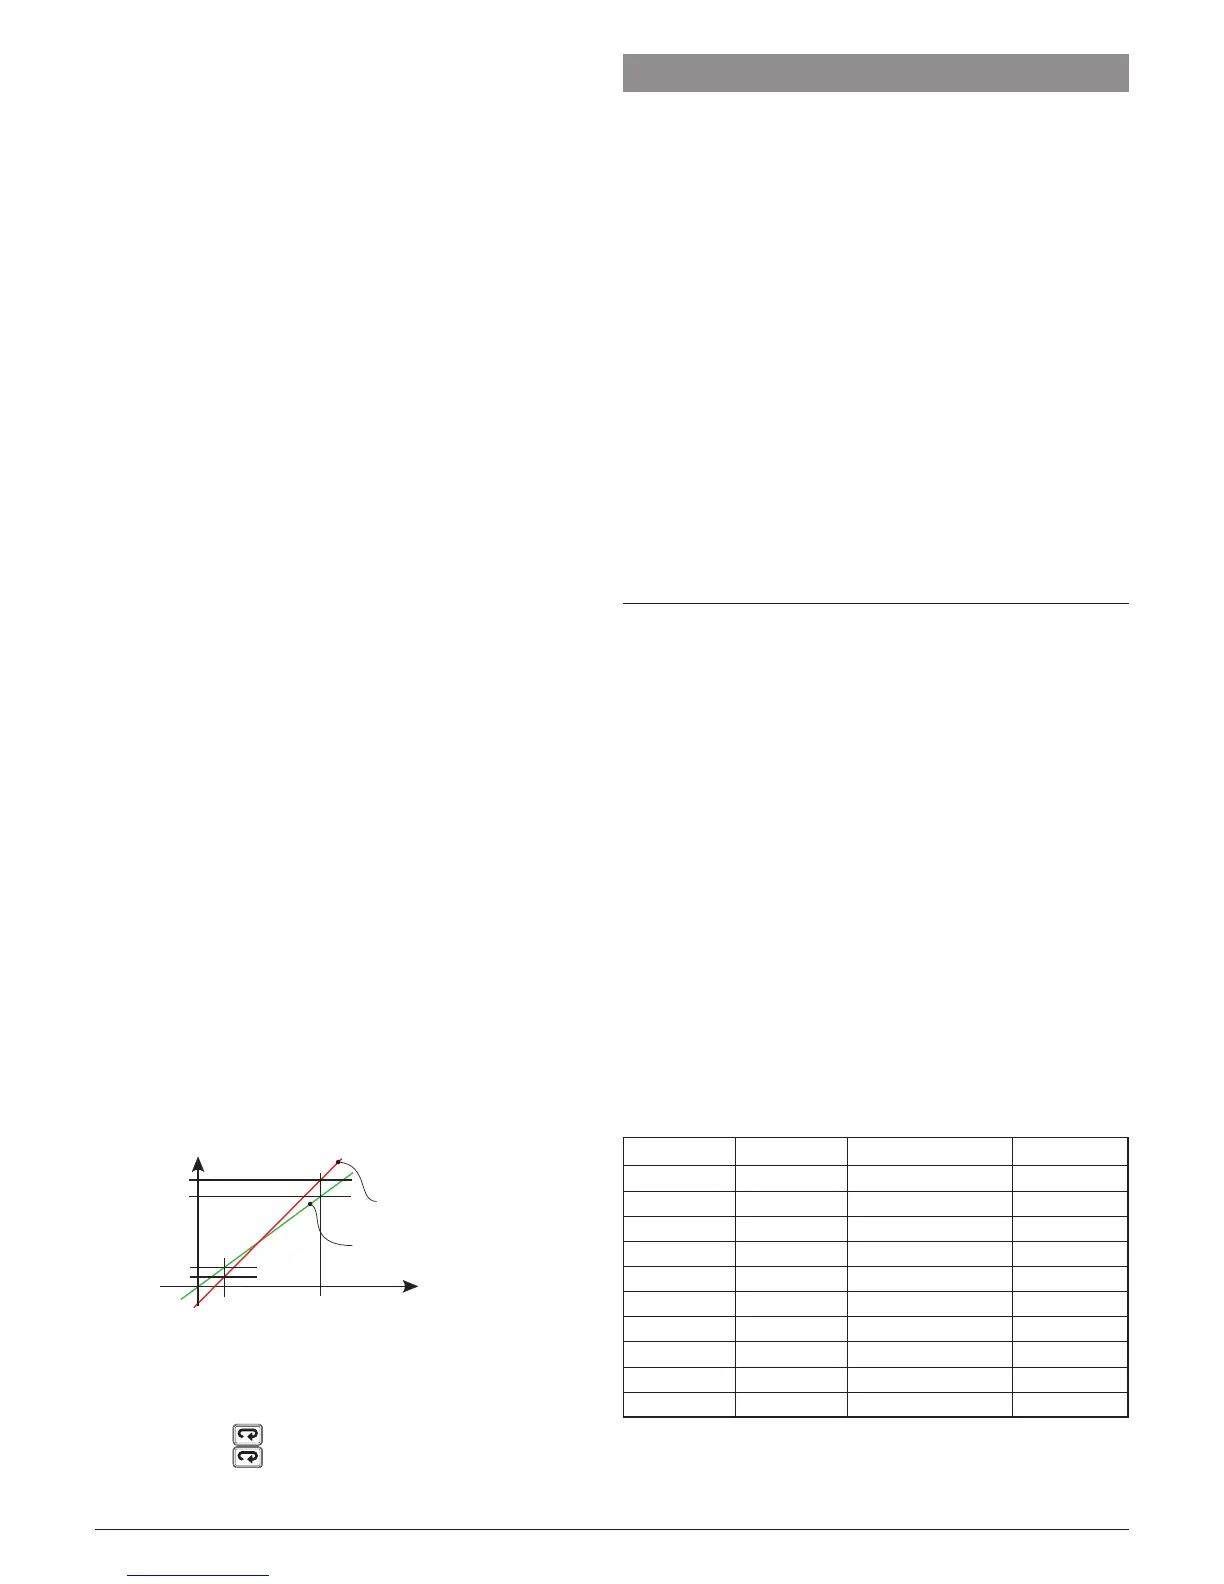
Example: Environmental chamber with an operative range:
10... 100°C.
1. Insert in the chamber a reference sensor connected with
a reference instrument (usually a calibrator).
2. Start the control of the instrument, and set a set point equal to
the minimum value of the operative range (e.g.: 10°C). When
the temperature in the chamber is steady, take note of the
temperature measured by the reference system (e.g.: 9°C).
3. Set [87] AL.P = 10 (low working point) and [88] AL.o = -1
(it is the difference between the reading of the instrument
and the reading of the reference system). Note that after
this set the measured value of the instrument is equal to
the measured value of the reference system.
4. Set a set point equal to the maximum value of the
operative range (e.g. 100°C). When the temperature
in the chamber is steady, take note of the temperature
measured by the reference system (e.g. 98°C).
5. Set [89] AH.P = 100 (low working point) and [90] AHo = +2
(it is the difference between the reading of the instrument
and the reading of the reference system). Note that after
this set the measured value of the instrument is equal to
the measured value of the reference system.
AH.P 100°C
AH.o = 2
AL.o = -1
AH.P 10°C
Real
curve
Modified
curve
The most important step of the configuration procedure is
completed.
In order to exit from configuration parameter procedure,
proceed as follows:
• Push button.
• Push button for more than 10 s. The instru-
ment will come back to the “standard display”.
7 PARAMETER PROMOTION
Another important step of the instrument configuration is due
to the possibility to create a custom HMI (interface) in order
to make the instrument easy to use for the operator and
comfortable for the assistance.
By a special procedure, named promotion, the OEM can
create two parameter subsets.
The first one is the “limited access” level. This subset is protected
by the password programmed by [73] PAS2 parameter.
The last subset is the “Operator” set (Level1). This level is
NOT password protected.
Notes: 1. The “limited access” parameter are collected in a list.
2. The sequence of the “limited access” parameters
is programmable and can be made according to
your needs.
3. The parameter sequence of the operator level is
the same programmed for “limited access” level
but only specified parameters can be displayed
and modified. This set must be create according
to your requirements.
7.1 Parameter promotion procedure
The limited access parameter set is a list, so that, before to
start promotion procedure, we suggest to operate as follows:
1. Prepare the exact parameter list you want to make
accessible for limited access.
2. Number the desired parameters in the same sequence
you want to have in the limited access.
3. Define which of the selected parameter will be available
in Operator level also.
Example: I would like to obtain the following limited access list:
• OPEr - Operative mode selection
• SP - first set point
• SP2 - Second set point
• A.SP - Set point selection
• AL1 - Alarm 1 threshold
• AL2 - Alarm 2 threshold
• Pb - Proportional band
• ti - Integral time
• td - Derivative time
• Aut.r - Manual start of the auto-tune
But I want that the operator to be able to change: the
operative mode, the SP value and the AL1 value. In this
case the promotion will be the following:
Parameter Promotion Limited Access Operator
- OPEr - o 1 OPEr OPEr
- SP - o 2 SP SP
- SP2 - A 3 SP2
- A.SP - A 4 A.SP
- AL1 - o 5 AL1 AL1
- AL2 - A 6 AL2
- Pb - A 7 Pb
- ti - A 8 ti
- td - A 9 td
- Aut.r - A 10 Aut.r