22 LM DRUM User Manual
PROGRAMMING
The LM DRUM’s programming has a hierarchy of selection. First you select the
song that you want to program, by pressing the song button (15) and using the
rst eight step/pad buttons to choose song 1 – 8. Then, within the song, select
a pattern to program by pressing the pattern button (16) and using the step/
pad buttons to select pattern 1 – 16. At this point you should also set the pattern
length and any song or pattern specic menu settings, such as probability. Finally
you can decide whether to program in step time or real time.
Step Time Programming
Step time programming can be accomplished in three ways:
Playhead Running
Having selected your song and pattern, set the pattern length and, if it is more
than sixteen steps long, switch on Auto Scroll in the length menu. Also set any
pattern or song specic parameters if you need them. Then press record and
play. The playhead will move between blocks of steps if the pattern is more than
sixteen steps long. Press record.
Select a drum using the voice select buttons (53). Note that only one drum can be
programmed at a time.
Press the Step buttons where you want the drum to sound. In the case of
drums with two sample variations (bass, closed hi-hat, ride cymbal, cabasa and
tambourine) a double press on any step means that the second variant is used,
and the step button will ash to indicate this. For the snare, where there are
three variations a third press means that the third is used, and the step button
will ash quickly. A further press will delete the drum from that step. Repeat with
other drums as required until the pattern is complete. Even if you have switched
Auto Save on in the Options sub-menu please remember to save your work
regularly in case of accident.
The metronome will sound while the playhead is running, but this can be faded
down using the Click volume slider on the mixer (55) if not required.
Playhead Stopped
Having selected your song and pattern, set the pattern length and ensure that
Auto Scroll is switched o. Press record. You can navigate through the dierent
blocks of steps using the << button (23) to go backwards and the >> button
(26) to go forwards.
Follow the same method as used in Playhead Running, but using the << and >>
buttons rather than Auto Scroll to change blocks.
SynthTribe
The SynthTribe app contains a step time sequencer where drums can be
programmed, the steps visualized as a grid and parameters set. It is possible to
upload patterns from the LM DRUM to SynthTribe and to download them from
SynthTribe to the LM DRUM.
Real Time Programming
Real time programming can be accomplished either using the Step/Pad buttons,
with a MIDI keyboard or with electronic drum pads.
As with step time programming rst select the song and pattern, set the length
if you want a pattern longer than sixteen steps, and switch Auto Scroll on. Also
set any other pattern or song parameters. If you want to PLAY to the metronome
ensure that the Click volume is raised on the mixer (55).
Use the step/pad buttons corresponding to the drums that you want to program,
or the relevant keys or pads if using an external MIDI source. As more than one
sound can be programmed at once it is possible, for example, to record bass and
snare rst, then switch to hi hats for the second loop round, and so on.
The drums are recorded with velocity as played. This can be edited by uploading
the pattern into SynthTribe, editing, then download back to the LM DRUM.
It is recommended that quantization is used on real time programming, unless
you want a loose feel.
Chromatic Programming and Playing
Pressing and holding the tap button then pressing the pads button lights up
step/pad buttons to show a keyboard. Select any of the tunable drums using the
voice select buttons, and the sounds can be played and recorded chromatically.
Use the tap button with the up and down navigation buttons to change the
octave up or down one. Exit chromatic mode by pressing the tap and pads
buttons again.
This can also be achieved using an external MIDI keyboard by switching
Chromatic MIDI on in the options sub-menu. When using an external keyboard
the chromatic voices respond to the following MIDI channels. The non-chromatic
voices will respond on whatever MIDI Rx channel is selected.
Note that the Rx channels can be changed using the SynthTribe app. Pitch values
can be edited by going into Step mode, pressing and holding a voice pad and
using button 36 to raise the pitch or 38 to lower it.
Micro Timing
Micro timing can be introduced onto any sequence step. Press the step button to
enter step mode. Then press and hold the step/pad button for the required step.
Use the left navigation button to move the step ahead of the beat; and the right
to move it behind.
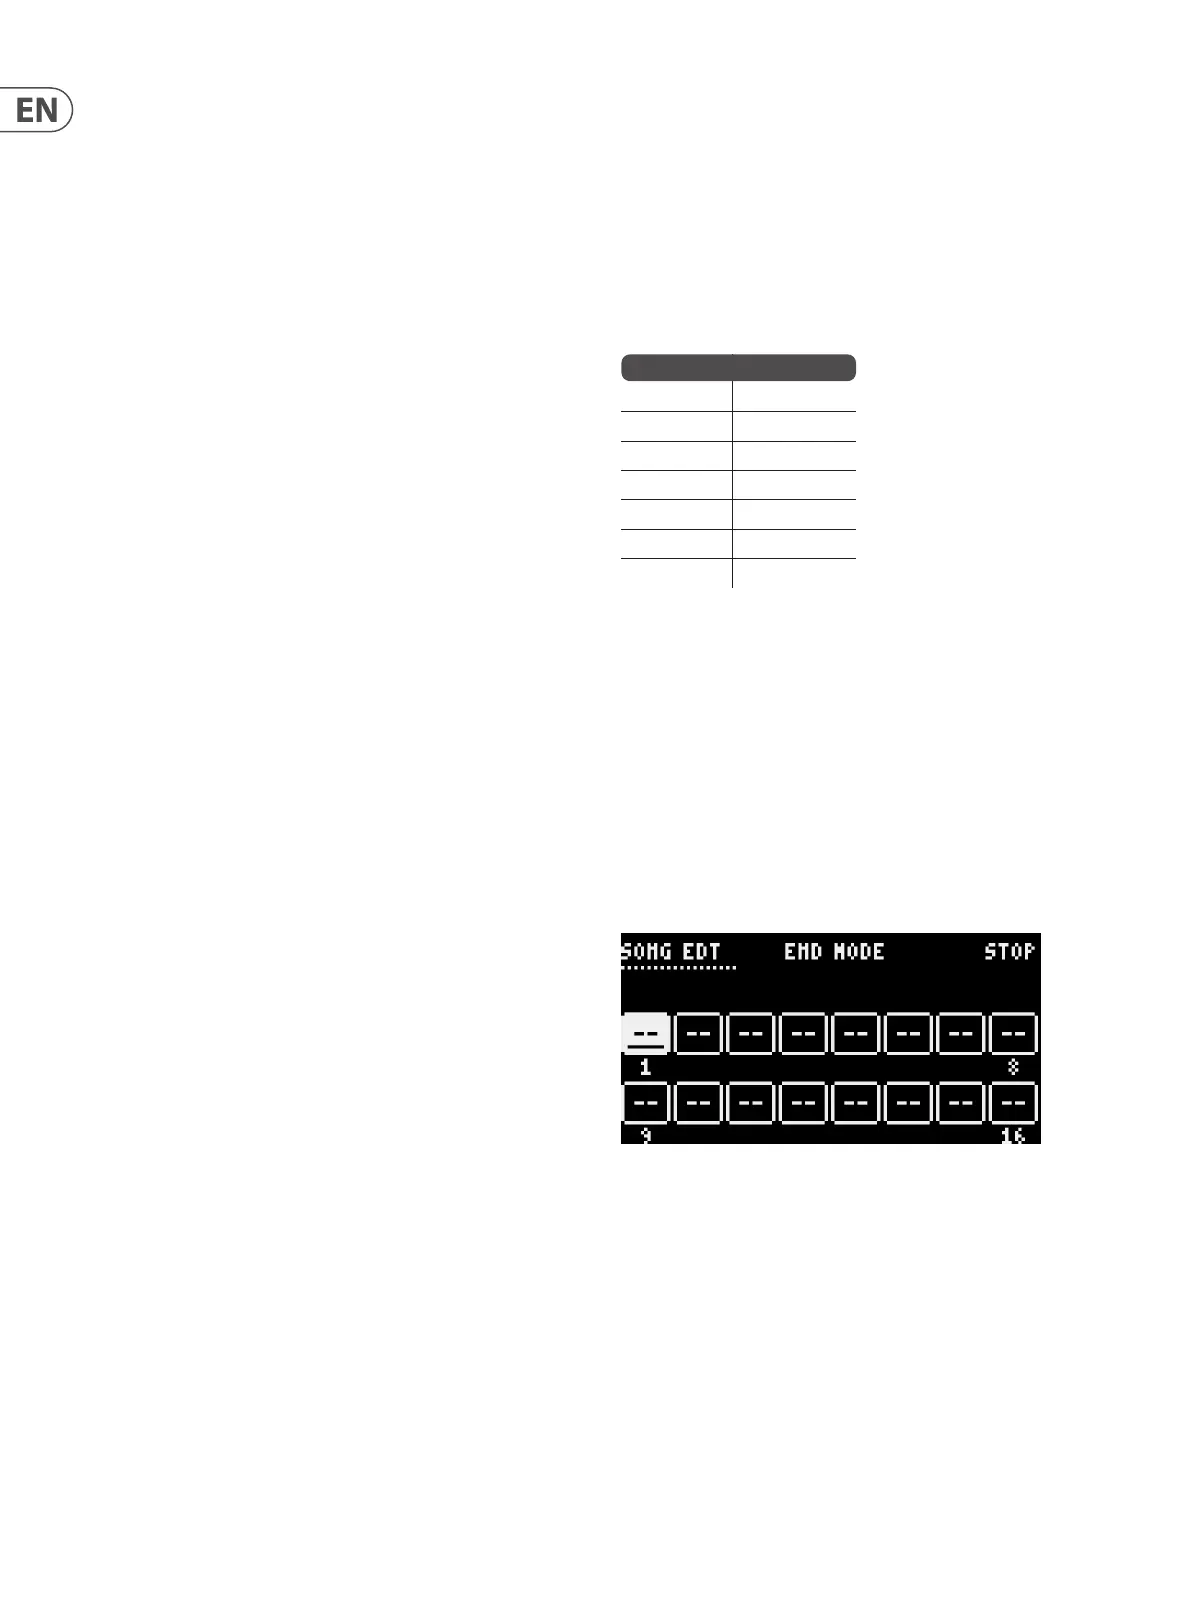
Creating a Song
Once you have programmed all of the patterns required to make up a song press
the pattern button, followed by the record button. You will see the
display change to
and the Length button start ashing. There are three End Mode options in the top
right hand corner, which can be stepped through with navigation buttons 36 and
38. The options are:
• • Stop (default) – the song will play through once and stop after
the last pattern.
• • Loop – the song will play through and loop back to the rst pattern
after the last one has played.
• • Hold – the last pattern of the song will play indenitely until the song is
manually stopped with the stop button.
The sixteen boxes each represent a pattern slot. To place a pattern into a slot
use the navigation buttons to highlight the required slot, and press the step/
pad button for the required pattern. If you have selected the wrong pattern then
simply press the button for the correct one to replace it. Patterns can also be
selected using the rate control or data control to scroll through them.
Voice Channel
Snare 1
Sidestick 2
Hi Tom 3
Mid Tom 4
Lo Tom 5
Hi Conga 6
Lo Conga 7