16
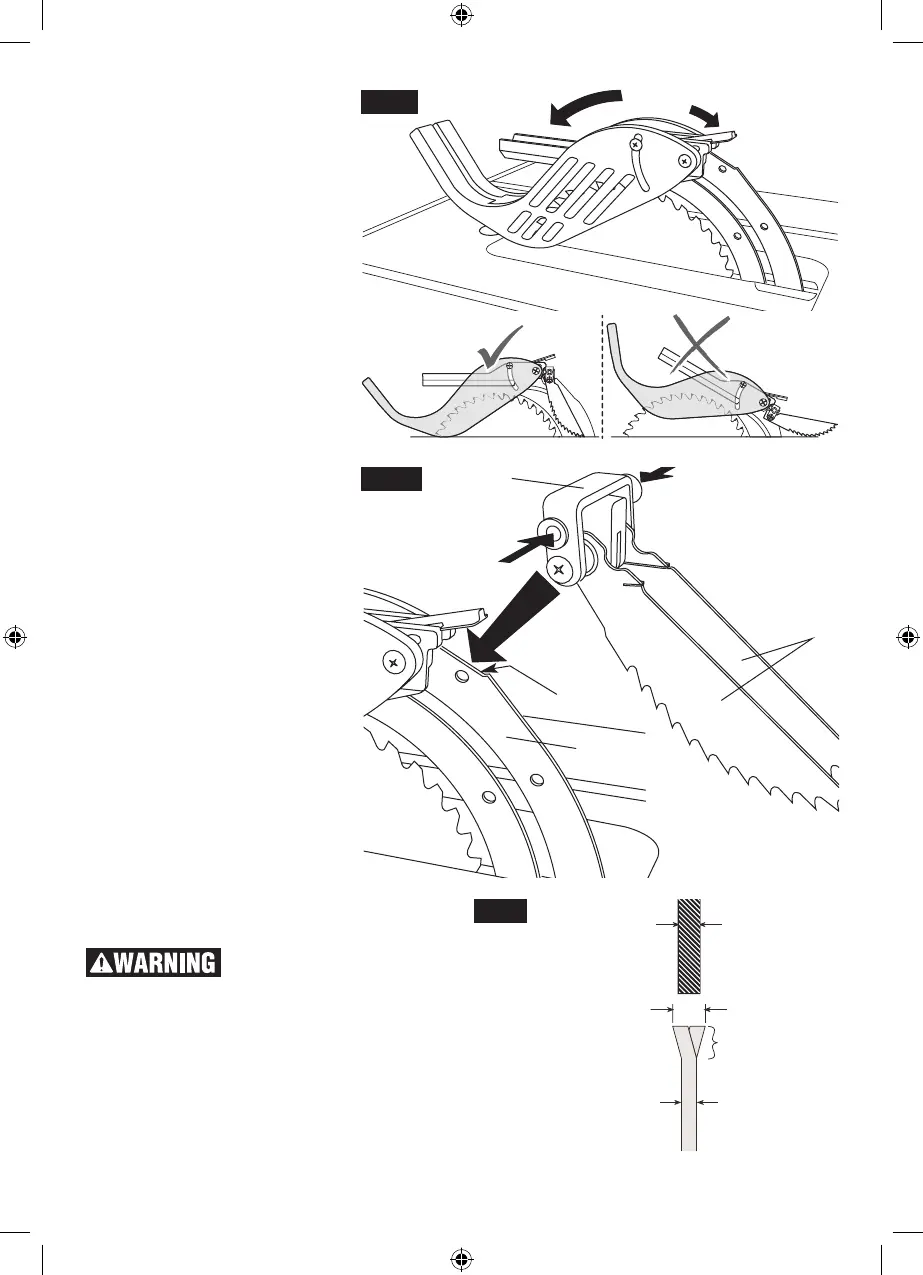
10. Lower the front of the guard as-
sembly 4 until the metal “fork” is
parallel with the table (Fig. 13).
11. Press down on the guard re-
lease lever 5 until you feel and
hear it snap into the locking po-
sition. Check that the guard as-
sembly is properly and securely
connected (Fig. 13).
ATTACHING THE
ANTI-KICKBACK PAWLS
12. Attach the Anti-Kickback Pawls
7 into the flat recessed area 8 of
the riving knife 2 (Fig. 14).
13. Squeeze the compression pads
9 while nesting the device into
the flat area (Fig. 14).
14. Release the compression pads
such that the Anti-Kickback
Pawls lock onto the riving knife
immediately behind the guard
assembly. Check that the attach-
ment pin is securely connected
into locking hole. Carefully raise
and lower the pawls 10 – when
letting go, the spring-loaded
pawls must come down and
contact the table insert (Fig. 14).
Hint: Position the Anti-Kickback
Pawls behind the flat recessed
area and slide it towards the front
until it drops into the recessed
area – then release the compres-
sion pins.
Note: The two attachments are
independent of each other, so the
Anti-Kickback Pawls can be at-
tached before the Guard Assem-
bly.
4
5
Fig. 13
SELECTING AND
CHANGING THE BLADE
To prevent personal injury,
always disconnect plug
from power source before changing blades.
USING THE CORRECT BLADE
IMPORTANT: The saw blade provided on this
tool has a carbide-tipped kerf width of .128” and
a plate (body) thickness that is .086” thick. When
looking for a replacement blade, select one with
dimensions close to the original blade. This infor-
mation may not be printed on the blades pack-
Fig. 15
.090” RIVING KNIFE
KERF WIDTH
BLADE TEETH
BLADE BODY PLATEMUST BE LESS THAN .090”
MUST BE .094” OR MORE
9
9
8
2
10
7
Fig. 14
1600A009XC 09-15.indb 16 9/14/15 1:51 PM