7
Using markers to partition tracks and create audio CDs (Disc At Once by Marker)
8.
Use [CURSOR] to move the cursor up and down and
check the list of the tracks you write.
* Audio CD standards require that a CD track be at least four
seconds long. Markers that define a CD track lasting less than
four seconds are disregarded, and do not appear in the list.
9.
Use [CURSOR] to move the cursor to “GO” and press
[ENTER].
“Write Speed” is displayed.
10.
Rotate the TIME/VALUE dial to set the write speed.
Write Speed:
x2 (352 kbps) Writes twice as fast.
x4 (704 kbps) Writes four times as fast.
x8 (1408 kbps) Writes eight times as fast.
* With some media, the range of write speeds may be limited. In
such cases, the values that can be set with the TIME/VALUE
dial may also be limited.
11.
Press [ENTER].
The message “Write Sure?” appears, then press [YES].
“Now Writing...” appears, and writing of the audio CD
begins.
* If the total time exceeds the CD-R/RW disc’s maximum
recording time, the message “CD Full!” appears, and you
cannot continue with writing. In such instances, change the
marker location (Owner’s Manual; p. 61), then carry out
Track Cut (Owner’s Manual; p. 72) or Track Erase (Owner’s
Manual; p. 73) so that the total time is within the CD-R/RW
disc’s maximum recording time.
* To quit while writing to the disc is still in progress, press
[EXIT]. When the message “Cancel?” appears, press [YES];
writing is cancelled (it may take some time after you press
[EXIT] for the message to appear). However, no guarantee can
be made for the utility of the content up to the time writing is
cancelled. Particularly with CD-R discs, note that you may be
unable to use the disc a second time.
* You cannot eject the disc while writing is in progress, even by
pressing the EJECT button.
When “Complete!” appears, the writing is finished.
12.
By continuously repeating Steps 9–11, you can write
songs to multiple CD-R/RW discs.
“Saving a song (Song Store)”; p. 80 in the Owner’s Manual
* If you want to use the Disc At Once feature from versions
prior to 2 (“Writing multiple songs all at one time (Disc At
Once)” p. 104 in the Owner’s Manual), select “BY SONG” at
Step 6. That way, songs are written to the audio CD song by
song as originally recorded, regardless of the markers used.
Assigning a CD track to an
existing marker
Even when a marker is set by pressing only [MARK] and not
[TAP], or if the marker is set in Auto Scene (p. 3), you can set
it as a CD track.
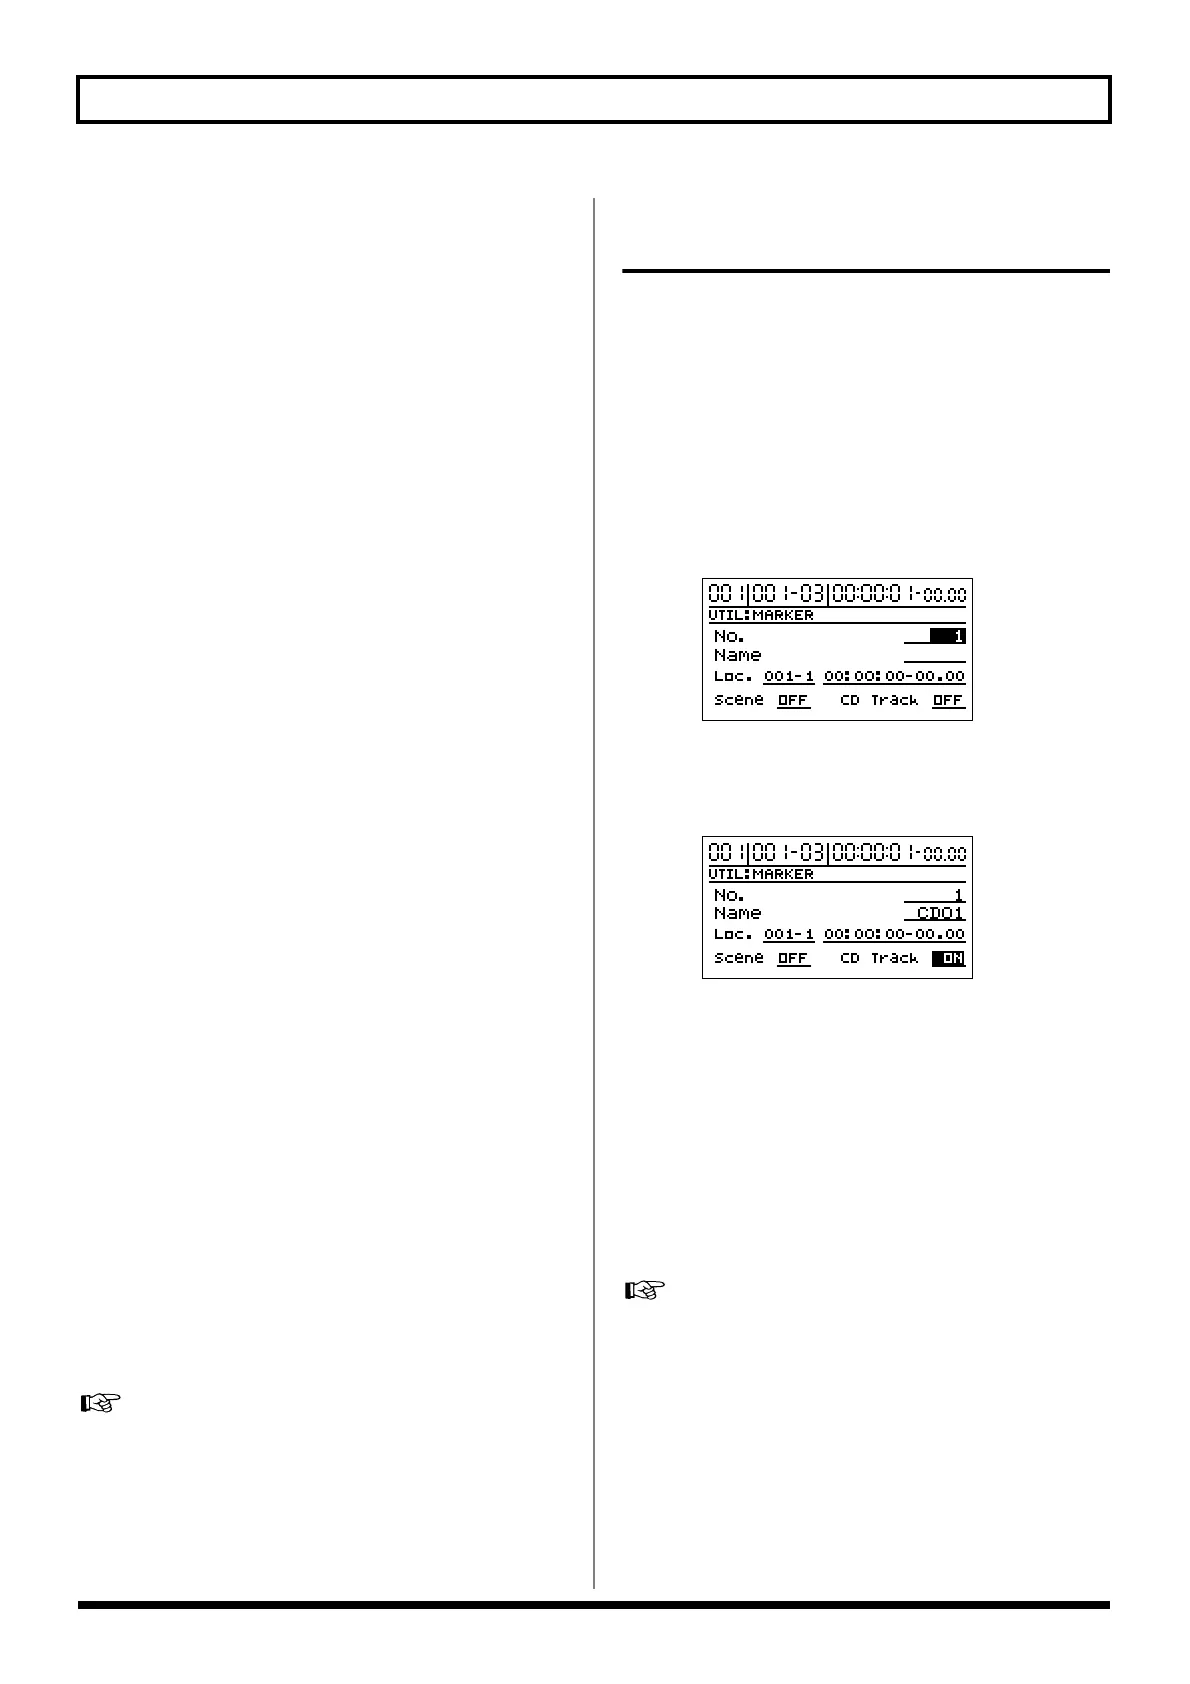
1.
Press [UTILITY], then press [CURSOR] to move the
cursor to “MARKER,” then press [ENTER].
This brings up the Marker screen.
2.
Use [CURSOR] to move the cursor to “No.” and then
select the marker number which you want to assign the
break with the TIME/VALUE dial.
fig.10
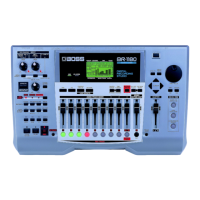
3. Press [CURSOR] to move the cursor to “CD Track,” and
switch the function to “ON” with the TIME/VALUE
dial.
fig.10
The selected marker is set as the CD track. At the same
time, the CD track number is automatically set as that
marker’s name.
* Note that if the marker is already named, that name is deleted.
* You can create a maximum of 99 CD tracks on a single audio
CD. If you attempt to create any further CD tracks, the
message “Marker Mem Full!” appears, and you cannot set the
marker.
4. Save the song to store these settings in memory.
“Saving a song (Song Store)”; p. 80 in the Owner’s Manual