How to use the drum cleaning sheet
Precaution for use: The drum cleaning sheet is supposed to be used only one time.
"Drum cleaning" appears on the LCD during the cleaning.
* Not displayed for machines in Group D.
DCP-7195DW MFC-7895DW
MFC-L2730DW MFC-L2730DWR
MFC-L2732DW MFC-L2750DW
MFC-L2750DWR MFC-L2750DWXL
MFC-L2751DW MFC-L2770DW
MFC-L2771DW
Group A
Group B
DCP-7090 DCP-7095D
DCP-7190DN DCP-B7500D
DCP-B7520DW DCP-B7530DN
DCP-B7535DW DCP-L2510D
DCP-L2510DR DCP-L2511D
DCP-L2512D DCP-L2530DW
DCP-L2530DWR DCP-L2531DW
DCP-L2532DW DCP-L2535D
DCP-L2535DW DCP-L2536D
DCP-L2537DW DCP-L2550DN
DCP-L2550DNR DCP-L2550DW
DCP-L2551DN DCP-L2551DW
DCP-L2552DN MFC-7390
MFC-7490D MFC-7890DN
MFC-B7700D MFC-B7715DW
MFC-B7720DN MFC-L2690DW
MFC-L2710DN MFC-L2710DNR
MFC-L2710DW MFC-L2710DWR
MFC-L2712DN MFC-L2712DW
MFC-L2713DW MFC-L2715D
MFC-L2715DW MFC-L2716D
MFC-L2716DW MFC-L2717DW
HL-L2390DW
Group C
HL-2590DN HL-2595DW
HL-B2050DN HL-B2080DW
HL-L2325DW HL-L2350DW
HL-L2350DWR HL-L2351DW
HL-L2352DW HL-L2357DW
HL-L2370DN HL-L2370DNR
HL-L2370DW HL-L2370DWXL
HL-L2371DN HL-L2372DN
HL-L2375DW HL-L2375DWR
HL-L2376DW HL-L2385DW
HL-L2386DW
Group D
HL-2290 HL-2295D
HL-B2000D HL-L2310D
HL-L2310DR HL-L2312D
HL-L2330D HL-L2331D
HL-L2335D HL-L2336D
1) Press .
2) Press to display [Machine Info] on the LCD and press .
3) Press to display [Parts life] on the LCD and press .
4)
Press again. [Remaining###%] (# refers to numbers) appears on the LCD.
5) Press and at the same time. "Attached the cleaning sheet.
Please refer to the included instruction." appears on the LCD.
1) Press to display [Machine Info] on the LCD and press .
2) Press to display [Parts life] on the LCD and press .
3)
Press again. [Remaining###%] (# refers to numbers) appears on the LCD.
4) Press and at the same time. "Attached the cleaning sheet.
Please refer to the included instruction." appears on the LCD.
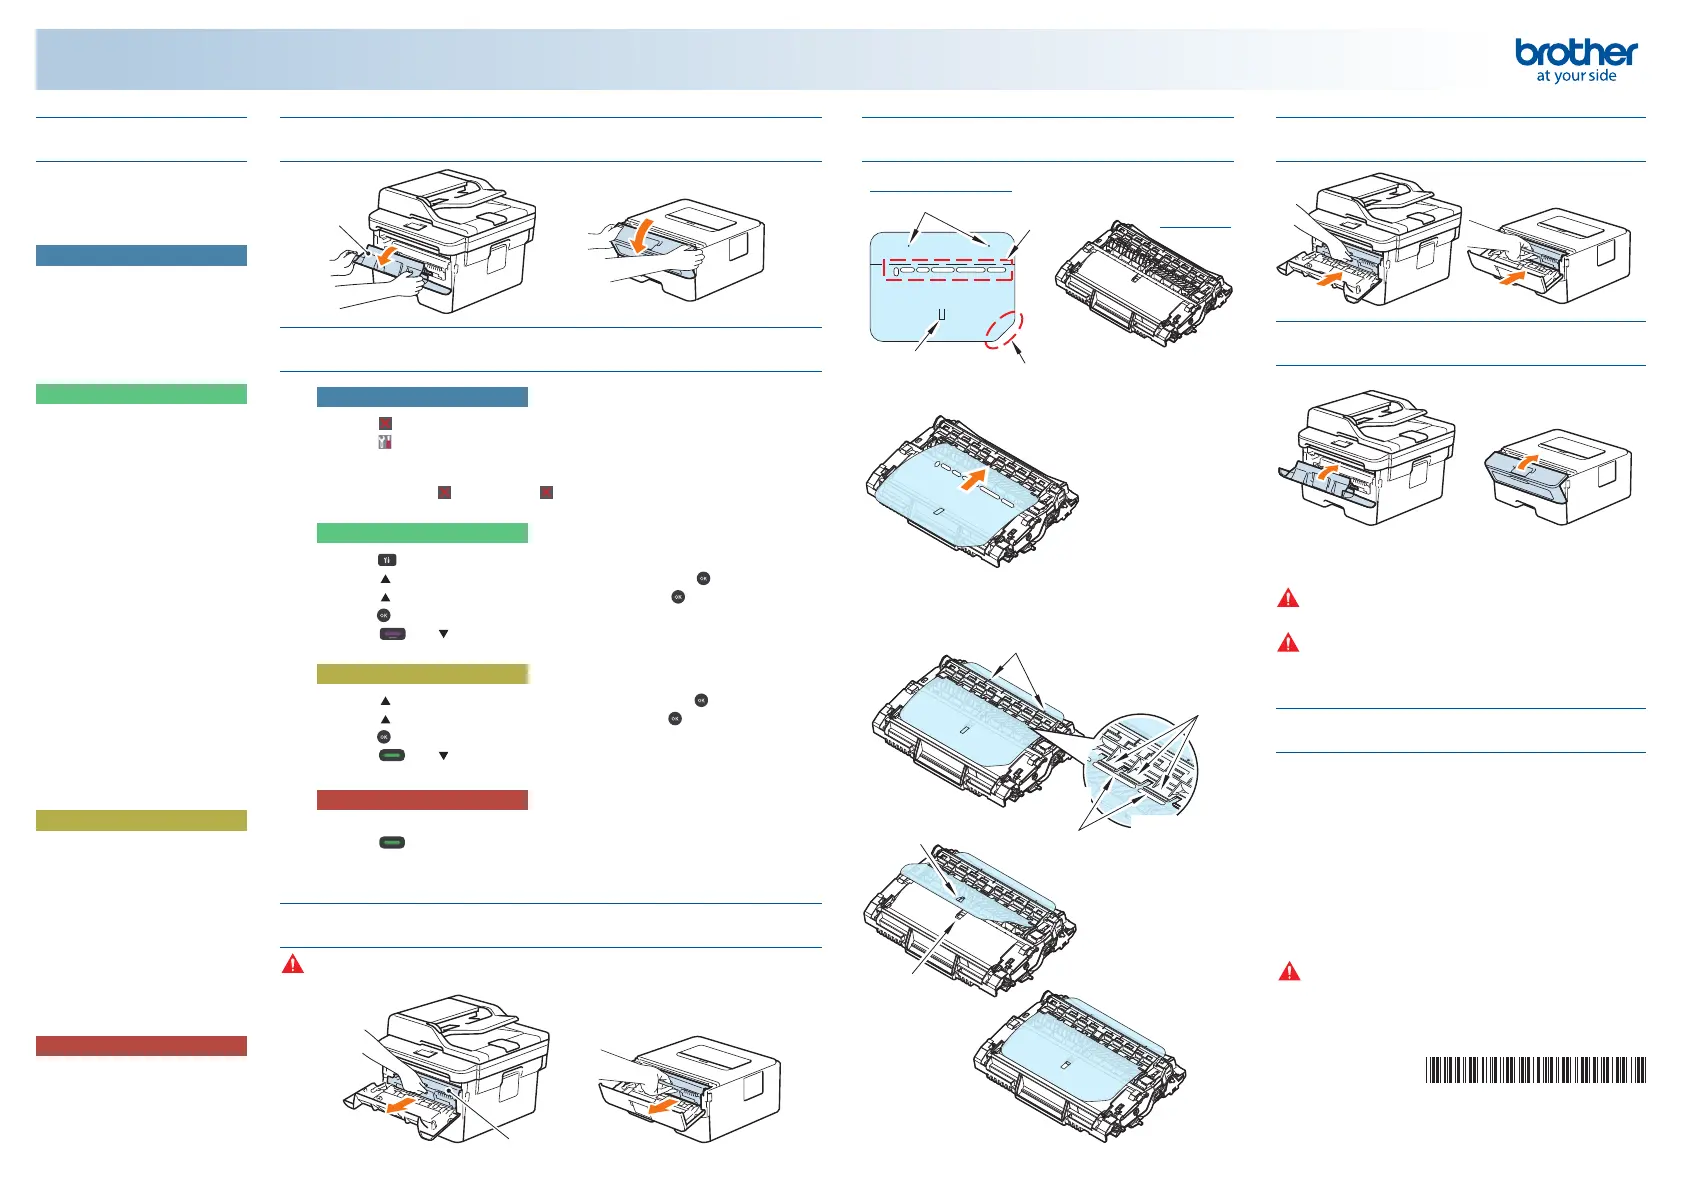
1) Open the back cover.
2) Press five times.
3) Drum LED and Ready LED flashes in turn.
4) Close the back cover.
1) Turn the drum unit
upside down and place
it as shown in the
figure on the left.
2) Insert the drum
cleaning sheet into the
drum unit. Check that
the tapered edge of the
drum cleaning sheet is
at the right bottom.
3) Push the elliptic holes
of the drum cleaning
sheet onto the guides
of the drum unit so that
the small round holes
of the drum cleaning
sheet are visible.
Toner can be scattered when the drum unit is getting removed from the machine.
Prepare a paper which may be stained on the flat surface and place the drum unit on it.
1) "Drum Cleaning completed." appears on the LCD once
the cleaning completes.
* For machines in Group D, check that the machine
stopped the cleaning.
2) Open the front cover.
3) Remove the drum unit from the machine.
4) Remove the drum cleaning sheet from the drum unit.
5) Attach the drum unit without the drum cleaning sheet
on the machine.
6) Close the front cover.
Check the product model of your
machine and look for it in the list
below to find out the group of
your machine.
1
Check the group
your machine belongs.
2
Check that the power of the machine is ON
and open the front cover.
5
Attach the drum cleaning sheet on the
drum unit.
6
Attach the drum unit on the machine.
7
Cleaning starts automatically once
the front cover is closed.
8
Remove the drum cleaning sheet
from the drum unit.
3
Follow the instruction according to the group.
4
Remove the drum unit from the machine.
Group A
Group B
Group C
Group D
Caution
Always remove the drum cleaning sheet from the drum
unit after the drum cleaning.
Paper jam error appears if the drum cleaning sheet is not
removed.
Caution
Drum cleaning takes about a minute.
Rasping sound comes out from the machine during the
cleaning but it's not faulty.
Note
Once the cleaning starts, it does not stop until the cleaning
completes successfully.
Even the cleaning stops due to an error, it starts again once
the error gets resolved.
Caution
D010SU001
4) Push the tab of the
drum cleaning sheet
onto the depressed
part of the drum unit.
(Back side of the drum unit)
Tab
Depressed part
Ready
Drum cleaning sheet
Drum unit
Tab
Small round holes
Tapered edge
Elliptic holes
Small round holes
Guides
Elliptic holes
1) Press to release the error.
2) Press > [All setting] > [Machine Info.] > [Parts life] in this order on the
touch panel.
3) [Drum###%] (# refers to numbers) appears on the LCD.
4) Press and hold , and release as soon as "Attached the cleaning sheet.
Please refer to the included instruction." appears on the LCD.
Front cover
Drum unit
Push in
Push in
5-55
Confidential
 Loading...