INDEX INSTRUMENT PANEL FEATURES
INSTRUMENT PANEL FEATURES 2
FUNCTIONS MENU 3
GETTING STARTED 4
Initial Set-up 4
AUTOTUNE 4
Tune or tune at setpoint program 5
PROPORTIONAL CYCLE-TIME 5
Cycle-time recommendations 5
SECOND AND THIRD SETPOINTS (SP2 and SP3) 5
Error messages 6
LINEAR INPUT 6
Set-up procedure 6
FUNCTION LIST 7
Level 1 7
Level 2 7
Level 3 8
Output Options Table 8
Re-transmission 8
Level 4 9
Level A 10
PROGRAMMER 11
Function overview 11
Getting started (Programmer) 12
Program run mode 12
Display functions 12
Example program 13
Function map 14
Function list 16
Memory allocation table 17
Memory full indicator 17
Programming example 18
Program edit example 18
MECHANICAL INSTALLATION 19
DIN panel cut-out 19
Mounting 19
Cleaning 19
ELECTRICAL INSTALLATION 19
Typical application 20
Input options (diagrams) 21
Output options (diagrams) 21
INPUT SENSOR SELECTION 22
Temperature sensors 22
Linear input 22
SPECIFICATION 22
SAFETY AND WARRANTY 23
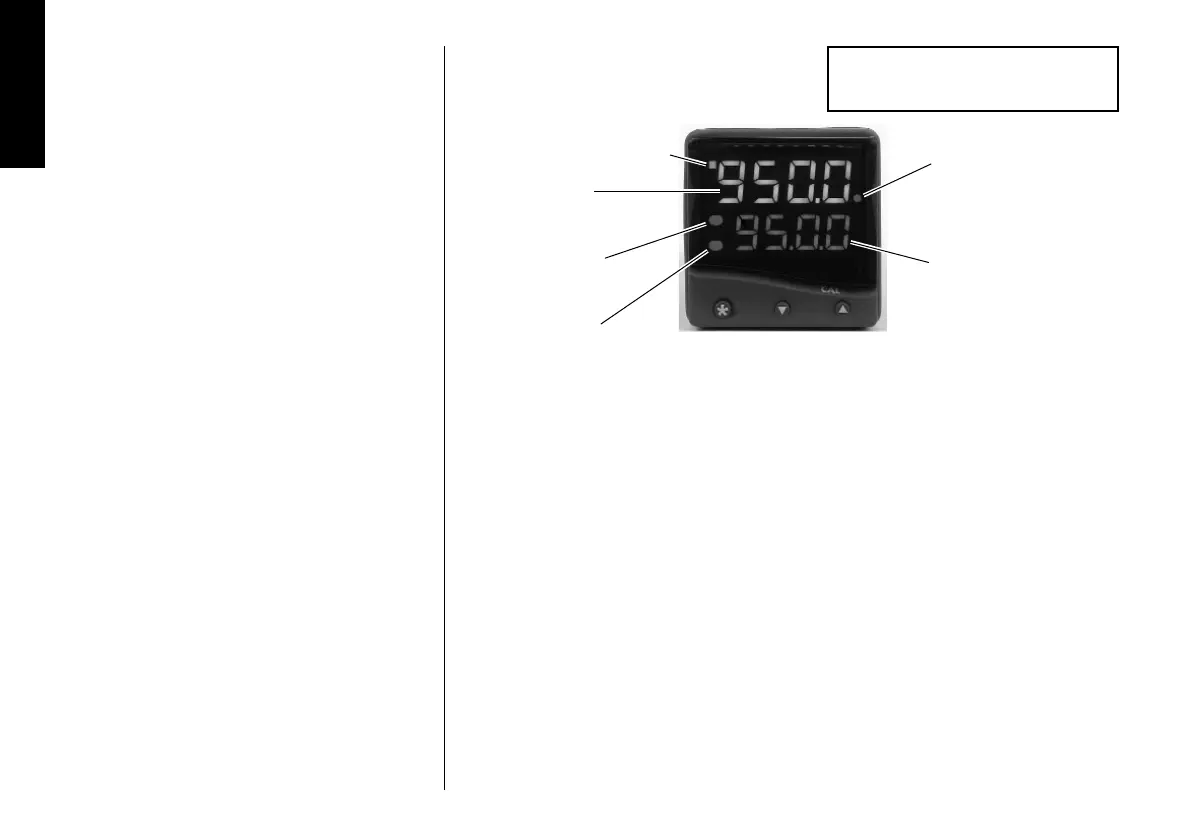
2
Right Red LED:
Program Holdback
indicator
Orange Display:
Setpoint value or
program selection
Green LED:
Setpoint 1 output indicator
Upper Red LED:
Setpoint 2 output
indicator
Lower Red LED:
Setpoint 3 output
indicator
Green Display:
Process variable or
Function/Option
ADJUSTMENTS
To enter or exit program mode: Press ▲ ▼ together for 3 seconds
To scroll through functions: Press ▲ or ▼
To change levels or options: Press ✱ ▲ together or ✱ ▼ together
To view setpoint units: Press ✱
To increase setpoint: Press ✱ ▲ together
To decrease setpoint: Press ✱ ▼ together
To reset latched alarm or tune fail: Press ▲ ▼ together briefly
To run or Hold a program: Press ✱ ▼ together for 3 seconds
Notes: If in difficulty by becoming “lost” in program mode, press ▲ and ▼ together for 3
seconds to return to display mode, check the INSTRUMENT ADJUSTMENTS above and
try again.
When in program mode, after 60 seconds of key inactivity the display will revert to
either
inPt : nonE
or, if the initial configuration has been completed, the measured
value. Any settings already completed will be retained. During Program Configuration it
is recommended that this feature is inhibited. Select
ProG StAY
in Level 4.
This page can be photocopied and
used as a visual aid and bookmark when
working in other parts of the manual.
!
English