6
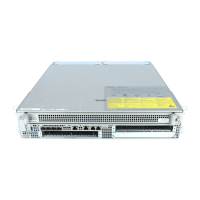
Figure 3 shows the Cisco ASR 1002 Router in a four-post rack.
Figure 3 Installing the Cisco ASR 1002 Router in a Four-Post Rack - Front and Rear Rack-Mounting
Note Because the rack-mount brackets support the weight of the entire chassis, use all the screws to fasten the two
rack-mount brackets on the chassis to the rack posts.
Note Ensure that you attach the cable-management brackets to the chassis after you install the chassis in an equipment rack.
To install the chassis in the four-post rack, complete the following steps:
Step 1 Make sure that the rack brakes are locked and the rack is stabilized.
Step 2 Mount the chassis by securing the rack-mount brackets to two posts or mounting strips in the rack using the screws
provided.
Step 3 On the chassis, ensure that all the screw fasteners on the installed components are securely tightened.
Step 4 Make sure that your path to the rack is unobstructed. If the rack is on wheels, ensure that the brakes are engaged or
that the rack is otherwise stabilized.
Step 5 Lift the chassis into position between the rack posts (requires two people).
Step 6 Align the mounting bracket holes with the rack post holes and attach the chassis to the rack. At this point, if there is a
third person, that person can insert the screws, while the other two people hold the chassis in place, unless the chassis
is resting on a shelf).
Step 7 Position the chassis such that the rack-mounting ears are flush with the mounting rails on the rack.
1
Rear rack equipment rail
3
Front rack-mount bracket ear and holes
2
Rear rack-mount bracket ear and holes
4
Front rack equipment rail
280281
ASR
10
02
sta
t
pwr
min
maj
cri
t
S
P
A
-
4
X
O
C
3
-
P
OS
ST
A
T
U
S
0
1
2
3
C
/
A
A
/
L
C
/
A
A
/
L
C
/
A
A
/
L
C
/
A
A
/
L
S
P
A
-
4
X
O
C
3
-
P
O
S
ST
A
T
U
S
0
1
2
3
C
/
A
A
/
L
C
/
A
A
/
L
C
/
A
A
/
L
C
/
A
A
/
L
S
P
A
-
4
X
O
C
3
-
P
O
S
ST
A
T
U
S
0
1
2
3
C
/
A
A
/
L
C
/
A
A
/
L
C
/
A
A
/
L
C
/
A
A
/
L
4
1
3
2