EasyManua.ls Logo

Cisco Meraki MR28 - User Manual

Cisco Meraki MR28
12 pages
Print Icon
To Next Page IconTo Next Page
Loading...
MR28 Installation Guide
The Cisco Meraki MR28 is a dual-band enterprise Wi-Fi 6 cloud-managed access point.
Package Contents
The MR28 package contains the following:
MR28 Cloud-Managed Access Point
Mount plate
Mount Kit
Wall screws, wall screw anchors, and security screws
1
Question and Answer IconNeed help?

Do you have a question about the Cisco Meraki MR28 and is the answer not in the manual?

Overview

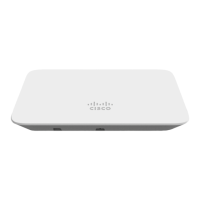
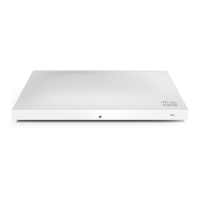
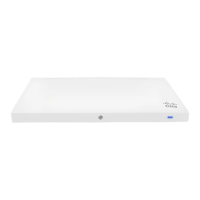
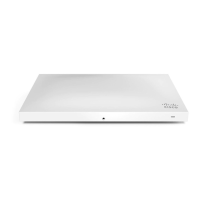
The Cisco Meraki MR28 is a dual-band enterprise Wi-Fi 6 cloud-managed access point designed for robust wireless connectivity in various environments. This device is part of the Meraki ecosystem, offering seamless integration with the Meraki dashboard for centralized management and monitoring.

Function Description

The MR28 serves as a wireless access point, providing Wi-Fi 6 (802.11ax) connectivity to client devices. It operates on both 2.4 GHz and 5 GHz bands, ensuring compatibility with a wide range of wireless devices and optimizing performance by utilizing less congested frequencies. As a cloud-managed device, its configuration, monitoring, and troubleshooting are handled remotely through the Meraki dashboard, eliminating the need for on-site controllers or extensive manual setup. This cloud-centric approach simplifies network deployment and scales easily for growing organizations. The MR28 is designed to provide reliable and high-performance wireless access, supporting various network features such as VLAN tagging, QoS, and guest access, all configurable from the cloud.

Usage Features

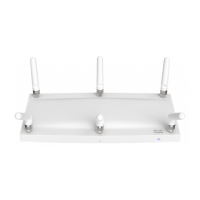
Installation and Mounting: The MR28 offers flexible mounting options to suit different deployment scenarios. It can be mounted on a wall, solid ceiling, drop ceiling, or an electrical junction box using the included mount plate and mounting kit. For desk or shelf placement, the device can simply rest on its non-scratch rubber feet, eliminating the need for the mount cradle. The installation process involves attaching the mount plate to the desired surface, then securing the MR28 to the mount cradle using a simple tab-and-screw mechanism. The mount kit includes various screws and anchors for different surface types, such as Phillips head wall mounting screws, wall screw anchors for masonry (brick, concrete), and security screws (both Phillips and Torx) to prevent accidental dislodging and theft.

Powering Options: The MR28 can be powered through several methods:

  • 802.3at PoE (Power over Ethernet): This is the primary method, allowing the device to receive both power and data over a single Ethernet cable. It can be connected to an 802.3at PoE switch or a Meraki 802.3at PoE Injector (both sold separately). The MR28 operates at full power with 802.3af PoE, indicating backward compatibility and efficient power usage.
  • AC Adapter: An optional Meraki AC Adapter (sold separately) can be used when PoE is not available or preferred. The Ethernet RJ45 port (labeled "Eth0, PoE") is a Gigabit Ethernet port, ensuring high-speed data uplink to the WAN connection.

LED Indicators and Run Dark Mode: The MR28 features a multi-color LED light on the front of the unit that conveys important information about its operational status:

  • Orange (solid): Indicates the AP is booting. A permanent orange light suggests a hardware issue.
  • Rainbow: The AP is initializing or scanning.
  • Blinking Blue: The AP is undergoing a firmware upgrade.
  • Green: The AP is in Gateway mode with no clients connected.
  • Blue: The AP is in Gateway mode with clients connected.
  • Blinking Orange: The AP cannot find an uplink connection. For enhanced security or to reduce visibility, the MR28 supports "Run Dark" mode, which disables the LED illumination. This mode can be enabled through the Meraki dashboard. A blinking green LED specifically indicates that the device is in site survey mode, useful for optimizing AP placement.

Network Configuration: Before physical installation, the MR28 needs to be configured within the Meraki dashboard. This involves:

  1. Logging into the Meraki dashboard (or creating a new account).
  2. Adding the MR28 to an existing or new network using its Meraki order number or serial number.
  3. Placing the AP on a map or floor plan view within the dashboard to visualize its location. The MR28 requires an active Internet connection for initial setup and firmware upgrades. Firewall settings must allow outgoing connections on specific ports and IP addresses to communicate with the Meraki cloud.

IP Address Assignment: Gateway MR28s (those with Ethernet connections to the LAN) require routable IP addresses, which can be assigned dynamically via DHCP or statically.

  • Dynamic Assignment (DHCP): The DHCP server can be configured to assign a static IP address for each MR28's MAC address, which is beneficial for features like 802.1X authentication that rely on static AP IP addresses.
  • Static Assignment: IP addresses can be statically assigned via the AP's local web server. This involves connecting a client machine (wirelessly or wired) to the AP, accessing the AP's built-in web server (http://my.meraki.com or http://10.128.128.128), logging in with the serial number as the username (no password), and configuring the static IP address, net mask, gateway IP address, and DNS servers on the "Uplink Configuration" tab.
  • Static IP via DHCP Reservations: An administrator can reserve static IP addresses for the MAC addresses of Meraki APs on the upstream DHCP server, avoiding individual AP configuration.

Firmware Management: The MR28 automatically checks for and performs firmware upgrades. Upon initial power-up and connection to the Internet, the LED will indicate if an upgrade is in progress (blinking orange). Once complete, the LED will turn solid green or blue. This ensures the device always runs the latest software, benefiting from new features and security enhancements.

Maintenance Features

Factory Reset: The MR28 includes a factory reset button. Pressing and holding this button for at least five seconds and then releasing it will reboot the device and restore it to its original factory settings, deleting all stored configuration information. This is useful for troubleshooting or re-purposing the device.

Security Features: Beyond the cloud-managed security aspects, the MR28 offers physical security options:

  • Security Screws: The accessory kit includes screws (Phillips and Torx) that can be used to secure the access point to the mount cradle, preventing accidental dislodging and deterring theft. The security screw hole is located on the bottom tab of the mount cradle.
  • Mount Cradle Design: The mount cradle itself is designed to securely hold the MR28, with tabs that insert into the AP's slots, making it difficult to remove without proper tools or knowledge of the release mechanism.

Troubleshooting: Basic troubleshooting involves:

  • Checking LEDs: Observing the LED indicator for its color and blinking pattern provides immediate feedback on the device's status, such as booting, upgrading, or connectivity issues.
  • Verifying Connectivity: Connecting a client device (e.g., laptop, smartphone) to the MR28 and testing internet access via a web browser confirms basic network functionality.
  • Assessing Network Coverage: Using a signal strength meter on a client device helps confirm adequate Wi-Fi coverage throughout the intended area. For more in-depth troubleshooting and information, users are directed to the MR Product Page, which serves as a comprehensive resource.

Heat Dissipation Warning: During pre-installation, it is crucial to avoid stacking powered-on MR28s on top of each other due to heat dissipation from the back of the APs during normal operation. This prevents potential heat damage to the devices.

Cisco Meraki MR28 Specifications

General IconGeneral
ModelMR28
Frequency Bands2.4 GHz and 5 GHz
Radio Chains2
Ethernet Ports1x 1 GbE
Wireless Standards802.11a/b/g/n/ac
Power over Ethernet802.3af
Mounting OptionsWall, Ceiling
MIMO2x2 MIMO

Related product manuals