NX700/NX700E
- 20 -
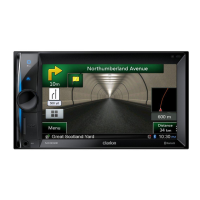
1-3. Installation of LCD (2)
No. PARTS CODE
Q'T
1. Turn the front side of
processed Escutcheon below.
2. Attach touch panel A 013-9723-00 1 * Put the touch panel
on processed Escutcheon. along the wall in Escutcheon.
* Bend Flex PWB naturally.
* Attach from the upper part
of the touch panel.
* Do not pinch Flex-PWB of
Panel PWB-B.
3. Draw out Flex-PWB of the touch panel * Do not pinch Flex-PWB
and FPC of Panel PWB-B. of the touch panel
Attach processed LCD and FPC of Panel PWB-B.
on processed Escutcheon.
WORKING DIAGRAM WORKING PROCESS WORKING POINT
A
processed
LCD
FPC of
Panel PWB-B
processed
Escutcheon
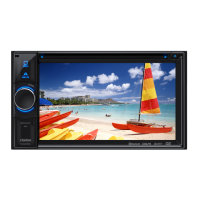
1-2. Installation of LCD (1)
No. PARTS CODE
Q'T
1. Clip the grounded tip of FPC of LCD, A 379-0478-00 1
bring LCD close to a ionaizer.
And peel off the protection sheet
slowly in the wind.
2. Peel off the spacer(B)(1) from the sheet B 347-8741-00 1 * The sticking portion(B)(1)
and stick it on LCD. (Fig.1)
3. Peel off the spacer(B)(2) from the sheet B 347-8741-00 1 * The sticking portion(B)(2)
and stick it on LCD. (Fig.1)
4. Peel off the spacer(C)(3) from the sheet C 347-8740-00 1 * The sticking portion(C)(3)
and stick it on LCD. (Fig.1)
5. Peel off the spacer(C)(4) from the sheet C 347-8740-00 1 * The sticking portion(C)(4)
and stick it on LCD. (Fig.1) * Stick it on the center of
LCD metallic frame.
WORKING DIAGRAM WORKING PROCESS WORKING POINT
(Fig.1)
A
B
B
C
C
B
1
B
2
(C)(3)
C
4
ASSEMBLY
1. Processing of Panel ASSY
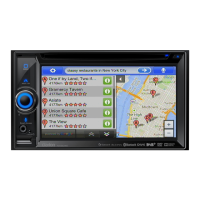
1-1. Installation of Panel PWB-B (1)
No. PARTS CODE
Q'T
1. Peel off the Double face from a sheet, A 347-8742-00 2
stick it on Escutcheon B 370-6443-00 1
and peel off the separator.
2. Fit the gate side of the badge C 378-0559-03 1 * No floating,
to the hole of Escutcheon. (NX700) bending and warping.
C 378-0559-04 1
(NX700E)
3. Attach the Reset button on Escutcheon. D 382-9177-00 1
4. Attach the IR filter on Escutcheon. E 335-8654-00 1
5. Attach the three buttons(G) F 382-9176-00 3
on Escutcheon.
6. Unlock Flex-socket of Panel PWB-B, G 039-3225-00 1
insert FPC, and lock by hand.
7. Attach Panel PWB-B
on the processed Escutcheon,
fix the pad screw. H 778-2004-01 4
8. Attach the film on Panel PWB-B. (Fig.1) I 347-8743-00 1 * Put it based on the wall
of Escutcheon.
9. Peel off the sheet key from a sheet, J 382-9175-00 1
confirm the top and bottom,
and stick it on Escutcheon.
WORKING DIAGRAM WORKING PROCESS WORKING POINT
A
C
gate side
B
D
E
F
×2
G
H
Panel PWB-B
J
(Fig.1)
I
basic line
 Loading...