TN836 High Current Digital Series AC to DC Power Supplies
MT-3/4 Radio Systems
TECHNICAL NOTES
Page 2 of 4
LMRSALES@CODANCOMMS.COM
CODANCOMMS.COMTECHNICAL NOTE:
TN836, REV 3-0-0, © Aug 2016
CANADA/US +1 250 382 8268 | TOLL FREE +1 800 664 4066
Installation
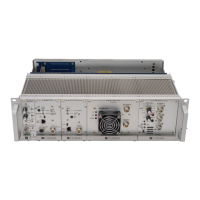
1. Mount the unit to the 19” rack.
2. Connect the positive side of the load to the “POS” busbar and the negative side of the load to the “NEG” busbar.
Tighten the busbar hardware to properly secure the wires.
3. Connect the backup battery (if applicable) positive side of the load to the “BAT” busbar, and the negative side of
the load to the “NEG” busbar. Tighten the busbar hardware to properly secure the wires.
4. Connect a chassis bonding wire to the 1/4 inch ground stud located on the back panel (if required).
5. While the switch is in the OFF position, connect the supplied AC power cord to the AC input socket.
6. Plug the unit into an AC source capable of handling the rated input current.
7. Turn the AC switch (located on the front panel) to the ON position to operate the unit.
Front Panel Control
The Front Panel Display allows the following:
• View Input Voltage and Output Current
• View and Control Output Voltage (+11.5 - +15.5 Vdc) and Current Limit (25 A - 106 A)
• Turn the DC Output On or Off
• Set and Clear a password for the front panel control, including a lockout timer (0 - 60 min.)
• View the IP address, MAC address and device name
• Reset the password, IP address and port to factory default
• Confi gure parallel mode (Master and Slave setting), number of units paralleled, or set as standalone
• Set the LVD disconnect (+10 - +12.4 Vdc) and reconnect voltage (+10.6 - +13.8 Vdc), and view battery voltage
Battery Backup
The “BAT” terminal provides a current limited charge up to the maximum rated output of the supply. When AC
fails, the load is automatically and seamlessly transferred to the battery so that the load is not interrupted. When
AC returns, the power supply picks up the load, and resumes charging the battery to an optimal state of charge.
A built-in Low Voltage Disconnect (LVD) protects the battery voltage from dropping too low, thereby avoiding
damage to the battery.
AC Power Cords
The 50 Amp Power supply requires a NEMA 5-15 (15 Amp) socket for the power cord.
The 100 Amp Power supply requires a NEMA 5-20 (20 Amp) socket for the power cord.