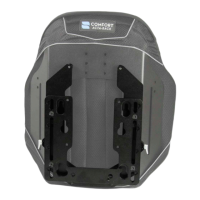
The device described in this manual is the Compass® Power Mount Hardware from Comfort Company, designed for use with all Acta-Series back supports.
Function Description
The Compass® Power Mount Hardware serves as a crucial interface, connecting Comfort Company back supports to specific power wheelchairs. Its primary function is to provide stable and adjustable support for users with various rehabilitation needs, enhancing their daily function and comfort. The hardware allows for on-the-spot height adjustments of the back support while the user remains seated, and it integrates with the adjustable support systems of Acta-Series back supports.
The Acta-Series back supports themselves offer a range of positioning features. Acta-Back® and Acta-Embrace® models utilize patented Moldable Support Stays, which can be shaped to accommodate individual user needs and deformities, providing even pressure distribution and encouraging proper positioning. These models also feature adjustable wings that can be repositioned for height, medial-lateral adjustments, or rotation to achieve optimal lateral support, including 3-point lateral support. Acta-Relief™ models incorporate Boa® Technology, a closure system that allows users to easily adjust tension in cables to conform to their shape, open up the chest cavity, improve line of sight, and increase comfort and stability. The lowest Boa® cable is ideally positioned at the user's PSIS to capture the pelvis, with subsequent cables supporting the lumbar region and upper back as needed.
Important Technical Specifications
Compatibility:
- Power Chairs:
- Permobil®: M400 Corpus®, M300 Corpus®, C350 Corpus®, F3 Corpus®, F5 Corpus® (with Corpus® 3G Seating System).
- Quickie®: QM-710™ SC, QM-710™ MPC, QM-715™ HD MPC, QM-720™ MPD, PULSE™ 6 SC, PULSE™ 6 MPC (with 3.7 Power Recline Seating System).
- Quantum®: Q6 Edge®, Q6 Edge® X, Rival® (with TRU-Balance® 3 Seating System). Note: A Recessed Planar Interface Plate must be installed on the chair.
- Rovi®: X3 (with Motion Concepts Seating System). Note: A Recessed Planar Interface Plate must be installed on the chair.
- Back Supports: All Acta-Series back supports, including Acta-Relief™™, Acta-Back®, and Acta-Embrace® models.
- Fastener Torque: Unless otherwise specified, fasteners should be tightened to 9.6 Nm (85 lb-in).
Seat Depth Used (distance from base mounting plate to rear face of back support shell):
- Acta-Relief™™: Requires at least a 1" spacer, resulting in 2" of seat depth (standard configuration). Additional 1" or 2" spacers can be combined to increase immersion, leading to 2.356" (6.0 cm), 3.356" (8.5 cm), or 4.356" (11.1 cm) seat depth. An extra track spacer for head support clearance adds 0.356" (0.9 cm) of seat depth.
- Acta-Back® & Acta-Embrace®: Requires four spacers, resulting in 1.5" (3.6 cm) of seat depth.
Back Gap (manufacturer recommended dimension from seat base to bottom edge of back support):
- Quantum® (Without Recline): 3" (7.6 cm)
- Quantum® (With Recline): 7" (17.8 cm)
- Permobil®: 6" (15.2 cm)
- Quickie®: 7" (17.8 cm)
- Rovi® (Tilt Systems): 4" (10.2 cm)
- Rovi® (Recline Systems): 6" (15.2 cm)
Height Adjustment: Available height adjustment range after recommended back gap is in 1/2" increments.
Materials:
- Back Support Covers: All fabrics are latex-free.
- COMFORT-TEK™ fabric: Fluid-resistant, easily cleaned, soft, stretchy, helps alleviate pressure.
- STRETCH-AIR™ fabric: Airy, breathable, superior stretch, provides heat dissipation, multi-directional stretch for pressure relief.
- Foam: Varying foam materials in different levels of thicknesses, elasticity, and firmness for optimal comfort, immersion, conforming, and pressure redistribution.
Usage Features
Installation and Setup:
- The Compass® Power Mount Hardware typically comes pre-assembled and attached to the back support.
- Mounting Bracket Setup: The mounting bracket orientation (Side A for Quantum®, Quickie®, Rovi®; Side B for Permobil®) must match the power chair. Male tracks with notches indicate the correct side. If switching orientation, four flat head screws are unscrewed, male tracks are moved, and screws are reassembled evenly.
- Track Alignment: Male tracks should slide easily into female tracks. If binding occurs, eight screws in the track assembly can be gently loosened and then tightened in a specific order (1-8) until smooth operation is achieved.
- Attaching to Power Chair:
- Quantum®/Permobil®: Threaded knob is removed, pegs on the mounting bracket are aligned with the power chair's base mounting plate, and the knob is re-inserted and tightened.
- Rovi®: Back support is aligned, four countersunk holes are marked and drilled, then longer flat head screws and lock nuts are used to fasten.
- Quickie®: Four countersunk holes on the mounting bracket are aligned with threaded holes on the base mounting plate and fastened with 12mm flat head screws. For Quickie® 20W & up, adapter plates are used, aligning their countersunk holes with the base plate, then the mounting bracket is aligned with the adapter plates.
- Back Support Assembly: Release levers on the hardware assembly are flipped open, female tracks are aligned with male tracks on the mounting bracket, and the assembly slides down. Once in desired position, levers are closed and will click into place. Set screws on the release levers are then turned to lock them.
- Back Support Adjustments:
- Moldable Support Stays (Acta-Back® & Acta-Embrace®): Stays are removed from inner pockets, molded by hand or on a firm surface (black end is bottom), and reinstalled to fill gaps, accommodate rotation, or provide positioning.
- Adjusting Wings (Acta-Embrace®): Wings are attached to the anterior side of the shell. Fasteners are loosened for height, medial-lateral adjustments, or rotation. Additional slots allow for greater range of adjustment. Wings can be flipped for different orientations or additional wings added for 3-point lateral support.
- Boa® Closure System (Acta-Relief™™): Reels are pulled to release tension, allowing the user to sink into the back support. Reels are pushed in to engage the system, then turned to achieve desired shape, with cables conforming to the user and providing even pressure.
Maintenance Features
Inspection:
- All components should be inspected monthly.
- Hardware fasteners should be checked and tightened regularly.
- Materials should be inspected for wear (stretching, fraying, fractures, bends). Excessive wear requires contacting customer service for repair or replacement.
Cleaning and Lubricating Tracks:
- Release levers are opened, and the back support is slid apart from the mounting bracket.
- A clean, dry cloth is used to wipe debris from male and female tracks.
- A light lubricant is applied to the inside edges of female tracks with a cloth or cotton swab.
- The mounting bracket and back support assembly are slid back together, and the tracks are run the full length to spread the lubricant.
- The back support height is reset, and release levers are closed.
Back Support Cleaning (Covers):
- Surface Cleaning (COMFORT-TEK™ fabric only): Spray with common household or commercial antibacterial cleansers or disinfectants. Wipe with a damp, water-only cloth after disinfecting and let dry before use.
- Complete Cleaning (All fabrics): Unzip cover, remove foam and moldable stays. Remove cover from back support shell. Machine wash cover with common laundry detergents. Air dry when possible. Hand wash is also an option. Do not steam clean, autoclave, tumble dry high, or iron. Avoid washing covers with Stretch-Air™™, mesh fabric, or GlideWear® with hook and loop fasteners or other materials that could snag the fabric.
- Disinfecting (All fabrics): Unzip cover, remove foam and moldable stays. Remove cover from back support shell. Wash cover with water and bleach, followed by a thorough rinse. Air dry.
- Foam: Soiled foams should be replaced. Remove cover, dab foam with a water-only cloth, and let dry before replacing. Do not submerge foam in any liquid or use contaminated foam with multiple users. Air dry only. Avoid prolonged exposure to light to prevent discoloration.
Storage:
- Store assembly or individual parts in a clean, dry place at room temperature, away from extreme hot or cold temperatures.
- Avoid direct sunlight exposure for prolonged periods to prevent aging and decreased effectiveness.
- Do not store near open flame or spark.
Reuse:
- The back support must be re-fitted to a new user or after extended periods of non-use by the same user, following setup and adjustment procedures.
- Before transferring to a new user, the back support must be completely cleaned and disinfected.
Disposal:
- Contact local authorities for regulations on proper disposal of the product and its components.
- Do not incinerate.
Warranty:
- Covered by Comfort Company Lifetime Guarantee.
- Manufacturing defects will result in replacement at no cost.
- Wear from regular use is not considered a manufacturing defect; replacement parts are available through customer service or suppliers.
- Alterations or defects from irregular use void the warranty.
- Warranty claims are filed by the original purchaser through their DME Supplier, Distributor, or Retailer. An RMA (Return Merchandise Authorization) is required for processing.