2) Connect the electronic unit to the textile unit by
pressing the snap buttons together. Pay attention
to the correct direction of assembly: the dash of the
ignition switch symbol must be positioned towards
the face as shown.
a.We recommend to exert a moderate pression, on one
side rst and then on the other side of the unit, while
putting the connection clips together.
When using the CMF9TXM13 or CMF9TXM14 strap,
rst connect the three snaps on one side and then refer
to point 3) for dressing.
Note: For a correct electronic connection both
automatic buttons need to be well in contact with each-
other (when you connect the snaps correctly you will
hear a distinctive fastening clicking noise).
It is also recommended to keep the snaps clean, clear
of dust and other agents, in order to have a good
electric connection between the metallic terminals.
3) Have the garment (textile unit) worn by the infant.
When using the CMF9TXM13 belt, rst clip on the
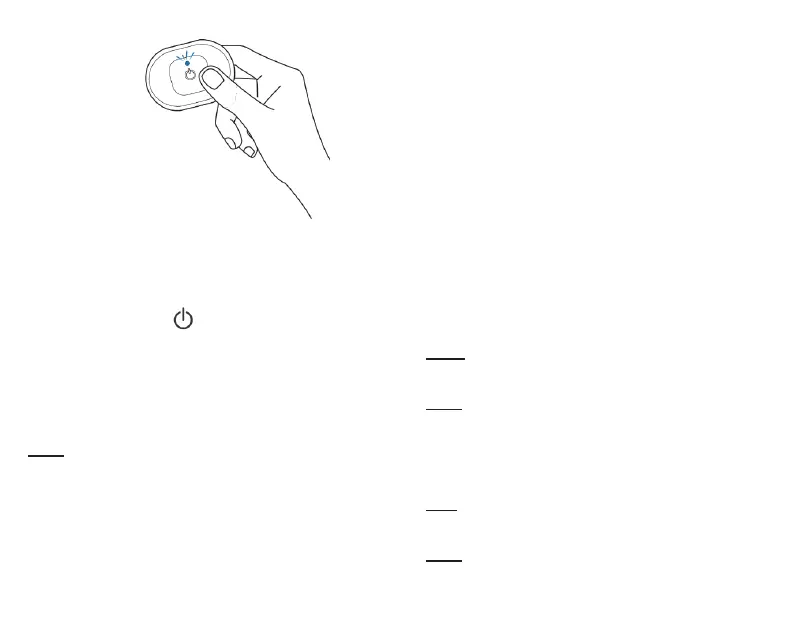
Figure 5.
Switching on HOWDY BABY electronic unit
Blue ashing LED light
three snaps on one side, then pass the band around
the newborn’s chest and clip on the other two snaps,
taking care not to put pressure on the newborn
and positioning the electronics below the pectorals.
When using the CMF9TXM14 belt, rst clip on the
three snaps on one side, then pass the belt around
the newborn’s chest and clip on the other two snaps,
taking care not to put pressure on the newborn and
positioning the electronics on the newborn’s back.
4) Make sure that the textile sensors inside the garment
are well in contact with the body and always below the
chest;
o you can test it inserting a nger inside the garment
and smoothing the sensors out, avoiding creases and
turn-ups;
o If a sensor rolls up or loses contact with the body, you
just need to put the sensor in contact with the skin again
and wait for a few seconds;
Note: the sensors are more eective if the skin is clean;
grease and dust in the contact area could interfere with
the radio signal.
Note: the sensors are more eective if slightly moisten
with water. Sweat could also be an adjuvant for the
quality of the electrode-skin interface.
5) Start monitoring (as per instructions in the next
paragraph)
Note: After removing the electronic unit, put it on the
charging mat and check that it is charging correctly
(LED light on the charging unit will switch ON).
Note: The textile unit can be comfortably worn even
without the electronic unit (in this case the monitoring
will not work) to be ready when necessary.
35