MODEL 2200
www.comtecltd.com For Kasco Corp use only.
7
6. DO NOT turn the thumb screw below the lower die half clockwise to lock die
half in position, yet.
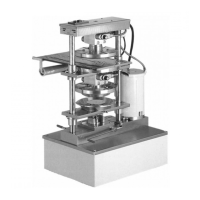
7. Insert pocket of upper die half into hub at heater assembly. Using the supplied
hex head wrench, turn wrench to secure die so that it is approximately aligned with
the lower die half. The hex head wrench fits into the opening located in the panel
on top of Press. The die must be “snug” but not overly tight to assure good heat
conduction. (See Figure 6)
Figure 6 Installing Upper Die Half
8. Thread the die alignment bolt into the corresponding hole on upper die half.
Tighten the die alignment bolt until it is completely threaded into the upper die
half.
9. Switch Power On.
10. USING TWO HANDS, ONE HAND ON EACH LEVER, push both levers
down simultaneously to bring the travel plate up. Repeat 3 or 4 times to allow the
die alignment bolt to align the two die halves. If the lower die half binds on the
alignment bolt, release the press handles immediately and check that the alignment
bolt is not bent and that it is completely seated in the upper die half. Check to see if
the dies close fully. If your die is equipped with a damming ring on the upper die
half, the damming ring on the upper die half will move 1/8 inch (3 mm) or more
when the dies close fully. If the dies do not close fully, bring the travel plate down
(release both levers) and carry out the procedures on page 9 (If The Dies Do Not
Close Fully).