63
1. Wireless Settings
You can switch between normal ash and wireless ash. For
normal ash shooting, be sure to set the wireless setting to OFF.
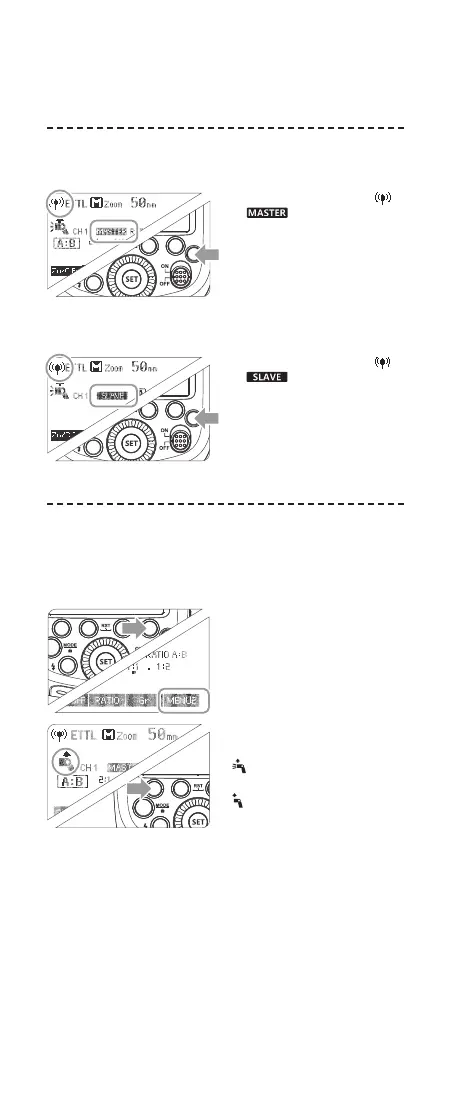
Master Unit Setting
Press <R> button so that < >
or < > are displayed on
the LCD panel.
Slave Unit Setting
Press <R> button so that <
>
or < > are displayed on
the LCD panel.
2. Master Unit’s Flash OFF
When the master unit is set to OFF, only the slave units will re
a ash.
1
Press Function Button 4 so
that < MENU2 > is displayed
on the LCD panel.
2
Press Function Button 1
< ON/OFF > to control the
ON/OFF of the master unit.
<
> : The master unit ash
ring is ON.
<
> : The master unit ash
ring is OFF.
• Even if the master unit ash
ring is disabled, it still res a
preash to transmit wireless
signals.
Wireless shooting using radio transmission has advantages over
wireless shooting using optic transmission, such as being less affected
by obstacles, and not having to point the slave unit’s wireless sensor
toward the master unit. The main functional differences are as follows:
Function
Distance
Channel
A/B/C Power
To be Disturbed
Group
Radio Transmission
100m
1~32
OFF, 1/128~1/1
Hard
A/B/C/D/E
Optic Transmission
15m
1~4
1/128~1/1
Easy
A/B/C
● There are four flash modes in this wireless radio transmission:
TTL, M, Multi and Gr. Choose one of those modes by pressing
the MODE Button.
A
C
D
Ceiling
Manual flash
B
Auto external
flash metering
E-TTL II
E
* The flash mode settings are indicated only as an example
● Shooting with a Different Flash Mode set for Each Group
Manual flash
Manual flash
MENU2
Slave Unit Setting
Master Unit Setting
Press < > button so that < >
or < > are displayed on
the LCD panel.
Press < > button so that < >
or < > are displayed on
the LCD panel.
2. Master Unit’s Flash OFF
When the master unit is set to OFF, only the slave units will fire a
flash.
Press Function Button 4 so
1 that < > is displayed
on the LCD panel.
Press Function Button 1
2 < > to control the
ON/OFF of the master unit.
< >:The master unit flash
firing is ON.
< >:The master unit flash
firing is OFF.
● Even if the master unit
flash firing is disabled, it
still fires a preflash to
transmit wireless signals.
ON/OFF
1. Wireless Settings
You can switch between normal flash and wireless flash. For normal
flash shooting, be sure to set the wireless setting to OFF.
- 55 -
- 56 -
R
R
Wireless shooting using radio transmission has advantages over
wireless shooting using optic transmission, such as being less affected
by obstacles, and not having to point the slave unit’s wireless sensor
toward the master unit. The main functional differences are as follows:
Function
Distance
Channel
A/B/C Power
To be Disturbed
Group
Radio Transmission
100m
1~32
OFF, 1/128~1/1
Hard
A/B/C/D/E
Optic Transmission
15m
1~4
1/128~1/1
Easy
A/B/C
● There are four flash modes in this wireless radio transmission:
TTL, M, Multi and Gr. Choose one of those modes by pressing
the MODE Button.
A
C
D
Ceiling
Manual flash
B
Auto external
flash metering
E-TTL II
E
* The flash mode settings are indicated only as an example
● Shooting with a Different Flash Mode set for Each Group
Manual flash
Manual flash
MENU2
Slave Unit Setting
Master Unit Setting
Press < > button so that < >
or < > are displayed on
the LCD panel.
Press < > button so that < >
or < > are displayed on
the LCD panel.
2. Master Unit’s Flash OFF
When the master unit is set to OFF, only the slave units will fire a
flash.
Press Function Button 4 so
1 that < > is displayed
on the LCD panel.
Press Function Button 1
2 < > to control the
ON/OFF of the master unit.
< >:The master unit flash
firing is ON.
< >:The master unit flash
firing is OFF.
● Even if the master unit
flash firing is disabled, it
still fires a preflash to
transmit wireless signals.
ON/OFF
1. Wireless Settings
You can switch between normal flash and wireless flash. For normal
flash shooting, be sure to set the wireless setting to OFF.
- 55 -
- 56 -
R
R
616x0_CUlight_FR60X_BDA_Canon englisch.indd 63 24.10.2016 13:55:45