64
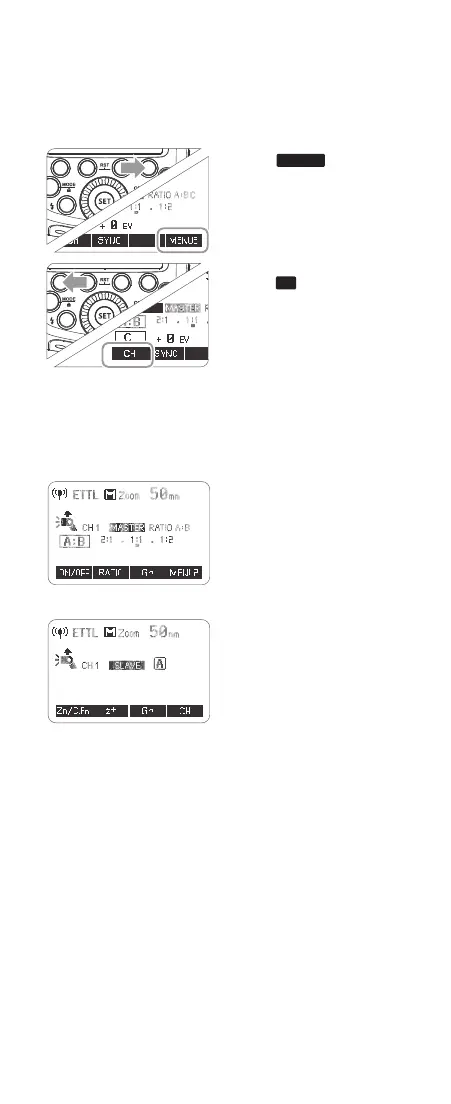
3. Setting the Communication Channel
If there are other wireless ash systems nearby, you can change
the channel IDs to prevent signal interference. The channel IDs
of the master unit and the slave unit(s) must be set to the same.
1
Press Function Button 4 so
that <
MENU3
> is displayed
on the LCD panel.
2
Press Function Button 1 so
that <
CH
> is displayed on
the LCD panel. Turn the Se-
lect Dial to choose a channel
ID from 1 to 4.
3
Press the < SET > button to
conrm.
4. ETTL Fully Automatic Wireless
Flash Shooting
Using Automatic Wireless Flash with a Single Slave Unit
1
Master Unit Setting
• Attach a CUlight FR 60C
camera ash on the camera
and set it as the master
unit.
• As a master unit, CUlight
FR 60C can control e.g.
CUlight FR 60C oder CU-
light RR 500C via wireless.
2
Slave Unit Setting
• Set the other camera ash
as the wireless slave Unit.
• As a slave unit, the CUlight
FR 60C can receive wire-
less signals of CUlight FR
60C or CUlight RT 500C.
3
Check the communication
channel.
• If the master unit and slave
unit(s) are set to a different
channel, set them to the
same channel. (This side)
4
Position the camera and
ashes.
• Position the camera and
ashes as the picture
shows. (Page 61)
5
Set the master unit’s ash
mode to < ETTL >.
• Set the master unit’s ash
mode to < ETTL >.
• For shooting, < ETTL > will
automatically be set for the
slave unit.
• Set the master unit ash
ring as ON to re a ash.
3. Setting the Communication Channel
If there are other wireless flash systems nearby, you can change the
channel IDs to prevent signal interference. The channel IDs of the
master unit and the slave unit(s) must be set to the same.
Press Function Button 4 so
1 that < > is displayed
on the LCD panel.
Press Function Button 1 so
2 that < > is displayed
on the LCD panel. Turn the
Select Dial to choose a
channel ID from 1 to 4.
Press the <SET> button to
3 confirm.
4. ETTL:Fully Automatic Wireless Flash Shooting
Using Automatic Wireless Flash with a Single Slave Unit
Master Unit Setting
1
● Attach a camera TT685C
flash on the camera and
set it as the master unit.
●X1T-C can also be used as
master unit. X1T-C can
control 's ZOOM TT685C
value when the ZOOM is
adjusted to auto (A) mode.
Slave Unit Setting
2
● Set the other camera flash
as the wireless slave Unit.
Check the communication
3 channel.
● If the master unit and slave
unit(s) are set to a different
channel, set them to the
same channel. (Page 57)
Position the camera and
4 flashes.
● Position the camera and
flashes as the picture
shows. (Page 54)
MENU3
CH
Set the master unit’s flash
5 mode to <ETTL>.
● Set the master unit’s flash
mode to <ETTL>.
● For shooting, <ETTL> will
automatically be set for the
slave unit.
● Set the master unit flash
firing as ON to fire a flash.
Check that the flash is
6 ready.
● Check that the master flash
ready indicator is lightened.
● When the slave flash ready
indicator is ready, the AF-
assist beam lighting area
will blinks at 1 second
intervals.
Check the flash operation.
7
● Press the master unit’s
Test Button < >.
● Then, the slave unit will
fire. If not, adjust the slave
unit’s angle toward the
master unit and distance
from the master unit.
Using Automatic Wireless Flash with Multiple Slave Units
When stronger flash output or
more convenient lighting operation
is needed, increase the number of
slave units and set it as a single
slave unit.
To add slave units, use the same
steps as setting “automatic
wireless flash with a single slave
unit”. Any flash group can be set
(A/B/C).
When the number of slave units is
increased and the master unit
flash firing is ON, automatic
control is implemented to make all
groups of flashes fire the same
flash output and ensure the total
flash output up is to standard
exposure.
● Press the depth-of-field preview button on the camera to fire a modeling
flash.
● If the slave unit’s auto power off function is workable, press the master
unit’s test button to power it on. Please note that test firing is unavailable
during the camera’s regular metering time.
● The effective time of slave auto power off is changeable. (C.Fn-Sv APOT
Page 74)
● By making some settings, the auto AF-assist transmitter will not blink after
the slave unit’s flash ready indicator is lightened. (C.Fn-AF Page 74)
- 57 -
- 58 -
616x0_CUlight_FR60X_BDA_Canon englisch.indd 64 24.10.2016 13:55:50