70
3
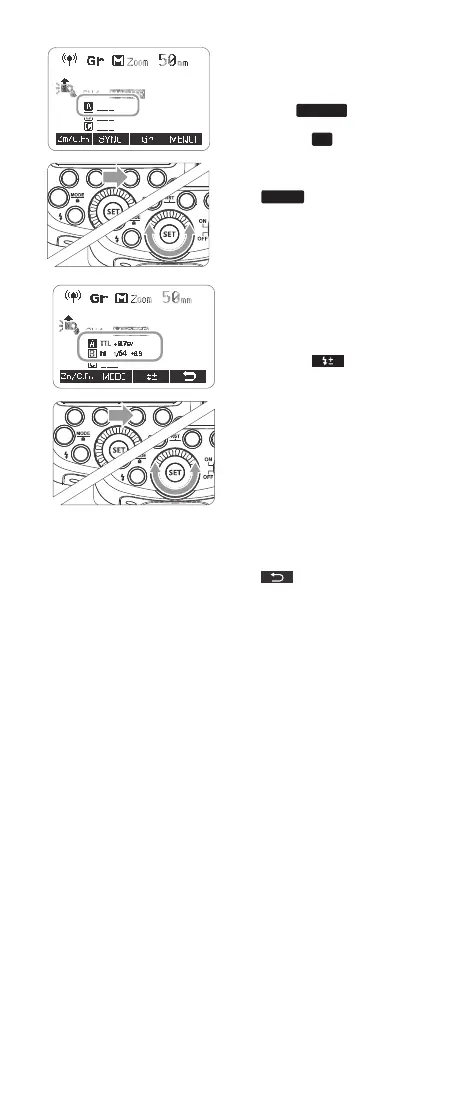
Set the ash mode
• Set the ash mode of each
ring group by operating
the master unit.
• While <
MENU 1
> is
displayed, press Function
Button 3 <
Gr
> and turn
the Select Dial to choose
the group.
• Press Function Button 2
<
MODE
> and select the
ash mode of the selected
group from <ETTL>, <M>
and <-- - OFF >.
• Repeat step 3 to set the
ash mode of all groups.
4
Set the ash output and
ash exposure compensa-
tion amount.
• While a ring group is
selected, press Function
Button 3 <
>.
• Turn the Select Dial to set
the ash function corre-
sponding to ash mode,
and press <SET> Button to
conrm.
• When using the <M>
mode, set the ash output.
When using the <ETTL>
mode, set the ash expo-
sure compensation amount
as required.
• Repeat step 4 to set the
ash function of all groups.
• Press Function Button 4
<
> to return to the
shooting-ready state.
5
Take the picture
• Each slave unit res in the
respective ash modes set.
Set the flash mode
3
● Set the flash mode of each
firing group by operating
the master unit.
● While < > is
displayed, press Function
Button 3 < > and
turn the Select Dial to
choose the group.
MENU1
Gr
Set the flash output and
4 flash exposure
compensation amount.
● While a firing group is
selected, press Function
Button 3 < >.
● Turn the Select Dial to set
the flash function
corresponding to flash
mode, and press <SET>
Button to confirm.
● When using the <M>
mode, set the flash output.
When using the <ETTL>
mode, set the flash
exposure compensation
amount as required.
● Repeat step 4 to set the
flash function of all groups.
● Press Function Button 4
< > to return to the
shooting-ready state.
Take the picture
5
● Each slave unit fires in the
respective flash modes set.
● Press Function Button 2
< > and select the
flash mode of the selected
group from <ETTL>, <M>
and <---(OFF)>.
● Repeat step 3 to set the
flash mode of all groups.
MODE
Wireless Flash Shooting: Optic Transmission
This product supports wireless flash application and functions
as either a master or a slave unit. As a master unit, it can control
Canon speedlites e.g. 580EXII, 600EX-RT via wireless. As a slave
unit, it can receive wireless signals of Canon speedlites e.g.
580EXII, 600EX-RT and commanders of Canon cameras e.g.
7D/60D/600D.
● You can set up two to three slave groups for E-TTL II autoflash
shooting. With E-TTL II autoflash, you can easily create various
lighting effects.
● Any flash settings (of flash exposure compensation, high-speed
sync, FE lock, FEB, manual flash, Multi flash) on the master unit
will be automatically sent to the slave units. So the only thing you
need to do is to set the master unit to ETTL mode without any
operation for the slave units at all during the shooting.
● This flash can work in ETTL autoflash, M manual flash, and Multi
stroboscopic flash modes when set as a master unit.
Positioning and Operation Range
Slave Unit Setting
Master Unit Setting
● Even with multiple slave units, the master unit can control
all of them via wireless.
● In this user manual, “master unit” refers to the camera flash
on a camera and “slave unit” will be controlled by the
master unit.
1. Wireless Settings
You can switch between normal flash and wireless flash. For normal
flash shooting, be sure to set the wireless setting to OFF.
Indoors
Outdoors
15m(49.2ft)
10m(32.8ft)
80°
8m(26.2ft) 12m(39.4ft)
Press < > button so that < >
or < > are displayed on
the LCD panel.
Press < > button so that < >
or < > are displayed on
the LCD panel.
- 63 - - 64 -
R
R
616x0_CUlight_FR60X_BDA_Canon englisch.indd 70 24.10.2016 13:56:08