Installation Tips
Indoor Unit Installation (1)
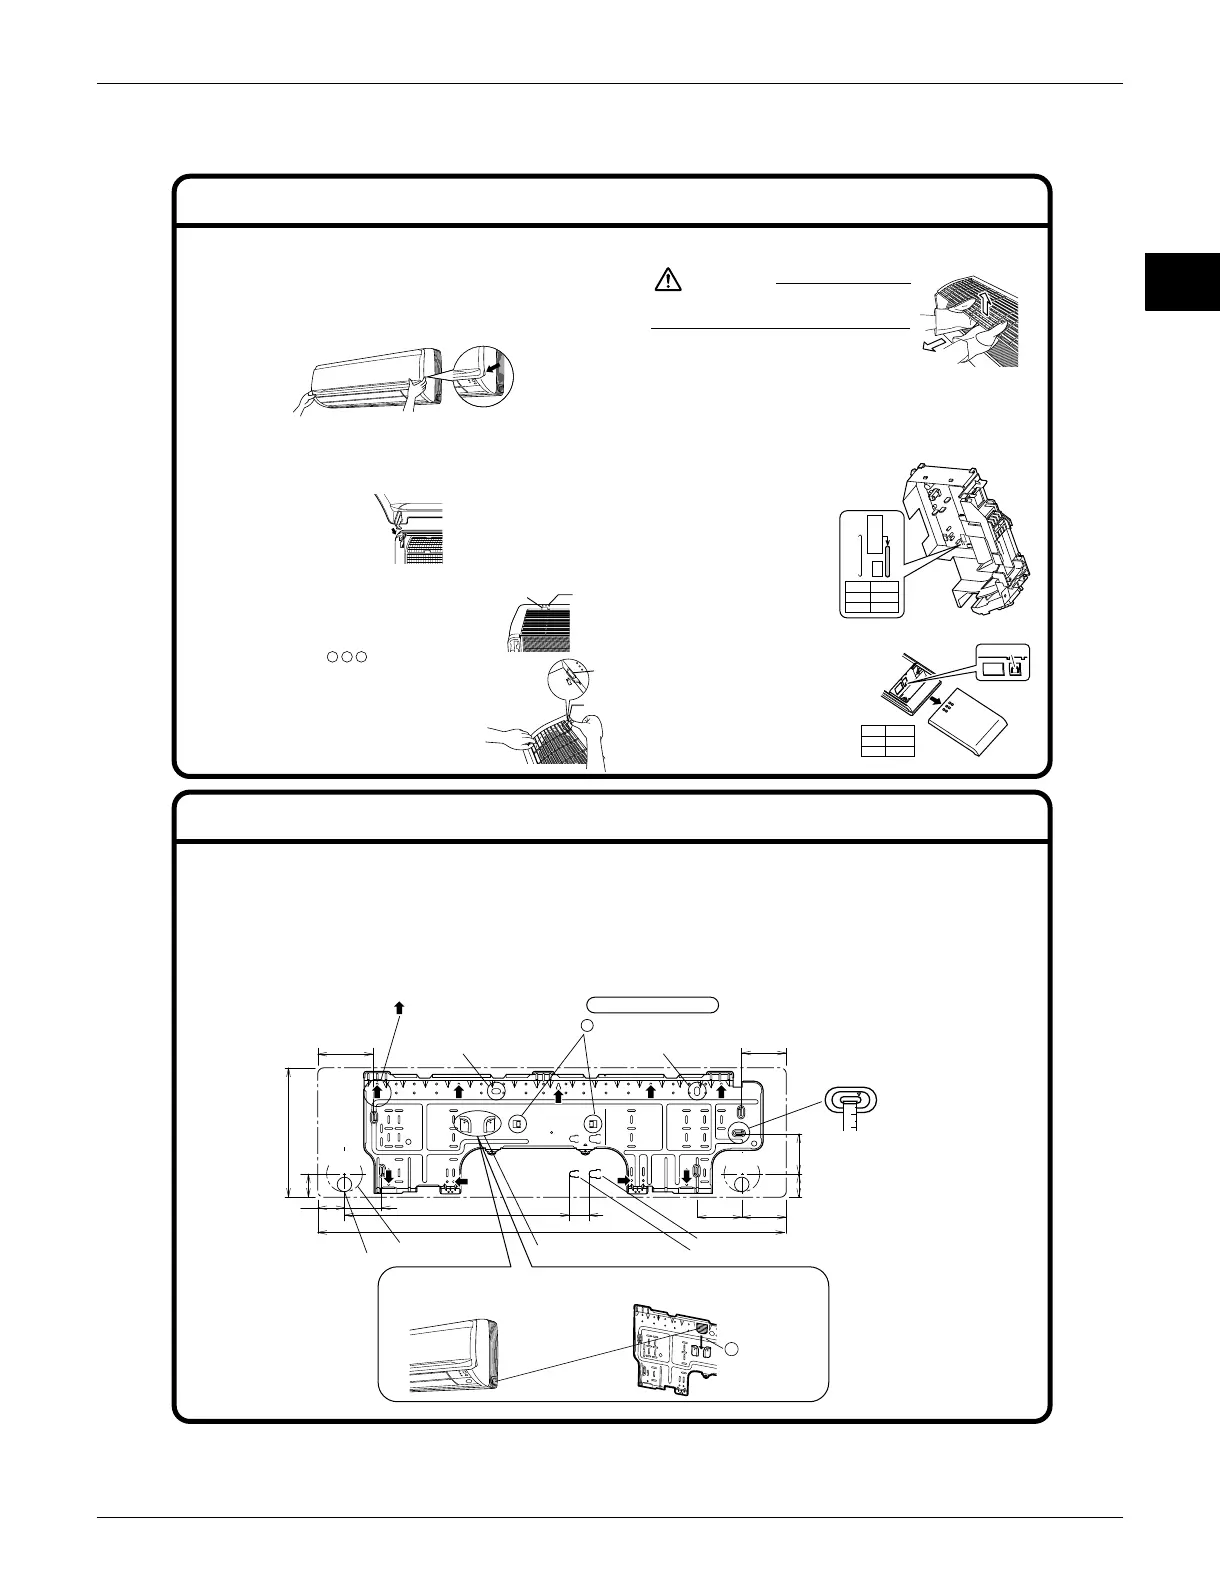
1. Removing and installing front panel.
•
Removal method
Hook fingers on the panel protrusions on the left and right
of the main body, and open until the panel stops. Slide the
front panel sideways to disengage the rotating shaft. Then
pull the front panel toward you to remove it.
•
Installation method
Align the tabs of the front panel with the grooves, and
push all the way in. Then close slowly. Push the center of
the lower surface of the panel firmly to engage the tabs.
2. Removing and installing front grille.
•
Removal method
1)Remove front panel to remove the air filter.
2)Remove the front grille. (3 screws)
3)In front of the mark of
the front grille, there are 3
upper hooks. Lightly pull the
front grille toward you with one
hand, and push down on the
hooks with the fingers of your
other hand.
<When there is no work space because the unit is close to ceiling>
Be sure to wear protection gloves.
Place both hands under the center of
the front grille, and while pushing up,
pull it toward you.
•
Installation method
1) Install the front grille and firmly engage the upper hooks.
(3 locations)
2) Install 3 screws of the front grill.
3) Install the air filter and then mount
the front panel.
3. How to set the
different addresses.
When two indoor units
are installed in one room,
the two wireless remote
controllers can be set for
different addresses.
1)In the same way as
when connecting to an
HA system, remove
the metal plate
electrical wiring cover.
2)Cut the address
jumper (JA).
3)Cut the address
jumper (J4).
CAUTION
1.
Installing the mounting plate.
• The mounting plate should be installed on a wall which can support the weight of the indoor unit.
1) Temporarily secure the mounting plate to the wall, make sure that the panel is completely level, and
mark the boring points on the wall.
2) Secure the mounting plate to the wall with screws.
Recommended mounting-plate retention spots and Dimensions
Push the
rotating shaft
of the front
panel into the
groove.
ΟΟΟ
mark area
(3 locations)
Upper hook
Lightly pull the front
grille toward you with
one hand, and push
down on the hooks with
the fingers of your other
hand. (3 locations)
Push
down.
Upper hook
Upper hook
Address
J4
EXIST
1
CUT 2
1) Push up.
2) Pull toward you.
Address
JA
Address
JA
EXIST
1
CUT 2
* The removed pipe port cover can be
kept in the mounting plate pocket.
Removed pipe
port cover
Leveling mounting plate
unit : inch (mm)
4-15/16
(125)
2-3/8
(60)
3-1/8
(83)
19-13/16
(503.5)
1-3/4
(44.5)
11-7/16
(290)
2-1/16 (52)
(1050)
41-5/16
3-15/16
(99.5)
2-1/16
(52)
3-9/16
(90)
3-15/16
(100)
3-15/16
(100)
Keep here the piece cut out
from the unit for piping
Through-the-wall
hole φ3-1/8 (φ80)
Drain hose position
Recommended mounting - plate retention
spots (9 spots in all)
(Bolt size : 3/8 (M10)) (Bolt size : 3/8 (M10))
Place a leveler on raised tab.
b
Use tape
measure
as shown.
Position the
end of tape
measure at ∇
Gas pipe end
Liquid pipe end
Mounting plate
A
J4
φ3-1/8
(φ80)
φ3-1/8
(φ80)

 Loading...