EasyManua.ls Logo

Delta JT360 - User Manual

Delta JT360
29 pages
Print Icon
To Next Page IconTo Next Page
Loading...
INSTRUCTION MANUAL
6" Deluxe Jointer
(Model JT360)
PART NO. A05753 - 09-17-024
Copyright © 2004 Delta Machinery
ESPAÑOL: PÁGINA 29
To learn more about DELTA MACHINERY
visit our website at: www.deltamachinery.com.
For Parts, Service, Warranty or other Assistance,
please call
1-800-223-7278 (In Canada call 1-800-463-3582).
Question and Answer IconNeed help?

Do you have a question about the Delta JT360 and is the answer not in the manual?

Summary

Safety Guidelines and Warnings

Safety Definitions and Symbols

Defines safety symbols (DANGER, WARNING, CAUTION) used in the manual.

California Proposition 65 Warning

Warns about potential exposure to hazardous chemicals during operation.

General Safety Rules

Personal Protective Equipment

Requirements for eye protection, apparel, and hearing protection.

Workshop Safety Practices

Rules for work area cleanliness, tool condition, and avoiding hazards.

Jointer-Specific Safety Rules

Safe Operation Procedures

Rules for handling workpieces, knives, and preventing kickback.

Operational Limitations and Precautions

Guidelines on workpiece size, feed direction, and unattended operation.

Electrical and Grounding

Power Connections and Motor Specifications

Details on power requirements, voltage, and motor specifications.

Grounding Instructions

Procedures and importance of grounding the machine for safety.

Extension Cords and Product Description

Extension Cord Gauge Recommendations

Tables showing correct gauge for extension cords based on load and length.

Functional Description

Overview of the jointer's main features and specifications.

Unpacking and Parts Identification

Carton Contents and Unpacking

List of included items and initial unpacking and cleaning steps.

Jointer Components Diagram

Illustrated diagram identifying various parts of the jointer.

Jointer Parts List

Main Jointer Components

Detailed list of main jointer parts (1-24).

Hardware and Accessories List

Detailed list of hardware and accessories (Fig. 4A, 4B).

Assembly - Stand and Dust Chute

Assembling the Stand

Step-by-step guide to assembling the machine's stand.

Attaching the Dust Chute

Instructions for attaching the dust chute to the stand.

Assembly - Motor and Jointer to Stand

Mounting Motor and Switch to Stand

Steps for mounting the motor and switch assembly onto the stand.

Securing Jointer to Stand

Instructions for attaching the main jointer unit to the stand.

Assembly - Finalizing Jointer Mounting

Fastening Jointer to Stand

Using special studs and wrenches to secure the jointer to the stand.

Final Stand Adjustments

How to level the machine and tighten all stand hardware.

Assembly - Table and Dust Systems

Infeed Table Adjustment Handle

Assembling and adjusting the infeed table handle mechanism.

Dust Chute Cover and Adapter

Installing the dust chute cover and dust collector adapter.

Assembly - Pulleys and Belts

Motor Pulley Installation

Attaching the motor pulley to the motor shaft.

Belt Alignment and Tensioning

Aligning pulleys and adjusting belt tension for optimal performance.

Assembly - Guards and Fence

Motor Pulley and Belt Guard

Installing the guard for the motor pulley and belt assembly.

Fence Assembly and Locking

Inserting and securing the fence assembly.

Operation - Controls and Basic Use

Cutterhead Guard Installation

Proper installation and tensioning of the cutterhead guard.

Starting, Stopping, and Locking the Switch

Procedures for operating the power switch and securing the machine.

Operation - Table Adjustments

Infeed Table Adjustments and Stops

How to adjust table height, depth, and set positive stops.

Outfeed Table Adjustments

Procedure for leveling the outfeed table with the knives.

Operation - Knife and Table Alignment

Knife and Outfeed Table Alignment

Aligning knives with the outfeed table for accurate cuts.

Checking Knife Height Settings

Visual guide to correct, too high, and too low knife settings.

Operation - Table Gibs and Fence

Adjusting Table Gibs

Taking up play in table dovetail ways for smooth operation.

Fence Operation and Movement

Sliding and tilting the fence across the table.

Operation - Fence Stops and Guards

Adjusting Fence Positive Stops

Setting fence angles to 90 and 45 degrees.

Adjusting Fence Guards

Positioning guards to close openings around the fence bracket.

Operation - Knife Maintenance

Replacing and Resetting Knives

Procedures for removing, replacing, and correctly setting cutterhead knives.

Knife Installation Safety

Crucial safety warnings and notes for handling sharp knives.

Machine Use and Feeding

General Machine Use Guidelines

Tips for beginners on checking settings and practicing cuts.

Hand Placement During Feeding

Proper hand positioning and movement while feeding material.

Jointing and Planing Operations

Definitions of Jointing and Planing

Explains the difference between jointing and planing operations.

Jointing an Edge and Dimensions

Technique for squaring an edge and minimum workpiece dimensions.

Advanced Cutting Operations

Planing, Beveling, and Taper Cuts

Techniques for planing, cutting bevels, and tapers on the jointer.

Cutting Rabbets

Procedure for making rabbet cuts, including guard removal.

Planing Techniques and Troubleshooting

Planing Techniques

Methods for planing warped, short, or thin materials and grain direction.

Troubleshooting Common Issues

Guidance for diagnosing and resolving operational problems with the jointer.

Maintenance and Care

Knife Sharpening and Dust Chute

Procedures for sharpening knives and removing the dust chute cover.

Machine Cleaning and Lubrication

Tips for keeping the machine clean, lubricated, and protected from rust.

Service and Support

Parts, Service, and Warranty Assistance

Contact information for obtaining parts, service, and warranty support.

Accessory Usage and Warranty Details

Warnings on accessory use and summary of the two-year limited warranty.

Overview

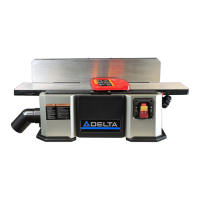
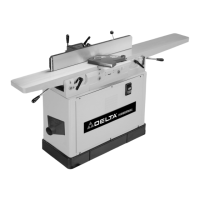
This document is an instruction manual for the DELTA ShopMaster 6" Deluxe Jointer, Model JT360. It provides comprehensive information on assembly, operation, maintenance, safety, and warranty.

Function Description

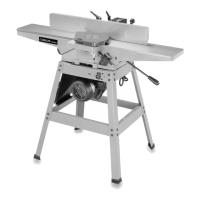
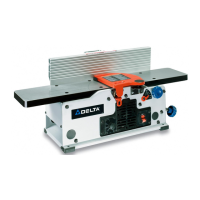
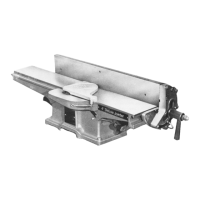
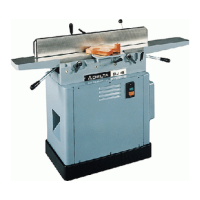
The DELTA ShopMaster Model JT360 is a Deluxe 6" (152mm) Jointer designed for woodworking operations such as jointing, planing, beveling, taper cuts, and rabbeting. Its primary function is to create flat and square surfaces on wood workpieces. It can also be used to create specific angles (bevels) and tapers, and to cut rabbets. The machine includes a heavy-duty 3/4 hp, 120/240 volt induction motor, a stand, a dust chute, a center-mounted fence, a three-knife cutterhead, a cutterhead guard, and push blocks.

Important Technical Specifications

  • Model: JT360
  • Cutting Capacity: 6" (152mm) width
  • Maximum Depth of Cut: 1/2" (13mm) for jointing and planing, 1/2" (13mm) for rabbeting.
  • Motor: Heavy-duty 3/4 hp induction motor
  • Voltage: 120/240 volts, 60 HZ alternating current. Shipped ready-to-run for 120 volt operation; convertible to 240 volt operation by qualified electrical personnel at an Authorized Delta Service Center.
  • Power Cord: Requires a 3-wire extension cord with a 3-prong grounding type plug and matching receptacle. Minimum gauge extension cord recommendations are provided based on ampere rating, voltage, and cord length (e.g., 18 AWG for 0-6 Ampere Rating, 120 Volts, up to 25 feet; 12 AWG for 10-12 Ampere Rating, 120 Volts, 100-150 feet).
  • Weight: Approximately 175 lbs (79.4 kg).
  • Minimum Workpiece Dimensions for Jointing/Planing: 10" (254mm) length, 3/4" (19mm) width, 1/2" (12.7mm) thickness.
  • Cutterhead: Three-knife cutterhead.
  • Fence: Center-mounted, capable of tilting 45 degrees right or left, with positive stops for 90 and 45-degree angles.
  • Dust Collection: Includes a dust chute and a 4" O.D. dust collector adapter for connection to a dust collection system.

Usage Features

Assembly: The manual details the step-by-step assembly process, including the stand, dust chute, motor and switch, and attaching the jointer to the stand. It emphasizes the need for a minimum of two people to lift the 175 lbs machine onto the stand. Tools required for assembly (6mm, 4mm, 3mm, 2.5mm Allen wrenches, 12x14mm, 8x10mm open end wrenches) are supplied.

Infeed Table Adjustments: The infeed table's height, which controls the depth of cut, can be adjusted using a lockhandle and a raising/lowering handle. An index stop automatically sets the table at 1/8 inch depth of cut, which can be overridden by pulling out the stop. The maximum depth adjustment is 1/2 inch. Positive stops are provided for limiting height and depth, allowing for rapid setting for finish or final cuts.

Outfeed Table Adjustments: For accurate work, the outfeed table must be level with the knives at their highest point of revolution. Adjustment involves loosening a lockscrew and turning a hand knob.

Knife Adjustment: Knives must be precisely level with the outfeed table. The manual provides detailed instructions for checking and adjusting knife height using a straight edge and a feeler gauge. It also covers loosening and tightening locking screws and raising screws for knife adjustment.

Fence Operation: The fence can be moved across the table and tilted 45 degrees to the right or left. Lock handles and tilting levers are used for positioning. Positive stops are available for 90 and 45-degree angles, with adjustment instructions provided. The fence guards are adjustable to close the opening between the fence bracket and the fence, limiting access to the cutterhead.

Starting and Stopping: The on/off switch is located on the front of the jointer. The switch toggle can be removed to lock the switch in the "OFF" position, preventing unauthorized use.

Operational Techniques:

  • Jointing an Edge: The workpiece is held firmly against the infeed table and fence, with the narrow edge on the infeed table and the major flat surface against the fence.
  • Planing or Surfacing: Similar to jointing, but the major flat surface of the workpiece is placed on the infeed table, with the narrow edge against the fence. Push blocks are recommended.
  • Beveling: The fence is locked at the desired angle, and the workpiece is run across the knives. Tilting the fence inward (towards the table) for angles approaching 45 degrees is suggested for better workpiece control.
  • Taper Cuts: Involves lowering the forward end of the workpiece onto the outfeed table, spanning the knives, and pushing forward.
  • Cutting a Rabbet: Requires removing the cutterhead guard, adjusting the fence to the desired rabbet width, and lowering the infeed table to the desired rabbet depth. Multiple passes may be needed for deep rabbets.
  • Planing Warped Pieces: Light cuts are recommended to avoid springing the wood.
  • Planing Short or Thin Work: Always use push blocks.
  • Direction of Grain: Feed with the grain to avoid chipping and splintering.

Safety: The manual includes extensive safety guidelines and specific rules for jointers. Key warnings include:

  • Always read and understand all instructions before operation.
  • Wear eye protection, hearing protection, and a dust mask.
  • Wear proper apparel (no loose clothing or jewelry).
  • Do not use in dangerous environments (damp/wet locations).
  • Maintain tools in peak condition.
  • Check for damaged parts.
  • Keep the work area clean.
  • Keep children and visitors away.
  • Reduce the risk of unintentional starting (ensure switch is OFF before plugging in).
  • Use guards.
  • Remove adjusting keys and wrenches before starting.
  • Use the right machine for the job.
  • Use recommended accessories.
  • Use the proper extension cord.
  • Secure the workpiece.
  • Feed workpiece against the direction of cutterhead rotation.
  • Do not force the workpiece.
  • Do not overreach.
  • Never stand on the machine.
  • Never leave the machine running unattended.
  • Turn OFF and disconnect power before adjustments or repairs.
  • Make workshop childproof.
  • Stay alert and use common sense.
  • Take precautions against dust inhalation.
  • Do not operate until fully assembled.
  • Keep knives sharp.
  • Tighten infeed/outfeed tables before starting.
  • Secure blades in cutterhead.
  • Clear table of objects before turning ON.
  • Never turn ON with workpiece contacting cutterhead.
  • Avoid awkward operations and hand positions.
  • Keep arms, hands, and fingers away from the cutterhead.
  • Never make cuts deeper than 1/8" (3.2mm).
  • Never joint or plane workpieces shorter than 10" (254mm), narrower than 3/4" (19mm), or less than 1/2" (12.7mm) thick.
  • Use hold-down/push blocks for small workpieces.
  • Hold workpiece firmly against table and fence.
  • Never perform "free-hand" operations.
  • Do not feed workpiece into the outfeed end.
  • Do not feed warped, knotted, or foreign object-embedded workpieces.
  • Maintain proper relationship of infeed and outfeed table surfaces and cutterhead knife path.
  • Support long or wide workpieces.
  • Never perform layout, assembly, or set-up work when the machine is running.
  • Always use cutterhead guard and push blocks.
  • Never pass hands directly over the cutterhead.

Maintenance Features

Cleaning:

  • Periodically blow out all air passages with dry compressed air.
  • Clean plastic parts with a soft damp cloth; avoid solvents.
  • The dust chute cover can be removed for cleaning.

Lubrication:

  • Apply household floor paste wax to the machine table and extension table or other work surface weekly.

Protecting Cast Iron from Rust:

  • Use WD-40® and a Scotch-Brite™ Blending Hand Pad to polish the table surface, followed by degreasing and applying TopCote® Aerosol.

Knife Maintenance:

  • Whetting Knives: Instructions are provided for whetting dull knives using a fine carborundum stone on the infeed table, ensuring the stone lies flat on the knife's bevel.
  • Replacing and Resetting Knives: Detailed steps for safely removing, replacing, and resetting the three knives, emphasizing extreme caution due to sharp edges. Knives must be installed correctly and securely fastened before operation.

Troubleshooting:

  • For assistance, users are directed to the Delta Machinery website (www.deltamachinery.com) for service centers or to call the DELTA Machinery help line (1-800-223-7278; in Canada, 1-800-463-3582).
  • A basic troubleshooting tip for "Failure to Start" is to check the cord plug contact, blown fuses, or open circuit breakers.

Delta JT360 Specifications

General IconGeneral
BrandDelta
ModelJT360
CategoryPower Tool
LanguageEnglish

Related product manuals