35
ENGLISH
Basic versionSimple version InformationAdvanced version
1
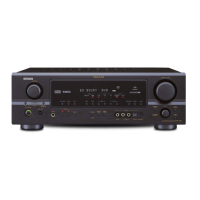
Set up
the remote control unit
n Set up the zone mode
Press ZONE SELECT to switch the
zone mode to “MAIN”.
The “MAIN” indicator lights.
Press ZONE SELECT
n Set up the operation mode
Press AMP to set the remote control
unit to amplier operation mode.
Press AMP
2
Connect the setup microphone.
3-1.Audyssey Auto Setup
MultEQ
at ear height at
Normal
Amp Assign:
Start
Cancel
[ENT]:Select [RTN]:Back
Please place microphone
main listening position.
When the setup microphone is
connected, the following screen is
displayed.
3
Use ui to select “Amp Assign”.
3-1.Audyssey Auto Setup
MultEQ
at ear height at
Normal
Amp Assign:
Start
Cancel
[RTN]:Back
Please place microphone
main listening position.
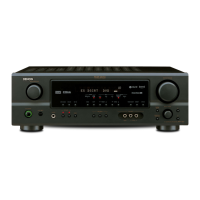
Set up speakers
around items indicate the settings.
Here we describe how to set up speakers other than 5.1-channel speakers.
For the method of setting up 5.1-channel speakers, see “Simple version”, “Set up speakers (Audyssey
®
Auto Setup)” (vpage6).
First install and connect the speakers to this unit.
4
Use o p to select the conguration
of the connected speakers.
Normal
Set when using 7.1-channel
(Front/Center/Surround/Surround
Back/Subwoofer) speakers.
ZONE2
Set for connecting the speakers
for ZONE2 to the SURR. BACK/
AMP ASSIGN terminals.
Front Height
Set for connecting the front
height speakers to the SURR.
BACK/AMP ASSIGN terminals.
Front Bi-Amp
Set for connecting a tweeter
of a front speaker to the SURR.
BACK/AMP ASSIGN terminals
and a woofer of the front speaker
to the FRONT terminals.
Front B
Set for connecting the second set
of front speakers to the SURR.
BACK/AMP ASSIGN terminals. In
this case, go to step 5.
5
GWhen “Front B” is selected in
step 4H
q Use ui to select “Front Sp.”.
w Press o p to select a speaker.
A
Select this to use front speaker A.
B
Select this to use front speaker B.
A+B
Select this to use front speakers A and B
simultaneously.
Remote control operation
buttons
Move the cursor
(Up/Down/Left/Right)
Confirm the setting Return to previous menu
6
Proceed to page 8
“
Preparation
” step 5.
NOTE
After performing Audyssey Auto Setup, do not
change the speaker connections or subwoofer
volume. In event of a change, perform Audyssey
Auto Setup again.
 Loading...