EasyManua.ls Logo

Denon AVR-1905 - User Manual

Denon AVR-1905
77 pages
Print Icon
To Next Page IconTo Next Page
Loading...
2
We greatly appreciate your purchase of this unit.
2
To be sure you take maximum advantage of all the
features this unit has to offer, read these instructions
carefully and use the set properly. Be sure to keep this
manual for future reference should any questions or
problems arise.
“SERIAL NO.
PLEASE RECORD UNIT SERIAL NUMBER ATTACHED TO
THE REAR OF THE CABINET FOR FUTURE REFERENCE”
“NO. DE SERIE
PRIERE DE NOTER LE NUMERO DE SERIE DE L’APPAREIL
INSCRIT A L’ARRIERE DU COFFRET DE FAÇON A POUVOIR
LE CONSULTER EN CAS DE PROBLEME.”
2
Nous vous remercions pour l’achat de cet appareil.
2
Pour être sûr de profiter au maximum de toutes les
caractéristiques qu’offre cet appareil, lire avec soin ces
instructions et bien utiliser l’appareil. Toujours
conserver ce mode d’emploi pour s’y référer
ultérieurement en cas de question ou de problème.
FOR ENGLISH READERS PAGE 2 ~ PAGE 70, 138 ~ 142 POUR LES LECTEURS FRANCAIS PAGE 2, 71 ~ PAGE 142
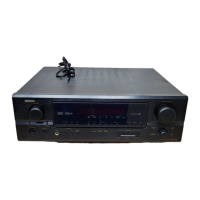
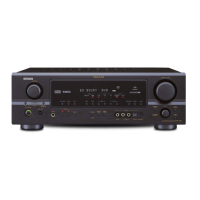
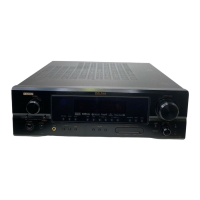
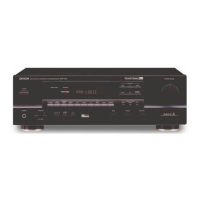
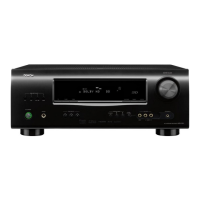
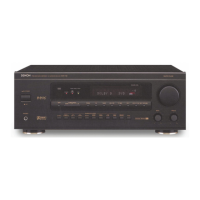
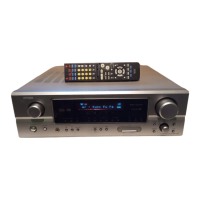
AV SURROUND RECEIVER
RÉCEPTEUR AUDIO-VIDÉO
AVR-1905/785
OPERATING INSTRUCTIONS
MODE D’EMPLOI

Other manuals for Denon AVR-1905

Questions and Answers

  • D
    Daniel AlexanderSep 3, 2025
    Why is my Denon AVR-1905 making a howling noise at high volume?
    • L
      lgarzaSep 4, 2025
      If you experience howling noise from your Denon Stereo Receiver when the volume is high: * The turntable and speaker systems might be too close together. Separate them as much as possible. * An unstable floor could be the cause. Use cushions to absorb speaker vibrations transmitted by the floor. If the turntable lacks insulators, use audio insulators.
  • C
    Crystal West DVMSep 18, 2025
    Why is the sound distorted on my Denon Stereo Receiver?
    • F
      Faith BoydSep 18, 2025
      If the sound from your Denon Stereo Receiver is distorted, consider the following: * Stylus pressure may be too weak: Apply the proper stylus pressure. * The stylus may be dirty: Check the stylus for dust or dirt. * The cartridge may be defective: Consider replacing the cartridge.
  • P
    Paul McleanSep 16, 2025
    Why does my Denon Stereo Receiver produce a howling noise when the volume is high?
    • C
      Corey WalkerSep 16, 2025
      If your Denon Stereo Receiver produces a howling noise at high volumes, it could be because: * The turntable and speaker systems are too close together: Separate them as much as possible. * The floor is unstable and vibrates easily: Use cushions to absorb speaker vibrations transmitted through the floor. If your turntable lacks insulators, consider using audio insulators.
  • C
    Carol ElliottSep 14, 2025
    Why are the instrument positions reversed during stereo playback on my Denon Stereo Receiver?
    • M
      Megan LarsonSep 14, 2025
      If the instrument positions are reversed during stereo playback on your Denon Stereo Receiver, it's likely due to reversed connections of the left and right speakers or the left and right input/output cords. Check these connections to ensure they are correct.
  • B
    brianwalkerSep 12, 2025
    Why is my Denon Stereo Receiver producing a humming noise when playing records?
    • S
      Stephanie FrankSep 12, 2025
      If your Denon Stereo Receiver is producing a humming noise while playing records, it could be due to: * The turntable's ground wire not being properly connected: Ensure it's securely connected. * An incomplete PHONO jack connection: Make sure the connection is secure.
  • J
    Jacob HaynesSep 12, 2025
    What to do if sound is only coming from one channel on my Denon Stereo Receiver?
    • B
      Brandon BlankenshipSep 12, 2025
      If sound is only coming from one channel on your Denon Stereo Receiver, the issue might be due to incomplete connections. Ensure that both the speaker cords and the input/output cords are securely connected.
  • M
    Mr. Nathan WilliamsSep 9, 2025
    Why is my Denon Stereo Receiver not responding to the remote control?
    • N
      nelsonchristinaSep 9, 2025
      If your Denon Stereo Receiver isn't responding to the remote control, check the following: * Dead batteries: Replace them with new ones. * Excessive distance: Move closer to the unit. * Obstacles: Remove any obstructions between the remote and the unit. * Incorrect button: Ensure you're pressing the correct button. * Incorrect battery insertion: Verify the batteries are inserted with the correct polarity (+ and -).
  • E
    elizabeth53Sep 7, 2025
    Why is the power indicator flashing rapidly and the display not lit on my Denon Stereo Receiver?
    • E
      Emily SchmittSep 7, 2025
      If the display is not lit and the power indicator is flashing rapidly on your Denon Stereo Receiver, it could be due to: * Short-circuited speaker terminals: Switch the power off, connect the speakers correctly, and then switch the power back on. * Blocked ventilation holes: Turn off the power, ventilate the unit to cool it down, and then turn the power back on once it's cooled. * Continuous high power operation and/or inadequate ventilation: Turn off the power, ventilate it well, and then turn it back on after it cools down.
  • G
    Gary BurnettSep 5, 2025
    Why are the instruments reversed on my Denon Stereo Receiver during stereo playback?
    • E
      Elizabeth StevensSep 5, 2025
      If the instrument positions are reversed during stereo playback on your Denon Stereo Receiver, it's probably due to reversed connections of the left and right speakers or input/output cords. Check the left and right connections to correct this.
  • M
    Mr. Mark Peterson Jr.Aug 20, 2025
    Why does my Denon AVR-1905 have no sound but the display is on?
    • K
      Katherine MendozaAug 20, 2025
      If the display is lit on your Denon Stereo Receiver but you're not getting any sound, check the following: * Ensure the speaker cords are securely connected. * Verify the audio function button is in the correct position. * Make sure the volume isn't set to the minimum. * Confirm that MUTING is switched off. * If using digital signals, ensure they are being input correctly and the correct input jacks are selected.

Summary

SAFETY PRECAUTIONS

Electric Shock Risk Warning

Warning about removing covers and referring to qualified personnel for servicing.

Fire;Electric Shock Risk (Rain;Moisture)

Warning about exposing the appliance to rain or moisture.

Canadian Model Plug Caution

Specific caution for Canadian models regarding plug insertion.

NOTES ON USE AND OBSERVATIONS

Temperature and Heat Dispersion

Advise to avoid high temperatures and allow for heat dispersion.

Environmental Protection (Moisture, Dust, Chemicals)

Advise to protect the unit from moisture, water, dust, and chemicals.

Foreign Objects and Handling

Warnings against foreign objects and instructions for careful power cord handling.

Ventilation and Unit Modification

Do not obstruct ventilation holes; do not disassemble or modify the unit.

SAFETY INSTRUCTIONS

Read, Heed, and Follow Instructions

All safety and operating instructions should be read and adhered to before use.

Cleaning, Attachments, and Water;Moisture Precautions

Guidelines for cleaning, attachments, and avoiding water/moisture.

Accessories, Ventilation, and Power Sources

Advice on accessories, ventilation, and operating from the correct power source.

Grounding, Polarization, and Cord Protection

Safety regarding plugs, grounding, and power cord routing.

Antenna Grounding, Lightning, and Power Lines Safety

Safety for outdoor antennas, lightning storms, and proximity to power lines.

Overloading, Object;Liquid Entry, and Servicing

Prevent overloading, object entry, liquid spills, and refer servicing to qualified personnel.

Damage, Parts, Checks, Mounting, and Heat

Conditions requiring service, correct parts, safety checks, mounting, and heat placement.

INTRODUCTION

Before Using the Unit

Read manual before hookup and operation for maximum feature advantage.

Cautions on Installation and Handling

Important precautions regarding installation and handling to prevent issues.

Unit Features Overview

Overview of the unit's capabilities and advanced functions.

Connections and Setup Guides

Guides for connecting components and setting up the system.

Part Names, Remote Control, and Operation

Identification of parts, remote use, and basic operation instructions.

ACCESSORIES

Included Parts Verification

List of included accessories to verify upon unpacking.

1 BEFORE USING

Moving the Set Safely and Pre-Power On Checks

Instructions for safely moving the unit and checks before turning the power on.

Storing Instructions and V. AUX Terminal

Keep manual safe; details about the front panel V. AUX terminal.

2 CAUTIONS ON INSTALLATION

Heat Dispersal Space Requirements

Space requirement for heat dissipation between the unit and walls/components.

3 CAUTIONS ON HANDLING

Input Switching and Output Muting Precautions

Handling input switching and output muting to prevent noise or damage.

Standby Power and General Handling

Advice to turn off power when away; general handling advice.

4 FEATURES

Dolby Digital and Pro Logic IIx Features

Description of Dolby Digital and Dolby Pro Logic IIx surround sound technologies.

DTS and DTS-ES;Neo:6 Features

Details on DTS, DTS-ES Extended Surround, and DTS Neo:6 formats.

DTS 96;24, Multi Zone, and Future Upgrades

DTS 96/24 compatibility, Multi Zone system, and future format upgrades.

Input Terminals and Video Functions

Features like front input, video conversion, and component video switching.

Auto Surround Mode and Display

Auto Surround Mode functionality and the On Screen Display feature.

5 CONNECTIONS

Connecting Audio Components (CD, Tape, Digital)

Instructions for connecting CD players, tape decks, and digital audio equipment.

Connecting AC Outlets

Information on using the switched AC outlets for audio equipment.

Connecting video components

Connecting TV;DBS Tuners and DVD;VDP

How to connect TV/DBS tuners and DVD players/VDPs via video and audio.

Connecting Monitor TV and Video Decks

How to connect a monitor TV and video decks (VCRs) for input/output.

Connecting video components with S-Video jacks

S-Video Connections for DVD;VDP, TV;DBS, and VCR

Connecting DVD/VDP, TV/DBS, and VCRs using S-Video cables.

Connecting Monitor TV via S-Video

Connecting a monitor TV using S-Video output.

Connecting Component Video Jacks

Component Video Connections for DVD Player and Monitor TV

Connecting DVD players and monitor TVs using component video jacks.

Cautions on Video Conversion Function

Important notes regarding the video conversion function's behavior.

Connecting the antenna terminals

AM Loop Antenna Assembly and Connection

Step-by-step guide for assembling and connecting the AM loop antenna.

CATV System Installer Note

Important grounding guidelines for CATV system installers.

Connecting External Input Jacks (EXT. IN)

Using V.AUX Jacks for Video Components

Connecting video components using the V. AUX jacks.

Connecting MULTI ZONE Jacks

Zone 2 Fixed Out and Speaker;Preout Connections

Connecting amplifiers for fixed output and speaker/preout in Zone 2.

Speaker System Connections

Speaker Impedance and Connection Guidelines

Guidelines on speaker impedance and connecting speaker cords.

Banana Plugs and Protector Circuit Explanation

Instructions for banana plugs and explanation of the protector circuit.

6 PART NAMES AND FUNCTIONS

Front Panel Overview and Functions

Identification and functions of controls and indicators on the front panel.

Remote Control Unit

Remote Control Layout and Button Functions

Detailed overview of the remote control unit's buttons and their functions.

7 USING THE REMOTE CONTROL UNIT

Remote Control Operation Range and Conditions

Information on the effective range and conditions for remote control operation.

Inserting Batteries into Remote Control

Step-by-step guide for inserting batteries into the remote control.

8 SETTING UP THE SYSTEM

System Setup Overview and Default Settings

Instructions on using buttons and default settings for system setup.

8 SETTING UP THE SYSTEM

Auto Tuner Presets Configuration

Automatic searching and storing of FM broadcast stations.

Speaker System Layout Guide

Visual guide for arranging speaker systems for optimal sound.

8 SETTING UP THE SYSTEM

Before Setting Up the System: Preliminary Steps

Preliminary steps and checks before initiating system setup.

8 SETTING UP THE SYSTEM

Setting the Type of Speakers

How to set speaker types (size, presence) for optimal system configuration.

8 SETTING UP THE SYSTEM

Setting Speaker Delay Time

Adjusting speaker delay times based on listening position for surround sound.

8 SETTING UP THE SYSTEM

Setting Subwoofer Mode and Crossover Frequency

Configuring subwoofer mode and crossover frequency based on speaker setup.

8 SETTING UP THE SYSTEM

Setting the Test Tone for Level Adjustment

Using test tones to adjust channel levels for equal playback.

8 SETTING UP THE SYSTEM

Setting Digital Input Assignment

Assigning digital input jacks to specific input sources.

8 SETTING UP THE SYSTEM

Setting Video Input Mode

Setting the input signal to be output from monitor terminals.

8 SETTING UP THE SYSTEM

Setting Auto Surround Mode

Automatically selecting surround mode based on last input signal.

Setting External Input SW Level

Adjusting the analog input signal level for the Ext. In terminal.

8 SETTING UP THE SYSTEM

Power Amplifier Assignment for Zone 2

Assigning the surround back channel amplifier to Zone 2.

Setting On Screen Display (OSD)

Turning the on-screen display on/off and selecting display mode.

8 SETTING UP THE SYSTEM

Finalizing System Setup

Final step to confirm system setup completion and check on-screen display signals.

9 REMOTE CONTROL UNIT

Operating DENON Audio Components with Remote

Instructions for operating other DENON components with the remote.

Component System Buttons (CD, Tape, Tuner)

Controls for CD, Tape, and Tuner operations using the remote.

9 REMOTE CONTROL UNIT

Preset Memory Setup Procedure

How to register manufacturer codes to operate other components.

9 REMOTE CONTROL UNIT

Operating Preset Memory Components (DVD, VDP)

Operating DVD players and VDPs using the remote's preset memory.

9 REMOTE CONTROL UNIT

Component System Buttons (VCR, DBS;Cable, TV)

Remote controls for VCRs, DBS/Cable tuners, and TVs.

9 REMOTE CONTROL UNIT

Punch Through Functionality

Operate CD, TAPE, VCR, etc. buttons while in DBS/CABLE or TV mode.

10 OPERATION

Before Operating the Unit: Checks and Power On

Preliminary checks and power-on procedures before operating the unit.

Powering the Unit On and Off

Steps for powering the unit on and off using the main unit or remote.

Selecting Front Speakers for Operation

How to select front speakers A or B for operation.

10 OPERATION

Playing the Input Source

How to select and play audio/video sources.

Selecting the Input Mode

Choosing input modes like AUTO, PCM, DTS, ANALOG, or EXT. IN.

10 OPERATION

Selecting the Play Mode

Choosing playback modes like Stereo, Dolby Digital, DTS, etc.

Adjusting the Master Volume Level

How to adjust the master volume level.

10 OPERATION

Playback Using External Input Jacks

Using the external input jacks for audio playback.

Playing Audio Sources (CDs and DVDs)

How to play CD and DVD sources using DIRECT or STEREO modes.

10 OPERATION

Adjusting Sound Quality (Tone Controls)

Adjusting bass and treble controls for desired sound quality.

Listening Over Headphones

Instructions for listening via headphones, including automatic output muting.

Temporarily Muting Audio Output

How to temporarily mute the audio output.

Combining Sound with Desired Image (Simulcast)

Using VIDEO SELECT to monitor a different video source while listening to audio.

10 OPERATION

Checking Program Source and Unit Status

Displaying information about the current source and unit status.

Multi-source Recording (REC OUT Mode)

Recording one source while playing another.

11 MULTI ZONE

Multi-zone Playback with Multi-source Capability

Playing different sources in multiple rooms simultaneously.

Connecting for Multi-zone Audio Distribution

Connecting to integrated amplifiers for multi-zone audio distribution.

11 MULTI ZONE

Using Internal Amplifier for Zone 2 Output

Connecting and configuring the unit's internal amplifier for Zone 2 output.

11 MULTI ZONE

Multi-source Playback and Zone 2 Control

Outputting sources to another room and controlling Zone 2 via remote.

12 SURROUND

Pre-Surround Function Setup: Test Tones

Using test tones to adjust speaker levels before using surround modes.

Adjusting Speaker Levels with Test Tones

Steps to adjust speaker levels using test tones and the remote control.

12 SURROUND

Fine-tuning Individual Speaker Levels

Fine-tuning individual speaker levels after test tone adjustment.

12 SURROUND

Dolby Pro Logic IIx (Pro Logic II) Mode Operation

How to select and use Dolby Pro Logic IIx modes and parameters.

12 SURROUND

Selecting Optimum Surround Mode for Source

Choosing the best surround mode for different sources.

Adjusting Surround Parameters (Room Size, Effect Level)

Setting parameters like Room Size, Effect Level, etc.

12 SURROUND

DTS NEO:6 Mode Operation

How to select and use DTS NEO:6 modes and parameters.

12 SURROUND

Selecting Optimum DTS NEO:6 Mode

Choosing the best DTS NEO:6 mode for different sources.

Adjusting DTS NEO:6 Parameters

Setting parameters for DTS NEO:6 modes.

12 SURROUND

Dolby Digital and DTS Surround Modes with Digital Input

Using digital inputs for Dolby Digital and DTS Surround playback.

12 SURROUND

Displaying Surround Parameter Menu

Accessing and displaying the surround parameter menu.

Dialogue Normalization Function

Automatic adjustment of dialog level for Dolby Digital sources.

12 SURROUND

Checking the Input Signal Details

Checking input signal type, format, and parameters.

Detailed Surround Parameters Explanation

Detailed explanations of Cinema EQ, Dynamic Range Compression, LFE, and Surround Back settings.

13 DSP SURROUND SIMULATION

DSP Surround Modes Overview and Features

Overview of DSP surround modes like Stereo, Mono Movie, Rock Arena, etc.

Personal Memory Plus Functionality

Function to memorize and recall surround and input modes for sources.

13 DSP SURROUND SIMULATION

Selecting and Adjusting DSP Modes;Parameters via Remote

Operating surround modes and parameters using the remote control.

13 DSP SURROUND SIMULATION

Operating Surround Modes from Main Unit Panel

Using the main unit's SELECT knob and SURROUND PARAMETER button to control modes.

Surround Parameters Details (ROOM SIZE, EFFECT LEVEL)

Explanation of ROOM SIZE, EFFECT LEVEL, and DELAY TIME parameters.

14 LISTENING TO THE RADIO

Auto Preset Memory for Radio Stations

Automatically searching and storing FM stations into memory.

14 LISTENING TO THE RADIO

Auto Tuning Radio Stations

Step-by-step guide for automatic radio tuning.

Manual Tuning Radio Stations

Step-by-step guide for manual radio tuning.

14 LISTENING TO THE RADIO

Preset Stations Operation and Checking

Instructions for setting and checking preset radio stations.

14 LISTENING TO THE RADIO

Recalling Preset Radio Stations

How to recall stored radio stations using the remote control.

15 LAST FUNCTION MEMORY

Last Function Memory Feature

Unit stores last input/output settings for automatic recall upon power-on.

16 INITIALIZATION OF THE MICROPROCESSOR

Microprocessor Reset Procedure

Procedure to reset the unit to factory default settings.

17 ADDITIONAL INFORMATION

Optimum Surround Sound for Different Sources

Guidance on selecting surround settings based on source types.

Types of Multi-channel Signals

Overview of various multi-channel audio signal formats.

Movie Audio and Other Source Types

Information on movie audio playback and other 360° sound field sources.

17 ADDITIONAL INFORMATION

Surround Back Speaker Setup Guidelines

Information on 6.1-channel systems and surround back speaker setup.

17 ADDITIONAL INFORMATION

Speaker Setting Examples for Different Uses

Examples for setting up speakers for movies and diffusion type speakers.

12 SURROUND

Dolby Digital Format Explained

Detailed explanation of the Dolby Digital signal format and its features.

Dolby Pro Logic IIx and II Explained

Detailed explanation of Dolby Pro Logic IIx and II technologies and their benefits.

12 SURROUND

Dolby Surround Sources Information

Information on sources recorded in Dolby Surround.

DTS Digital Surround Format Explained

Detailed explanation of the DTS Digital Surround format.

12 SURROUND

DTS-ES Extended Surround Details

Details on DTS-ES Extended Surround format and its signal types.

DTS Neo:6 Surround Modes Explained

Explanation of DTS Neo:6 Cinema and Music modes.

12 SURROUND

DTS 96;24 Format Explained

Explanation of the DTS 96/24 format for high-quality audio.

18 TROUBLESHOOTING

Common Listening Problems Troubleshooting

Troubleshooting for common issues during audio playback.

Record Playback Issues Troubleshooting

Troubleshooting specific problems encountered when playing records.

Remote Control Unit Problems Troubleshooting

Troubleshooting problems related to the remote control unit.

19 SPECIFICATIONS

Audio and Output Specifications

Details on power output, frequency response, and output terminals.

Video and Tuner Specifications

Details on video input/output levels and tuner section specifications.

General and Unit Specifications

Power supply, dimensions, weight, and remote control specifications.

Denon AVR-1905 Specifications

General IconGeneral
Speakers connectivity type-
Receiver typeSurround
Frequency range10 - 100000 Hz
Audio output channels7.1 channels
Signal-to-Noise Ratio (SNR)100 dB
Power output per channel (1KHz@6 Ohm)110 W
Power output per channel (20-20KHz@8 Ohm)80 W
Product colorBlack
Audio decodersDTS 96/24, DTS Neo:6, DTS-ES (Discrete 6.1), DTS-ES (Matrix 6.1), Dolby Digital EX, Dolby Pro Logic IIx
Digital Signal Processing (DSP)Yes
HDMI in0
Composite video in4
Digital audio coaxial in1
Component video (YPbPr/YCbCr) in3
S-Video outputs quantity2
Ethernet LANNo
AM band range520 - 1710 kHz
FM band range87.5 - 107.9 MHz
Supported radio bandsAM, FM
AC input voltage120 V
AC input frequency60 Hz
Weight and Dimensions IconWeight and Dimensions
Depth171 mm
Width434 mm
Height416 mm
Weight11900 g

Related product manuals