Mbox 2 Pro Setup Guide40
2 Set the source to DI by pressing the input
channel Source selector until the DI LED is lit.
3 On the front of the Mbox 2 Pro, carefully turn
the Gain control to the right to increase the in-
put level of your microphone signal.
4 On the front of the Mbox 2 Pro, turn the
Monitor control to the desired level.
5 If the incoming signal is too loud, press the
Pad switch to engage the –20 dB pad.
Connecting Instruments to
the Mbox 2 Pro
Mbox 2 Pro provides three input types (DI, Line
and Aux In) that correspond to the different sig-
nal strengths output by different types of instru-
ments and other equipment.
DI Input (Front Panel) Instruments such as elec-
tric guitar or electric bass that usually have a
lower level of output than line level instruments
use the front panel DI (“Direct Inject”) input.
Line Inputs (Back Panel) Line level devices, in-
cluding electronic audio sources such as mixers,
samplers, keyboards, turntables, and synthesiz-
ers use the back panel Line input.
Aux In (Back Panel) Line in L and R for addi-
tional line level devices, plus Phono L and R in-
puts for turntables/preamps, DJ mixers, and
similar devices. The 1/4-inch TS Line L and R in-
puts accept balanced or unbalanced connec-
tions. The RCA inputs are fully RIAA compliant,
and Mbox 2 Pro also provides a grounding post
for devices that require such a connection. You
can connect devices to both pairs of Aux In in-
puts and then choose between them using the
front panel Source selector switch.
Connecting Electric Guitar or Bass
To use a guitar with Mbox 2 Pro:
1 On the front of the Mbox 2 Pro, plug your gui-
tar cable into one of the DI inputs.
2 On the front of the Mbox 2 Pro, set the source
to DI by pressing the Mic/DI switch until the DI
LED is lit.
3 On the front of the Mbox 2 Pro, turn the
Monitor control to the desired level.
4 On the front of the Mbox 2 Pro, carefully turn
the Gain control to the right to increase the in-
put level of your guitar.
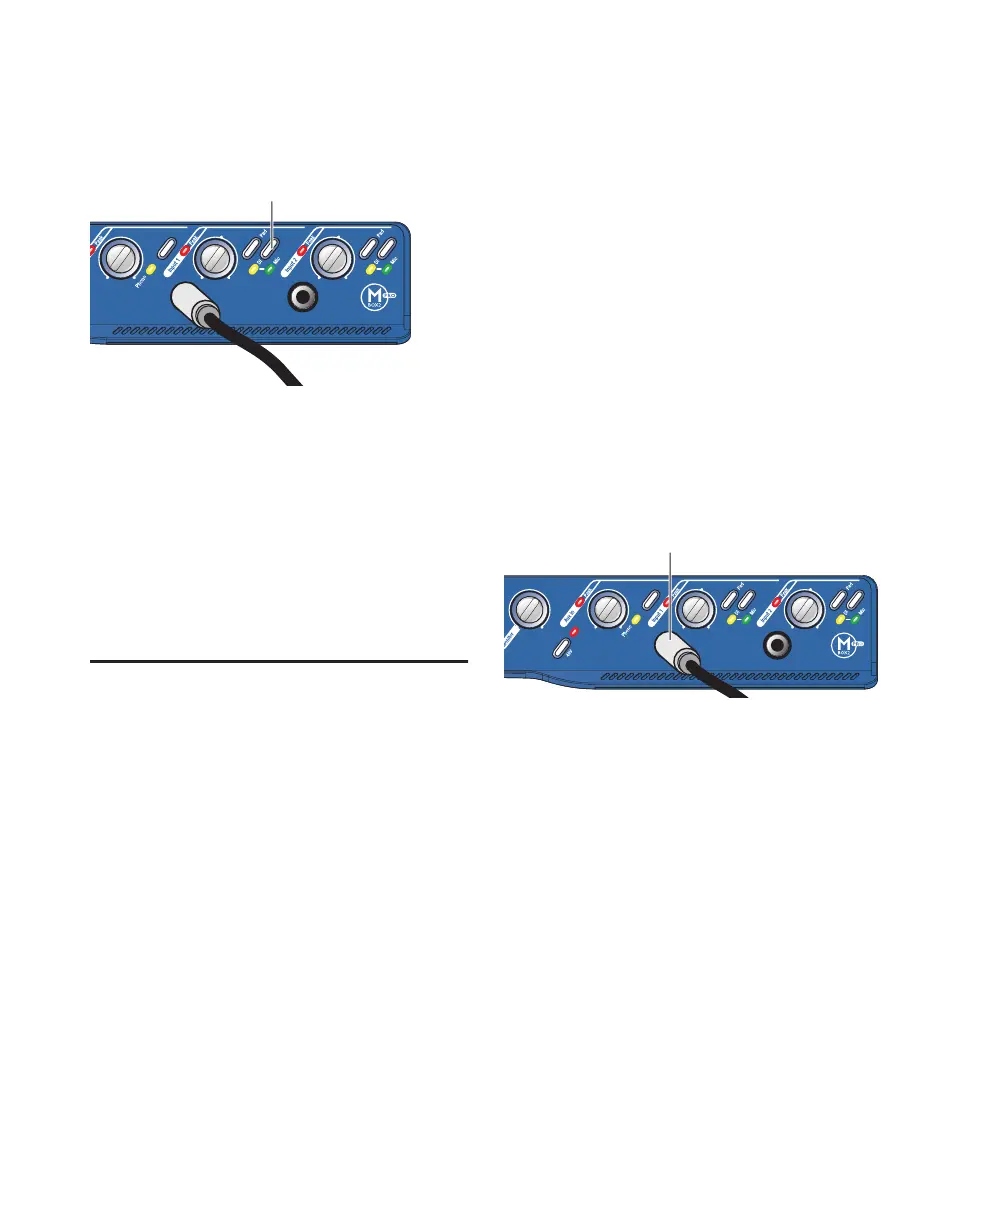
Input 1 selector switch and DI LED
Mic/DI
selector
Connecting guitar to the Input 1 DI connector
Input 1 DI