Do you have a question about the DigiTech RP14D and is the answer not in the manual?
Essential precautions for safe operation and preventing hazards like electric shock and fire.
Specific safety instructions for UK power plugs and fuses to prevent electrical hazards.
Guidelines for proper electrical connections and grounding to prevent shock.
Compliance statement regarding EMC standards and user operating conditions.
Cautionary notes regarding lithium battery replacement, polarity, and disposal.
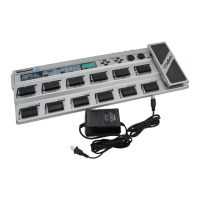
Lists all accessories and components included with the RP14D unit.
Highlights key capabilities and technologies of the RP14D.
Instructions for connecting instruments and amplifiers to the RP14D.
Steps for safely connecting and powering on the RP14D unit.
How to navigate and choose sound programs using footswitches or buttons.
Explains the functions of the 12 footswitches and the LED matrix display.
Details the Numeric Display and key control buttons like Store and Edit.
Covers the function of the output level knob and presence control.
Details for instrument input, mono/stereo outputs, and headphone jack.
Covers Jam-A-Long input and S/PDIF digital output.
Connector for the dedicated PS0920 power supply.
How to connect for single amplifier or mono output use.
Guide for connecting to two amplifiers or stereo power amps.
Connecting the RP14D directly to PA systems or recording consoles.
Utilizing the digital output for high-fidelity audio transfer.
Steps for powering on and overview of the primary performance mode.
How programs are numbered, stored, and differ from factory presets.
Detailed explanation of the 12 footswitches and their fixed functions.
How the expression pedal controls parameters and can be assigned.
How to engage and exit bypass mode for a clean signal.
Guide to creating unique sounds by editing existing programs.
Step-by-step process to enter edit mode and adjust parameters.
How to use the matrix to select effects and parameters for editing.
Procedure for saving edited programs to user locations.
How to use the built-in tuner and adjust tuning reference.
Using the feature to slow down and analyze musical passages.
Explanation of how the matrix displays effects and parameters.
Details Threshold, Ratio, and Gain for the compressor effect.
How the Wah effect works and is controlled by the expression pedal.
How to assign parameters for real-time control via the expression pedal.
List of parameters that can be controlled by the expression pedal.
Setting the range limits for expression pedal assignments.
Choosing from various amp models and their respective channels.
Adjusting core tonal characteristics like Gain, Bass, Mid, Treble, and Level.
Using the gate to reduce unwanted noise and setting threshold.
Overview of modulation and pitch shifting effects available.
Adjusting the overall mix level for modulation/pitch effects.
Adjusting Speed and Depth for the chorus effect.
Controlling Speed, Depth, and Regeneration for flanging.
Adjusting Speed, Depth, and Regeneration for phasing.
Controlling Speed and Depth for the vibrato effect.
Adjusting Speed and Depth for the tremolo effect.
Controlling Speed and Depth for auto panning.
Adjusting the Amount of detuning for a chorus-like effect.
Setting the Amount of pitch shift for harmonies.
Using the expression pedal for pitch bends and selecting ranges.
Adjusting Amount, Scale, and Key for intelligent harmonies.
Controlling Amount, Depth, and Regeneration for the YaYa effect.
Adjusting Speed, Depth, and Regeneration for the Auto Ya effect.
Setting Type, Level, Time, and Feedback for delay effects.
Choosing Type, Level, and Decay Time for reverb effects.
Configuring Pre/Post FX for the digital output signal.
Activating the speaker simulation for direct connection to mixers.
Adjusting overall program volume and expression pedal control.
Outline of the custom program creation example.
Selecting an initial program to edit as a base.
Turning off the compressor effect for the program.
Steps to access the program editing interface.
Choosing specific amp models for green and red channels.
Fine-tuning the Gain, Bass, Mid, Treble, and Level of amp models.
Configuring the Noise Gate parameters for noise reduction.
Adding and configuring the Phaser effect parameters.
Bypassing the Delay effect for the program.
Setting up the Reverb Type, Level, and Decay parameters.
Adjusting the overall volume level for the program.
Linking the expression pedal to control Phaser speed.
Saving the newly created custom program to a user location.
Restoring factory settings and calibrating the expression pedal.
| Display | LED |
|---|---|
| Type | Multi-Effects Processor |
| Effects Types | Chorus, Flanger, Delay, Reverb, Distortion |
| Inputs | 1 x 1/4" Instrument |
| Outputs | 1 x 1/4" (mono), 1 x 1/4" Headphone |
| MIDI | In, Out |
| Power Supply | 9V DC |