EasyManuals Logo
Home>DigiTech>Computer Hardware>STUDIO 400

DigiTech STUDIO 400 User Manual

DigiTech STUDIO 400
48 pages
To Next Page IconTo Next Page
To Previous Page IconTo Previous Page
Page #10 background imageLoading...
Page #10 background image
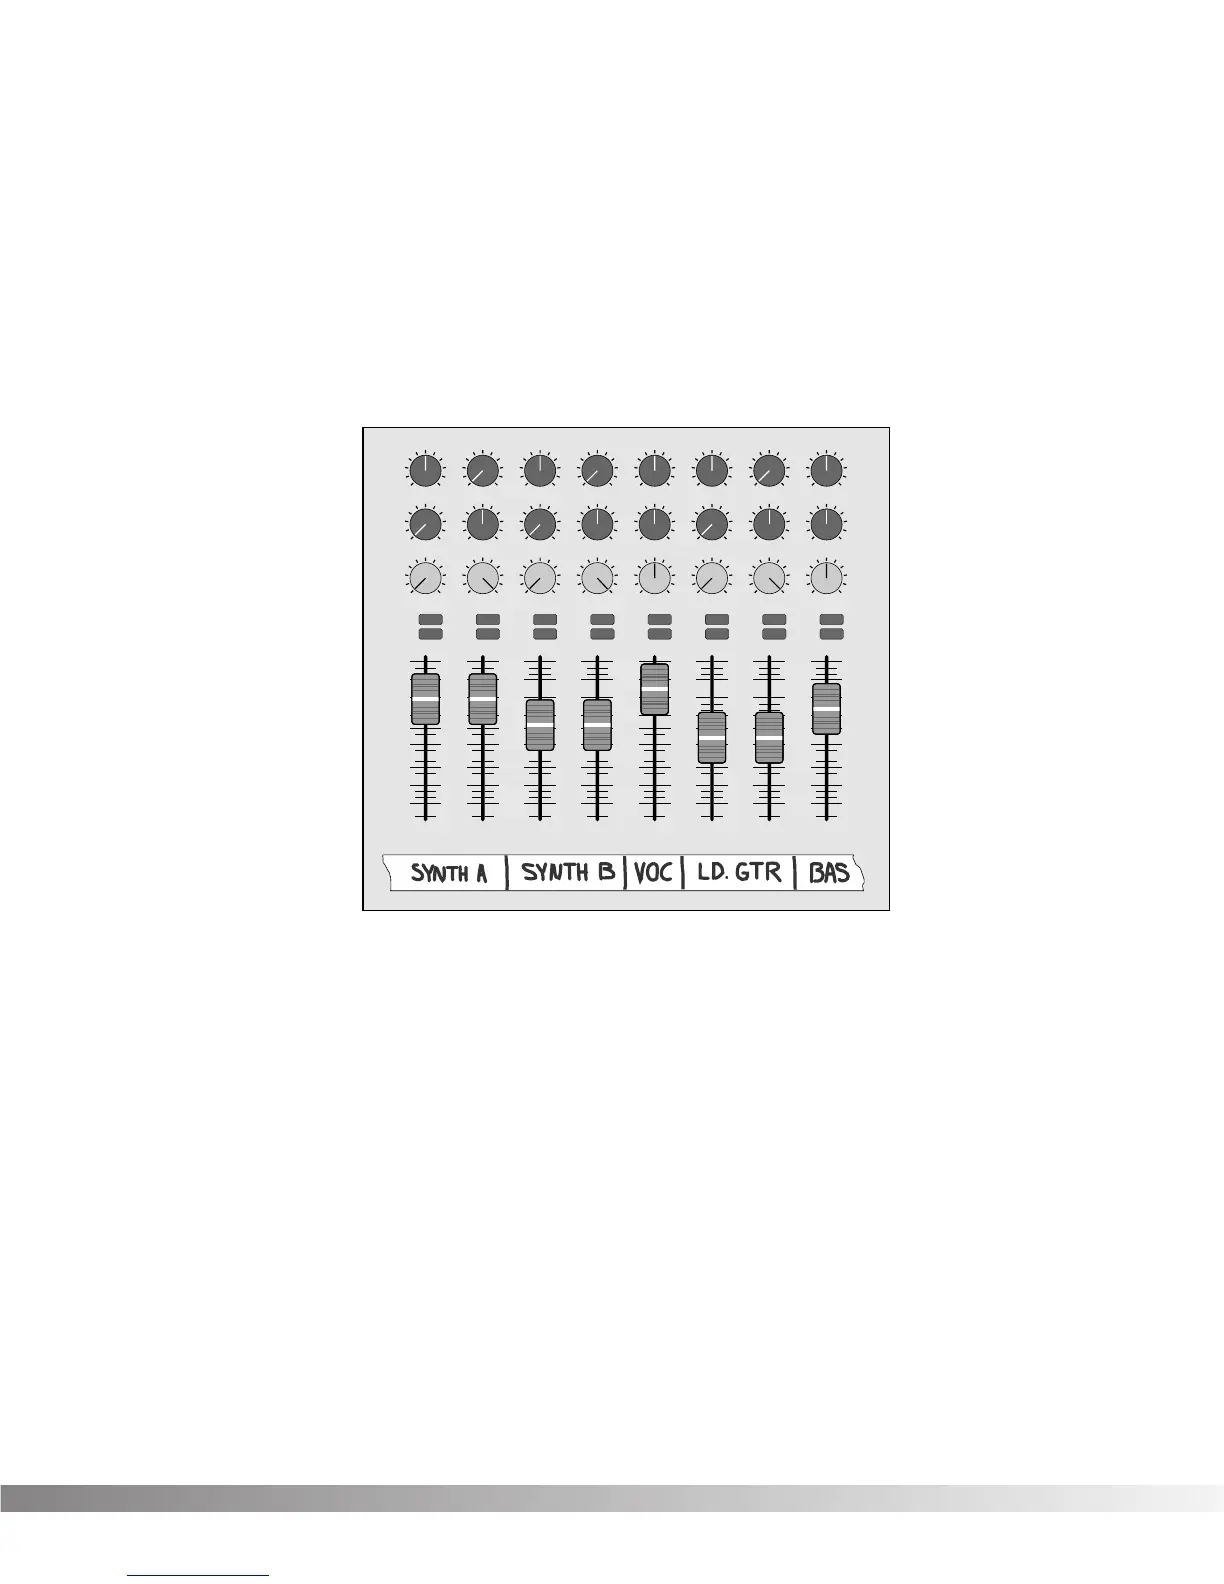
Figure 1-5 shows an example of a typical stereo effect setup as seen from the console, and shows how to
handle both true stereo and mono input signals using two auxiliary sends.
This is the method of choice in many recording applications because of the impressive realism and depth
of texture that it produces. While it is slightly more complicated to set up and requires twice as many aux-
iliary sends, stereo effects (particularly reverbs) improve dramatically in imaging and spaciousness.
Figure 1-5 Setting up a mixer's aux sends for true stereo operation
REMEMBER: When you use this method to process stereo sources such as keyboards, the auxiliary
sends on your console should be set up exactly opposite one another, as shown on
channels 1 and 2 of Figure 1-5. Note that the left channel is sent to Aux 1, while the
right channel is sent to Aux 2. When using mono sources like vocals and bass guitar,
send equal levels from both Aux 1 and Aux 2 to maintain proper soundfield balance of
the effects, as shown on channels 5 and 8.
PARALLEL EFFECTS: Another application for the Studio 400 allows you to independently process four
discrete signals simultaneously. This method also utilizes the effects loops of your console, and since
each effect has a mono input, the auxiliary sends can be set up in a much more straightforward way.
Figure 1-6 on the following page, shows how to connect the Studio 400 for this application.
Pan
Mute
-10
0
+5
+10
-20
-30
-
-5
L / R
Mute
L / R
Mute
L / R
Mute
L / R
-5
-4
-3
-2
-1
0
+1
+2
+3
+4
+5
Pan
-5
-4
-3
-2
-1
0
+1
+2
+3
+4
+5
Pan
-5
-4
-3
-2
-1
0
+1
+2
+3
+4
+5
Pan
-5
-4
-3
-2
-1
0
+1
+2
+3
+4
+5
Pan
-5
-4
-3
-2
-1
0
+1
+2
+3
+4
+5
Pan
-5
-4
-3
-2
-1
0
+1
+2
+3
+4
+5
Pan
-5
-4
-3
-2
-1
0
+1
+2
+3
+4
+5
Pan
-5
-4
-3
-2
-1
0
+1
+2
+3
+4
+5
1234
-10
0
+5
+10
-20
-30
-
-5
-10
0
+5
+10
-20
-30
-
-5
-10
0
+5
+10
-20
-30
-
-5
Mute
L / R
5
-10
0
+5
+10
-20
-30
-
-5
Mute
L / R
6
-10
0
+5
+10
-20
-30
-
-5
Mute
L / R
7
-10
0
+5
+10
-20
-30
-
-5
Aux 1
0
2
46
8
10
Aux 2
0
2
46
8
10
Aux 1
0
2
46
8
10
Aux 2
0
2
46
8
10
Aux 1
0
2
46
8
10
Aux 2
0
2
46
8
10
Aux 1
0
2
46
8
10
Aux 2
0
2
46
8
10
Aux 1
0
2
46
8
10
Aux 2
0
2
46
8
10
Aux 1
0
2
46
8
10
Aux 2
0
2
46
8
10
Aux 1
0
2
46
8
10
Aux 2
0
2
46
8
10
Aux 1
0
2
46
8
10
Aux 2
0
2
46
8
10
Mute
L / R
8
-10
0
+5
+10
-20
-30
-
-5
Aux Send 1
Aux Send 2
Pan Control
7
Section 1 - Setting Up
Studio 400 Owner's Manual

Questions and Answers:

Question and Answer IconNeed help?

Do you have a question about the DigiTech STUDIO 400 and is the answer not in the manual?

DigiTech STUDIO 400 Specifications

General IconGeneral
BrandDigiTech
ModelSTUDIO 400
CategoryComputer Hardware
LanguageEnglish

Related product manuals