12 13
ARC X BOLT
Regular maintenance of the ARC X bolt is important to the performance of the MXR. Use
DYE Slick lube Advanced when servicing the MXR. It is recommended that the ARC X bolt is
serviced with a light coating of fresh lube every 4,000 to 8,000 shots, depending on playing
conditions. During service, check condition of o-rings and be sure the ARC X bolt moves back
and forth without excessive force.
If you do not grease the ARC X Bolt you will run the risk of damaging o-rings.
This will create excessive friction and drag on the moving components, which will result in
reduced performance. When greasing the ARC X Bolt, pay special attention to all O-rings that
are on the bolt and that ride on a surface of the bolt as well as those on the reaction core.
#020
#015
#014
#016
#017
#008
#013
#111
#006
#012
#011
#010#009
#007
#020
#020
#020
#020
#013
#017
#013
#016
#016
#020
#111
#016
#015
#015
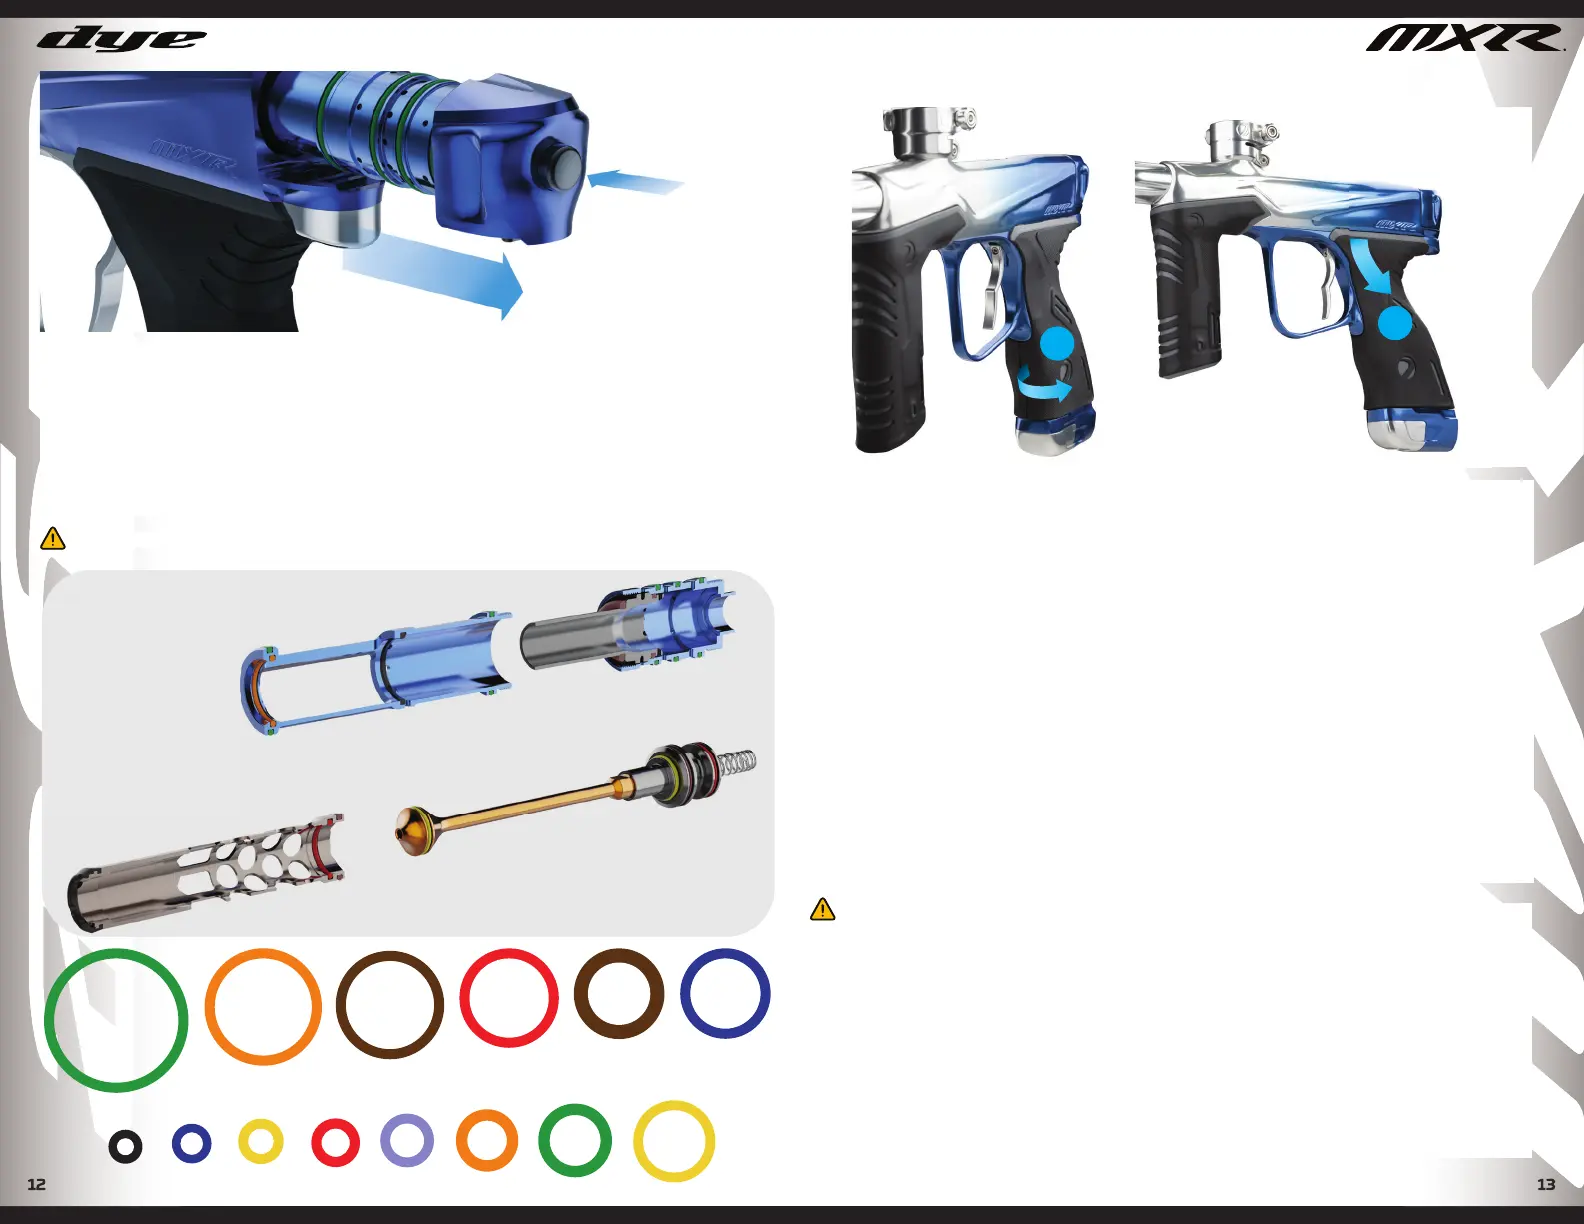
FLEX TIP
FRONT
BUMPER
BOLT
VALVE CORE
BOLT CAN
REAR CANBOLT GUIDE
VALVE
SPRING
ARC X SYSTEM
O-RING DIAGRAM
UL STICKY GRIP REMOVAL
1. Lift up and away at the bottom front corner of the grip
2. Once the grip clears the locking groove on the front strap of the frame, grab the
grip and lift back. This will release the top 2 locking tabs and the middle front locking
tab
3. Repeat this process for the other side of the grip and then slide the grip back off
the frame
UL STICKY GRIP INSTALLATION
1. Slide the grip onto the frame from the rear
2. Pivot the grip forward and down just enough to allow the upper rear locking tab
to slide into place then allow the grip to pivot back up and guide the upper front and
middle front tabs, slide into place.
3. Once the 3 locking tabs are seated into position, press the front strap rubber into
the locking groove
4. To complete installation, repeat this process with the other side of the grip.
TAKING OFF GRIPS
1
2
GRIPS
WARNING!
WHEN SERVICING YOUR MARKER:
• MAKE SURE YOUR HOPPER IS REMOVED FROM THE MXR.
• MAKE SURE THERE ARE NO PAINTBALLS IN THE BREACH OF THE MXR.
• ALWAYS REMOVE THE AIR SUPPLY AND RELIEVE ALL GAS PRESSURE IN THE
MXR BEFORE DISASSEMBLY.
• WHEN USING THE MARKER IN TEMPERATURES BELOW 50° FAHRENHEIT, IT MAY
BE NECESSARY TO LUBE THE ARC X™ BOLT MORE FREQUENTLY.
• THE MXR CAN HOLD A SMALL RESIDUAL CHARGE OF GAS AFTER THE AIR SUPPLY
HAS BEEN REMOVED. ALWAYS DISCHARGE THE MARKER IN A SAFE DIRECTION TO
RELIEVE THIS RESIDUAL GAS PRESSURE.
DYEPAINTBALL.COM
WARNING! ALWAYS REMOVE THE AIR SUPPLY AND RELIEVE ALL GAS PRESSURE IN THE MXR.
 Loading...