16 17
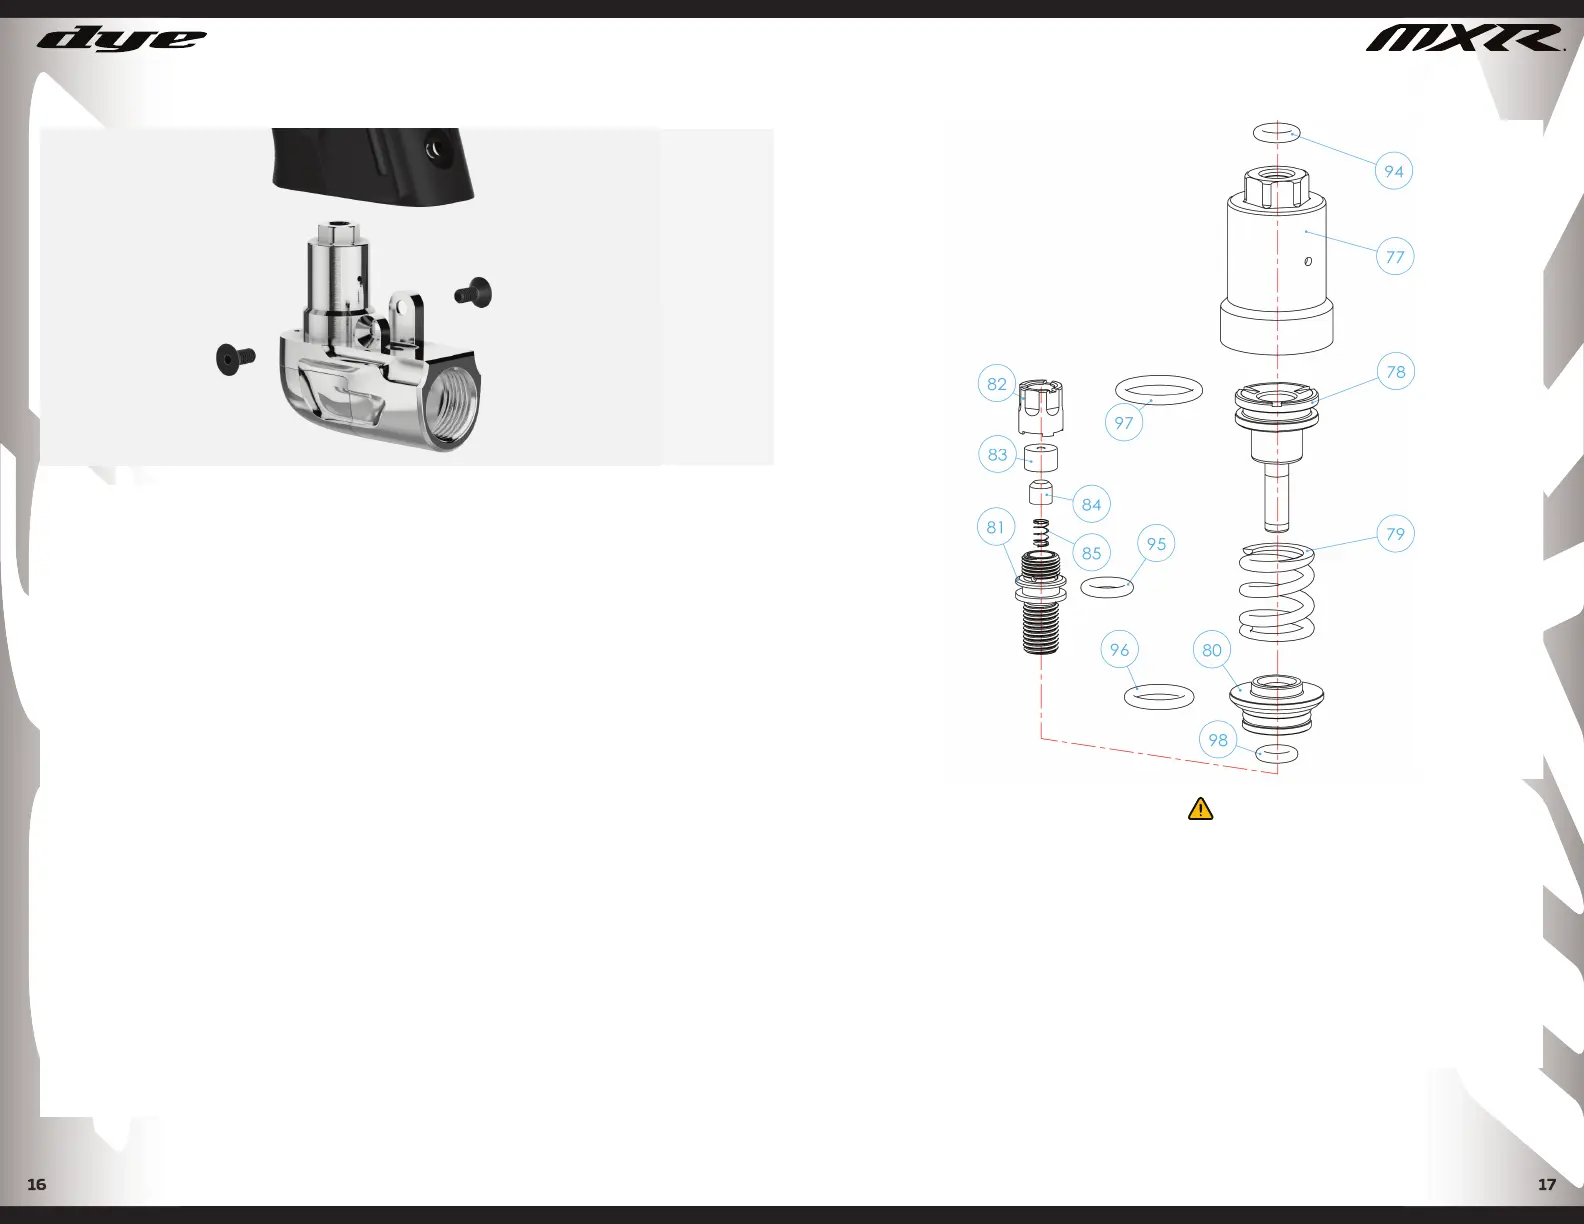
HYPER 6 REGULATOR
NOTE: IT IS IMPORTANT TO KEEP THE SEAT AND PISTON FACE CLEAN OF ALL DIRT
AND DEBRIS. CLEAN THE SEAT AND PISTON FACE AND APPLY FRESH GREASE EVERY
6 MONTHS OR 75,000 - 100,000 SHOTS, DEPENDING ON PLAYING CONDITIONS.
HYPER6™ REGULATOR DISASSEMBLY INSTRUCTIONS
The Hyper6™ assembly is housed in the SLAP 2 ASA assembly. A fouled Hyper6™
cartridge can be quickly removed for service. In most cases, the only seal that needs
to be serviced is the regulator seat, located in the brass reg adjuster screw.
• Remove the sticky grip panels.
• Unscrew and remove the 2 screws retaining the Hyper6™ assembly. Pull down to
remove it from the frame.
• Unscrew and remove the Hyper6™ reg cap. The Hyper6™ piston, spring, and
isolator plate may or may not come off within the reg cap.
• If the piston, spring, and isolator plate remain in the reg cap, use your fi ngers to
remove the isolator plate. Insert a fl at faced tool, like an allen wrench, through the
top hole of the reg cap and gently push the piston out of the bottom of the reg cap.
CHANGING THE HYPER6™ REG SEAT
• With the regulator cap and isolator plate off, use a 1/8” allen wrench to turn the
brass adjustment screw clockwise to remove the purging seat assembly.
• Unscrew and remove the brass retainer using a 1/8 allen wrench in the adjustment
screw and an adjustable wrench to hold the regulator seat retainer.
• Be careful not to lose the check valve and spring under the reg seat.
• Place the regulator seat cap on a fl at surface and use a 3/16” allen wrench to press
the seat from the retainer.
• To install a new reg seat, turn the seat retainer over and press a new reg seat into
the retainer.
• Lube the 010 o-ring and install the adjustment screw assembly into the ASA body
using a 1/8” allen wrench and turning it counter clockwise.
DISASSEMBLE HYPER 6 REGULATOR
HYPER 6 COMPONENTS
ARC X SYSTEM COMPONENTS
PARTS LIST
77 - MXR Reg Cap
78 - Hyper6 IM Reg Piston
79 - Hyper6 IM Reg Spring
80 - Hyper6 Isolator Plate
81 - H6 Regulator Adjuster Screw
82 - H6 Seat Cover
83 - H6 Reg Seat
84 - Purge Valve
85 - Pressure Relief Spring
94 - #009 N70 O-ring, Red
95 - #010 N70 O-ring, Purple
96 - #012 N70 O-ring, Green
97 - #014 N70 O-ring, Blue
98 - #008 N90 O-ring
HYPER 6 REGULATOR
WARNING!
THE HYPER6™ CAN HOLD A SMALL
RESIDUAL CHARGE OF GAS,
ALWAYS DISCHARGE THE MARKER
IN A SAFE DIRECTION TO RELIEVE
THIS RESIDUAL GAS PRESSURE.
EXCESSIVE DIRT AND DEBRIS
CAN AFFECT THE HYPER6™’S
PERFORMANCE AND INCREASE THE
NEED FOR SERVICE.
DYEPAINTBALL.COMDYEPAINTBALL.COM
 Loading...