89
8 Operating
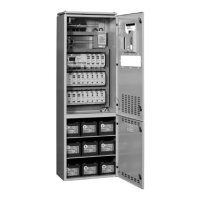
Mounting and Operating Instructions CEAG Central Battery System ZB-S 40071860179 (L) November 2018 www.ceag.de
<ok>: The search result is accepted; the
parameters will be used by the CU CG-S for
the controller
<Menu>: The search result is rejected – the
old settings are retained
When all possible addresses have been
polled the procedure is closed and the sys-
tem returns to menu 4 “DLS/TLS Setup”
with the new para meters.
Finish and return to Menu 4 with
<Menu>
Line selection (line 2, 4) with
Select a bus address with
The message “DLS/TLS Text” appears on line 4
as a default setting or, if already defined, a mod-
ule name
Editing DLS/TLS Text:
– Select line 4 with
– Select the input point with
– All the possible alphanumeric characters are
displayed cyclically with the cursor keys .
– Once a name has been fully entered, con-
firm the entry with <ok>. The remaining
characters after the current cursor position
are cleared.
Finish and return to Menu 4 with <Menu>
Line selection (line 1, 2) with
Make changes in the input field with
When this menu option is selected the system dis-
plays the first TLS module number it finds; in the
“Port” input field you can now select from among the
possible ports of the modules with
In line 2 the stairwell light operation times 1 sec, 1 ...
15 min can be selected with
Line 3 shows the module name (s. menu 4.2).
Finish and return to Menu 4 with <Menu>
After the search of the 3PhW and activate of the option
of selective emergncy lighting, at DLS/TLS-Setup appear
the menu option „3-Phase monitoring combination.“
In the first row of this menu the current Phase moni-
toring can be choosed which logic connected with other
Phase monitorings if other 3-Phase monitorings report
a mains failure.
From the second row appear a list of 3-Phase monitoring
which can logic connected with the Phase monitoring
of the first row.
By pushing the <ok> push button the favored Phase
monitoring will connected.
The connection is shown by the * sign.
8.4.5 Menu 5: “Circuit setup”
Menu 5.1:
<ok>
Successive selection of the installed
SKUs with
Numbering is consecutive; the number
of the relevant subrack 1 ... 5 is shown
for the operator’s information
<ok>: The displayed SKU module is
deactivated.
Finish and return to Menu 5 with
<Menu>
ote:N This menu function must be run
when removing SKU modules.
The SKUsare assigned by their
placing on the module slots of the
subrack.
Deactivate module
Search ext. modules
Text assignment
Monitoring mode
DLS/TLS-Assignment
Get new rated value
Deactivate SKU
Subrack:No SKU:No
Type: SKU CG-S 2x3
OK key=deactivate
Overview:
Main menu
Test & status menu
Block & reset alarms
Basic settings
DLS/TLS Setup
Circuit setup
Luminaire setup
Logbooksetup
Send ServicePinMsg
Menu 5
Deactivate module
Search ext. modules
Text assignment
Monitoring mode
DLS/TLS-Assignment
Get new rated value
Selection of
menu options
with the keys
<ok>:
confirm selec-
tion
<Menu>: can-
cel and return
to the
previous
menu (any
changes en-
tered are saved)
<ESC>: cancel
and return to
the
previous
menu (any
changes en-
tered are not
saved)
flashing input
prompt
Menu 5.2:
<ok>
Selection of a module address with
<ok>: Activation of module address
and search for further modules.
NID07 00 00 C2 62 11
Subrack:No SKU: No
Type: SOU CG-S 2x4
Key OK=activate
Deactivate module
Search ext. modules
Text assignment
Monitoring mode
DLS/TLS-Assignment
Get new rated value

 Loading...