Page
46
from the arc chutes and barriers, as long as it is done
out of the immediate vicinity of the circuit breaker. Wipe
accessible areas with a clean and dry lint-free cloth.
Carefully inspect the contacts.
NOTICE
Switching, fault interruptions and the making
of
motor inrush currents will cause some pitting
of
the
breaker contact parts. A large accumulation of oper-
ations will give the contacts, especially the arcing
contacts, a mottled, dirty, eroded appearance. This
appearance is the normal result
of
arc burning and
in itself is no cause for concern.
During any inspection, cleaning, part adjustment or part
replacement, be certain to look over all visible parts for
missing pin retainers, loose hardware, bent, worn or
damaged parts. Be especially alert for foreign matter
that should be removed. Make appropriate corrections
to anything found out of order.
After any such activity, make sure that all parts are
properly installed on the breaker, especially the arc
chutes and all four barriers. Take the time to double
check all work against provided drawings and written
instructions.
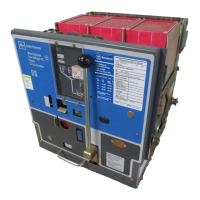
5-4.1 DSll-308 THROUGH DSll-620 INSPECTION
NOTICE
DSll-516 adjustments and maintenance apply to the
DSll-508. DSll-620 adjustments and maintenance
apply to the DSll-608 and DSll-616.
Remove the barriers and arc chutes to expose the con-
tacts. With the breaker open, examine the contact tips of
the moving and stationary arcing and main contacts
(Figures
5-1
and 5-2). If the tips are burned
or
worn
more than .030 inches, the contacts must be replaced.
Also check the dimension (C) between the stationary
arcing contacts. It should be .420 plus
or
minus .08
inches. If this dimension is not maintained, the station-
ary arcing contacts must be replaced.
Close the breaker and check the contact engagement
(Figures
5-1
and 5-2). The main stationary contact fin-
gers should be parallel (B) to the fixed contact cage. If
not, adjust the contacts according to Paragraph 5-5.3.
Also check the dimension (A) between the stationary
l.B.
694C694-02
arcing contacts and the center section of the cage. If
this dimension is not .02 inches or greater, the station-
ary arcing contacts should be replaced.
NOTICE
Be certain that all barriers and arc chutes are
replaced after the inspection
is
completed.
5-4.2 DSll-632 AND DSll-840/850 INSPECTION
In
addition to the requirements for the DSll-308 through
DSll-620 outlined
in
Paragraph 5-4.1, several additional
procedures are required (Figures 5-3 and 5-4).
The lower main fixed contacts should be inspected to
ensure that they have adequate contact pressure. This
is determined
by
Pin "X" being free to slide
in
the con-
tact cage. Unlike the DSll-308 through DSll-620 break-
ers, the top row of fixed main contacts are compressed
beyond the parallel position to assure adequate contact
pressure for the lower row of fixed main contacts.
5-4.3 DSll-308 CONTACT REPLACEMENT
To replace the stationary contacts, remove the rear
mounted disconnect finger contacts (Figure 3-1), fol-
lowed by the two bolts holding the upper contact assem-
bly to the molded base. Withdraw the contact assembly
from the front. Replace the removed contact assembly
with a new contact assembly. Be certain that all bolts
are tightened securely. Close the breaker and check all
contact dimensions as outlined
in
Paragraph 5-4.1.
Both the main moving and arcing contacts are held
between the two moving arms by two bolts with self-
locking nuts. Removal of the two bolts permits the
replacement of the moving contacts. These bolts must
be securely tightened after replacement.
The fixed arcing contacts are held by a single bolt pass-
ing through the contacts and their pressure springs. On
reassembly, the self-locking nut is tightened so that a
dimension of 3.12 inches is obtained between the inside
surfaces of the flat washers on the spring ends.
5-4.4 DSll-516 THROUGH DSll-840/850 CONTACT
REPLACEMENT
The moving arcing and main contacts are secured to the
moving contact assembly by two bolts. Removal of
Effective
07
/97
Courtesy of NationalSwitchgear.com

 Loading...