Effective 10/02
Page 4-1
For more information visit: www.cutler-hammer.eaton.com
Page 4-1
IL17562BH04
SECTION 4—OPERATOR PANEL
4.0 General Description
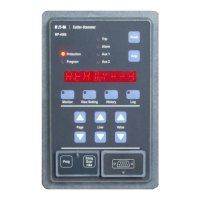
The faceplate of the MP-3000 contains the display, indicators, and
pushbuttons that make up the Operator Panel (Figures 4.1 and 4.2).
The Operator Panel is used to:
• Monitor the metered values on the Display Window
• Enter or modify settings
• View motor history or statistics
• View a log of recent events
• Determine that a trip or alarm condition exists by means of two
distinct LEDs and the cause of the trip by means of the Display
Window
• Reset the unit after a trip condition has occurred by means of a
Reset pushbutton
• Get help on any display
• Override start lockouts during emergencies
4.0.1 Display Window
All available displays are discussed in Sections 4.1 through 4.5.
4.0.2 Protected Pushbuttons
A security door located on the bottom left corner of the operator panel
covers two pushbuttons: the program pushbutton and the emergency
override pushbutton. This door will accept a lead seal to prevent
unauthorized setting changes and the overriding of start lockout
functions.
4.0.3 Mode Pushbuttons
The four mode pushbuttons near the middle of the operator panel
provide access to the four different modes used by the MP-3000. The
Monitor, View Settings, History, and Log modes are detailed in Sections
4.2 through 4.5.
4.0.4 Navigation Pushbuttons
The six buttons with up and down arrows, located beneath the mode
buttons, are used to navigate through the modes by page, line, and
value. The up arrow buttons are used to advance through the displays,
and the down arrow buttons are used to return to the previous display.
Refer to the mode examples in Sections 4.2 through 4.5 for an
explanation on the proper use of the navigation buttons.
4.0.5 Help Pushbutton
The Help pushbutton provides a scrolling explanation of the displayed
message, including units of measure, for any of the messages from the
MP-3000. The complete list of help messages for each function mode
is included in Tables 4.1 through 4.5. The help message may be
terminated by pressing the Reset or Help pushbutton.
4.0.6 Reset Pushbutton
The Reset pushbutton is primarily used to reset the MP-3000 after a
trip condition. If the cause of the trip has been corrected, the displayed
trip condition will be cleared. If a trip condition is not present, pressing
the Reset pushbutton to step out of Line, Page, or Mode will bring up
the Default mode displaying the status of the motor.
In the Program mode, pressing the Reset pushbutton will allow the user
to exit out of the Program mode without saving any entered settings.
4.0.7 Operator Panel LEDs
There are 10 LEDs on the operator panel.
The Protection LED is lit when the MP-3000 is in the Protection mode.
The MP-3000 provides protection with the relay while in the Program
mode; therefore, the only time the Protection LED is extinguished is
when the “DISARMED” feature is used and also for the brief time it
takes to calculate all settings when leaving the Program mode.
The Program LED is lit when the MP-3000 is in the Program mode.
The Trip LED is lit when a trip condition has occurred.
The Alarm, Aux 1 and Aux 2 LEDs are lit when these auxiliary relays are
activated. (The Program mode is used to specify what will cause these
relays to activate.)
The remaining LEDs are on the mode select buttons and indicate the
mode of the MP-3000 display - Monitor, View Setting, History, and Log.
If none of these four LEDs is lit and the relay is not in Program Mode,
then the display is in the Motor State (Default) Mode.
4.1 Default Mode
In the Motor State or Default mode, basic messages concerning the
state of the motor and relay are displayed. The following events reset
the system to Default mode:
• Cycling power
• Pressing any mode button a second time
• Pressing the Reset pushbutton the required number of times to step
out of Line, Page, or Mode
• A change in the state of the motor, except when in the Monitor mode
• An alarm or trip
When in the Motor State mode, The display normally shows READY—3
(stopped), START, or RUN. If the relay is disarmed, the DISARMED
display will alternate with the motor state See Table 4.1. Self-diagnos-
tics and trip or alarm data are also displayed. If more than one event
has occurred, the messages will alternate.
An alarm or trip will always return the display to the Default mode. As
soon as any mode button is pushed, the flashing stops and the Modes,
Page, and Line displays are available. Returning to the default display
will again show the alarm and/or trip condition until the condition is
cleared and is acknowledged with the Reset pushbutton. If the relay is
in Monitor mode when a change of motor state occurs, the new state
will flash on the display for 5 seconds and then the display will return to
the value being monitored.
4.2 Monitor Mode
The Monitor mode displays real-time data as shown in Table 4.2.
For example, to view the motor bearing temperatures:
• Press the Monitor pushbutton; the display will show MONITOR as
shown at the top of Table 4.2.
• Press the Page up button once to advance to MONT I.
• Press the Page up button a second time to advance to MONT RTD.
As the table shows, the motor bearing temperatures are part of the
MONT RTD page.
• Press the Line up button to advance to winding temperature 1.